Home >PHP Framework >Laravel >Teach you how to build a Laravel-like framework using component development and composer
Teach you how to build a Laravel-like framework using component development and composer
- 藏色散人forward
- 2020-06-19 13:40:293081browse
下面由Laravel教程栏目给大家介绍利用组件开发与composer构建类Laravel框架,希望对需要的朋友有所帮助!

(注意这篇文章不适合零基础同学,需要一定得PHP基础)
如今“敏捷开发”“不要重复造轮子”思想已经在软件开发方面盛行了。项目中以框架作为基础进行二次开发已经成为了首选方案。Laravel是一款优秀的PHP框架,在众多框架之中保持着一种领跑的姿态。Laravel比较突出的优点是组件式开发、Ioc容器、分布式运用架构设计。而说到PHP组件开发就不得不提到composer,composer是专门为PHP而生的,是PHP组件的管理工具。Laravel框架就是采用组件式开发的典范,稍后我将演示如何利用composer组件管理工具手动构建laravel主要功能,包括路由功能、控制器功能、模型、视图。
那么什么是组件式开发?
按照我的理解是:对于一个大型项目来说,如果把各个功能在项目初期分为各个不同的版块,最后在合成就是组件式开发。特别是在今天开源的社会,很多人已经把某个版块(组件)做的很好了,那么我们就可以直接嵌入到项目中去(比如一些优秀的类库)。甚至有时候我们可以快速更换项目中的模块而不修改系统中的其他部分代码。为了达到这个目的我们需要遵循一定得规范与接口。在PHP中有个著名的PHP-FIG(PHP Framework Interop Group,PHP 框架互动群),它的作用就是制定一系列PHP开发规范即PSR编码规范。PHPer在开发框架的时候共同遵守这个规则的话,各种组件就可以很友好地组合在一起。PSR主要包括PSR0-PSR4文档,其中PSR0与PSR4就制定了Autoloader标准。
接下来手动构建Laravel框架中的路由功能、控制器功能、模型、视图。
环境要求:
1、Composer(网上自行搜索安装)
2、PHP5.3以上
3、Mysql数据库
4、Apache或者Nginx服务器
步骤:
1、项目初始化
2、添加路由功能
3、添加控制器模块
4、添加模型
5、添加视图
1、项目初始化
在服务器根目录创建一个文件夹,起名为lara,比如我的E:\laravel\lara(虚拟目录),创建一个composer.json文件并输入以下内容(为了不重复用composer update,我将待会要用的组件一次性加载)
{
    "require":{
        "illuminate/routing":"*",
        "illuminate/events":"*",
        "illuminate/database":"*",
        "illuminate/view":"*"
    },
    "autoload":{
        "psr-4":{
            "App\\":"app/"
        }    }}
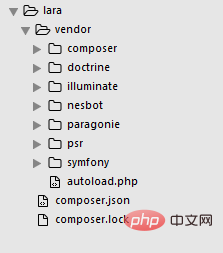
composer就是根据composer.json中的内容来加载组件的。其中有路由组件、事件组件、数据库组件、视图组件(其中控制器组件已经包括在路由组件)。autoload的配置为psr-4规范,也就是说当我们使用“$user =new \App\User()”实例化User对象时,autoload会在app目录下查找User.php文件。有了composer.json之后就可以加载组件了,在window下是用cmd定位到lara目录然后使用composer update命令,在linux类似。在加载之后有如下目录: 
2、配置路由文件
我们都知道laravel有入口文件和路由文件。我就仿照laravel在lara目录下新建一个public文件夹,在public目录下创建一个入口文件index.php配置如下:
<?php
//调用自动加载文件函数
require __DIR__.'/../vendor/autoload.php';
//实例化服务器容器,框架的一些功能生成都需要服务容器来实现,服务器容器来来服务注册和解析,比如可以实现下面两个服务的
//注册。注册之后可以用$app['router']来调用服务。
$app=new Illuminate\Container\Container;
//setInstance将服务容器的实例添加为静态属性,这样就可以在任何位置获得服务器的实例。
Illuminate\Container\Container::setInstance($app);
//注册时间和路由
with(new Illuminate\Events\EventServiceProvider($app))->register();
with(new Illuminate\Routing\RoutingServiceProvider($app))->register();
//加载路由
require __DIR__.'/../app/Http/Routes.php';
//实例化请求分发处理程序
$request =Illuminate\Http\Request::createFromGlobals();
$response =$app['router']->dispatch($request);
//返回请求的响应
$response->send();
?>接下来设置路由文件。在lara目录下创建app文件夹,在该目录再创建一个Http文件夹,在Http目录下创建一个routes.php文件。内容如下(学过laravel框架的人应该很清楚)
<?php
$app['router']->get('/',function(){
return '<h1>路由成功!</h1>';
});
$app['router']->get('welcome','App\Http\Controllers\WelcomeController@index');
?>接下来再通过服务器访问到public的index,结果如下: 
3、配置控制器模块
根据laravel目录结构,在app\Http目录下创建一个Controllers文件夹,然后创建一个WelcomeController.php文件,代码如下:
<?php
    namespace App\Http\Controllers;

    class WelcomeController
    {
        public function index(){
            return "控制器";
        }
    }
 ?>
然后再配置路由文件为:
<?php
$app['router']->get('/',function(){
return '<h1>路由成功!</h1>';
});
$app['router']->get('welcome','App\Http\Controllers\WelcomeController@index');
?>接下来再访问localhost:8080/lara/public/index.php/welcome(这是我的路径,大家根据自己的服务器写)结果; 
4、配置模型
首先创建一个数据库(我这里取名为lara),然后创建一个数据表students; 
再来配置database组件,在入口文件下配置,配置后为:
<?php
use Illuminate\Database\Capsule\Manager;
//调用自动加载文件函数
require __DIR__.'/../vendor/autoload.php';
//实例化服务器容器,框架的一些功能生成都需要服务容器来实现,服务器容器来来服务注册和解析,比如可以实现下面两个服务的
//注册。注册之后可以用$app['router']来调用服务。
$app=new Illuminate\Container\Container;
//setInstance将服务容器的实例添加为静态属性,这样就可以在任何位置获得服务器的实例。
Illuminate\Container\Container::setInstance($app);
//注册时间和路由
with(new Illuminate\Events\EventServiceProvider($app))->register();
with(new Illuminate\Routing\RoutingServiceProvider($app))->register();
//加载路由
//启动Eloquent ORM模块并进行相关配置
$manager =new Manager();
$manager->addConnection(require '../config/database.php');
$manager->bootEloquent();
require __DIR__.'/../app/Http/Routes.php';
//实例化请求分发处理程序
$request =Illuminate\Http\Request::createFromGlobals();
$response =$app['router']->dispatch($request);
//返回请求的响应
$response->send();
?>然后配置数据库连接,在lara目录下创建config文件夹,然后创建database.php
<?php
return [
'driver' =>'mysql',
'host' =>'localhost',
'database' =>'lara',
'username' =>'root',
'password' =>'123',
'charset' =>'utf8',
'collation' =>'utf8_general_ci',
'prefix' =>''
];
?>大家根据自己的数据库配置相关参数。
接下来就创建模板文件了,在app目录下创建Models文件夹,再该目录创建Student.php
<?php
    namespace App\Models;
    use Illuminate\Database\Eloquent\Model;
    class Student extends model
    {
        //禁用createTime/updateTime;
        public $timestamps =  false;
    }
 ?>
我没有创建createTime和updateTime字段所以要设置$timestamps = false;
最后再使用Eloquent ORM利用模型,在WelcomeController.php文件中运用该模型:WelcomeController.php
<?php
namespace App\Http\Controllers;
use App\Models\Student;
use Illuminate\Container\Container;
class WelcomeController
{
public function index(){
$student =Student::first();
$data =$student->getAttributes();
return $data['name'].";".$data['age'];
}
}
?>再访问localhost:8080/lara/public/index.php/welcome
结果如下: 
5、添加视图组件
配置入口文件如下:
<?php
use Illuminate\Database\Capsule\Manager;
use Illuminate\Support\Fluent;
//调用自动加载文件函数
require __DIR__.'/../vendor/autoload.php';
//实例化服务器容器,框架的一些功能生成都需要服务容器来实现,服务器容器来来服务注册和解析,比如可以实现下面两个服务的
//注册。注册之后可以用$app['router']来调用服务。
$app=new Illuminate\Container\Container;
//setInstance将服务容器的实例添加为静态属性,这样就可以在任何位置获得服务器的实例。
Illuminate\Container\Container::setInstance($app);
//注册时间和路由
with(new Illuminate\Events\EventServiceProvider($app))->register();
with(new Illuminate\Routing\RoutingServiceProvider($app))->register();
//加载路由
//启动Eloquent ORM模块并进行相关配置
$manager =new Manager();
$manager->addConnection(require '../config/database.php');
$manager->bootEloquent();
$app->instance('config',new Fluent);
$app['config']['view.compiled'] = "E:\\laravel\\lara\\storage\\framework\\views\\";
$app['config']['view.paths'] = ["E:\\laravel\\lara\\resources\\views\\"];
with(new Illuminate\View\ViewServiceProvider($app))->register();
with(new Illuminate\Filesystem\FilesystemServiceProvider($app))->register();
require __DIR__.'/../app/Http/Routes.php';
//实例化请求分发处理程序
$request =Illuminate\Http\Request::createFromGlobals();
$response =$app['router']->dispatch($request);
//返回请求的响应
$response->send();
?>其中的路径根据自己电脑配置。
然后再分别创建lara\storage\framework\views\目录,和E:\laravel\lara\resources\views目录,分别存放编译文件和模板文件。在WelcomeController.php配置使用视图文件:
<?php
namespace App\Http\Controllers;
use App\Models\Student;
use Illuminate\Container\Container;
class WelcomeController
{
public function index(){
$student =Student::first();
$data =$student->getAttributes();
$app=Container::getInstance();
$factory =$app->make('view');
return $factory->make('welcome')->with('data',$data);
}
}
?>读取一行数据给视图文件welcome
然后在lara\resources\views目录下创建welcome.blade.php,注意后缀为.blade.php,否则无法识别。代码如下:
{{ $data['name']}}{{ $data['age']}}主要不要用php标签包围该代码
最后访问localhost:8080/lara/public/index.php/welcome
结果如下: 
搞定。
这就构建了laravel的基本框架了。大家先试着构建一下,在接下来的文章中再慢慢解释其中的道理。
The above is the detailed content of Teach you how to build a Laravel-like framework using component development and composer. For more information, please follow other related articles on the PHP Chinese website!

