Home >Web Front-end >CSS Tutorial >CSS3 border shadow implements 2 image list display effects - case analysis (code example)
CSS3 border shadow implements 2 image list display effects - case analysis (code example)
- 易达Original
- 2020-06-04 17:19:482240browse
Goals of this article:
1. Master the usage of inner shadow and outer shadow in CSS3
Question:
1. It is required to use pure DIV CSS to achieve the following effects
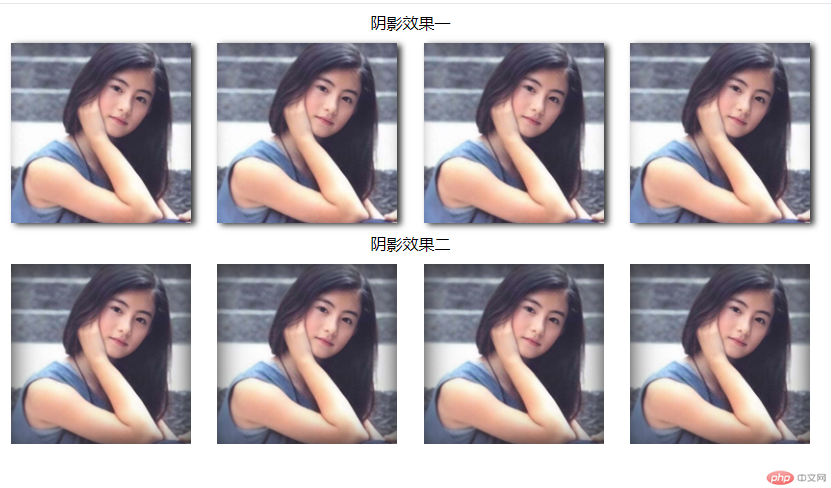
Additional notes:
1. The horizontal shadow size in effect one is 4, the vertical shadow is 2, and the blur is 6
2 , the horizontal shadow in effect two is 0, the vertical shadow is 0, the blur is 30
3, the overall width is 800px, the center display
4, the image size is 180px, and the height is also 180px
Idea analysis:
1. Create 2 lists, with a title on each list
2. The first list, display 4 pictures Pictures, but each picture must have an outer shadow effect
3. The second list displays 4 pictures, but each picture must have an inner shadow effect
The specific implementation is as follows :
1. Prepare the material, a picture of Cecilia Cheung, create images in the root directory, and put the material into it to facilitate image management

2. Create index.html and write the structure first
<!DOCTYPE html>
<html lang="en">
<head>
    <meta charset="UTF-8">
    <meta name="viewport" content="width=device-width, initial-scale=1.0">
    <title>带阴影图片展示列表</title>
</head>
<body>
    <div class="container">
        <!-- 阴影效果一 -->
        <p>阴影效果一</p>
        <ul class="shadow ">

        </ul>

        <!-- 阴影效果二 -->
        <p>阴影效果二</p>
        <ul class="shadow">

        </ul>
    </div>
</body>
</html>
3. Fill in the details and write in the relevant elements
Analysis:
1. Generally we use ul to create a list
2. We name the shadow effect of the first list boxshadow1
3. Because we can see from the effect that each li requires float, so we need to add a separate clear li, so that ul can wrap the floating li inside
4. The last column needs to be special Margin-left is not required for style processing, so we named the style name lastitem, which makes it easier to set the style separately
5. Because we found that the styles of the two lists are actually similar, the only difference is The shadow effects are different, so when creating the second list, you can directly copy the first one, but the li style of the second list is called boxshadow2
The final code is as follows:
<!DOCTYPE html>
<html lang="en">
<head>
    <meta charset="UTF-8">
    <meta name="viewport" content="width=device-width, initial-scale=1.0">
    <title>带阴影图片展示列表</title>
</head>
<body>
    <div class="container">
        <!-- 阴影效果一 -->
        <p>阴影效果一</p>
        <ul class="shadow">
            <li class="boxshadow1"><img  src="/static/imghwm/default1.png"  data-src="https://img.php.cn/upload/image/726/663/306/1591261040513409.png"  class="lazy"   / alt="CSS3 border shadow implements 2 image list display effects - case analysis (code example)" ></li>
            <li class="boxshadow1"><img  src="/static/imghwm/default1.png"  data-src="https://img.php.cn/upload/image/726/663/306/1591261040513409.png"  class="lazy"   / alt="CSS3 border shadow implements 2 image list display effects - case analysis (code example)" ></li>
            <li class="boxshadow1"><img  src="/static/imghwm/default1.png"  data-src="https://img.php.cn/upload/image/726/663/306/1591261040513409.png"  class="lazy"   / alt="CSS3 border shadow implements 2 image list display effects - case analysis (code example)" ></li>
            <li class="lastitem boxshadow1"><img  src="/static/imghwm/default1.png"  data-src="https://img.php.cn/upload/image/726/663/306/1591261040513409.png"  class="lazy"   / alt="CSS3 border shadow implements 2 image list display effects - case analysis (code example)" ></li>
            <li class="clear" ></li>
        </ul>

        <!-- 阴影效果二 -->
        <p>阴影效果二</p>
        <ul class="shadow">
            <li class="boxshadow2"><img  src="/static/imghwm/default1.png"  data-src="https://img.php.cn/upload/image/726/663/306/1591261040513409.png"  class="lazy"   / alt="CSS3 border shadow implements 2 image list display effects - case analysis (code example)" ></li>
            <li class="boxshadow2"><img  src="/static/imghwm/default1.png"  data-src="https://img.php.cn/upload/image/726/663/306/1591261040513409.png"  class="lazy"   / alt="CSS3 border shadow implements 2 image list display effects - case analysis (code example)" ></li>
            <li class="boxshadow2"><img  src="/static/imghwm/default1.png"  data-src="https://img.php.cn/upload/image/726/663/306/1591261040513409.png"  class="lazy"   / alt="CSS3 border shadow implements 2 image list display effects - case analysis (code example)" ></li>
            <li class="lastitem boxshadow2">
                <img  src="/static/imghwm/default1.png"  data-src="https://img.php.cn/upload/image/726/663/306/1591261040513409.png"  class="lazy"   / alt="CSS3 border shadow implements 2 image list display effects - case analysis (code example)" >
            </li>
            <li class="clear" ></li>
        </ul>
    </div>
</body>
</html>
4. Write styles
Create a css directory in the root directory and create a new index.css in it. How to write the styles inside
Idea analysis:
.container analysis
1. Usually for the outermost container, we can define some common attributes for all sub-elements inside, such as padding:0,margin: 0, this prevents some elements from having default padding and margin, which affects our ideas
So add the code to index.css as follows:
.container *{
    padding:0;
    margin: 0;
}
pParagraph analysis
1. The text must be centered
So add the code to index.css as follows:
p{ text-align: center; }ul Analysis
1.As required We learned that ul width=800px, and should be centered (margin: 0 auto). In order to facilitate the centering effect, we set a border: 1px solid red for it
So add the code to index.css as follows:
.shadow{
    width:800px;
    margin:10px auto;
    border:1px solid red;
}
ul li analysis
1. According to the requirements, the image size is 180, we can set the width of li to 180, height=180, It is displayed in a square, and because it is arranged horizontally, float:left, without black dots, so list-style:none,
Then the right spacing is 800-(180*4)=80 and then 80/ 3 is approximately equal to 26.6, that is, margin-right: 26.6
2. However, the last picture in li does not have margin-right, so you need to set it separately for li.lastitem
3. In order for ul to still wrap the li inside, we need to clear the float for the last column li.clear, and the width and height of the li must be 0
So add the code to index.css as follows:
.shadow li{
    list-style: none;
    float: left;
    width: 180px;
    height: 180px;
    margin-right: 26.5px;

}
.shadow li.lastitem{
    margin-right: 0;
}
.shadow li.clear{
    clear: both;
    float: none;
    width: 0;
    height: 0;
}
Picture analysis
1. To display the picture as 180, just set width: 100%, so that the width of the picture = the width of the li where it is located
So add the code to index.css as follows:
.shadow li img{width:100%;}Shadow analysis
1. Outer shadow effect, as required, box-shadow x-shadow:4px y-shadow:2px blur =6px color is #333333, name is boxshadow1
2. Inner shadow effect, as requested, box-shadow x-shadow:0 y- shadow:0, blur level is 30px, color is the same, the name is boxshadow2
So add the code to index.css as follows:
.boxshadow1{box-shadow:4px 2px 6px #333333; }
.boxshadow2{
    box-shadow: 0px 0px 30px  #333333 inset;
}
Okay, so far, we have put everything we can think of The style is finished, and finally modifications and adjustments are made based on the results. So far, the final code of index.css is as follows
.container *{
    padding:0;
    margin: 0;
}
p{ text-align: center; }
.shadow{
    width:800px;
    margin:10px auto;
    border:1px solid red;
}

.shadow li{
    list-style: none;
    float: left;
    width: 180px;
    height: 180px;
    margin-right: 26.5px;

}
.shadow li.lastitem{
    margin-right: 0;
}
.shadow li.clear{
    clear: both;
    float: none;
    width: 0;
    height: 0;
}
.shadow li img{width:100%;}

/* 阴影 */
.boxshadow1{box-shadow:4px 2px 6px #333333; }

.boxshadow2{
    box-shadow: 0px 0px 30px  #333333 inset;
}
.shadow li img{width:100%;}
5. Next, we introduce the style file into index.html
<!DOCTYPE html>
<html lang="en">
<head>
    <meta charset="UTF-8">
    <meta name="viewport" content="width=device-width, initial-scale=1.0">
    <title>带阴影图片展示列表</title>
    <link rel="stylesheet" href="css/index.css" />
</head>
<body>
    <div class="container">
        <!-- 阴影效果一 -->
        <p>阴影效果一</p>
        <ul class="shadow">
            <li class="boxshadow1"><img  src="/static/imghwm/default1.png"  data-src="https://img.php.cn/upload/image/726/663/306/1591261040513409.png"  class="lazy"   / alt="CSS3 border shadow implements 2 image list display effects - case analysis (code example)" ></li>
            <li class="boxshadow1"><img  src="/static/imghwm/default1.png"  data-src="https://img.php.cn/upload/image/726/663/306/1591261040513409.png"  class="lazy"   / alt="CSS3 border shadow implements 2 image list display effects - case analysis (code example)" ></li>
            <li class="boxshadow1"><img  src="/static/imghwm/default1.png"  data-src="https://img.php.cn/upload/image/726/663/306/1591261040513409.png"  class="lazy"   / alt="CSS3 border shadow implements 2 image list display effects - case analysis (code example)" ></li>
            <li class="lastitem boxshadow1"><img  src="/static/imghwm/default1.png"  data-src="https://img.php.cn/upload/image/726/663/306/1591261040513409.png"  class="lazy"   / alt="CSS3 border shadow implements 2 image list display effects - case analysis (code example)" ></li>
            <li class="clear" ></li>
        </ul>

        <!-- 阴影效果二 -->
        <p>阴影效果二</p>
        <ul class="shadow">
            <li class="boxshadow2"><img  src="/static/imghwm/default1.png"  data-src="https://img.php.cn/upload/image/726/663/306/1591261040513409.png"  class="lazy"   / alt="CSS3 border shadow implements 2 image list display effects - case analysis (code example)" ></li>
            <li class="boxshadow2"><img  src="/static/imghwm/default1.png"  data-src="https://img.php.cn/upload/image/726/663/306/1591261040513409.png"  class="lazy"   / alt="CSS3 border shadow implements 2 image list display effects - case analysis (code example)" ></li>
            <li class="boxshadow2"><img  src="/static/imghwm/default1.png"  data-src="https://img.php.cn/upload/image/726/663/306/1591261040513409.png"  class="lazy"   / alt="CSS3 border shadow implements 2 image list display effects - case analysis (code example)" ></li>
            <li class="lastitem boxshadow2">
                <img  src="/static/imghwm/default1.png"  data-src="https://img.php.cn/upload/image/726/663/306/1591261040513409.png"  class="lazy"   / alt="CSS3 border shadow implements 2 image list display effects - case analysis (code example)" >
            </li>
            <li class="clear" ></li>
        </ul>
    </div>
</body>
</html>
The operation effect is as follows:
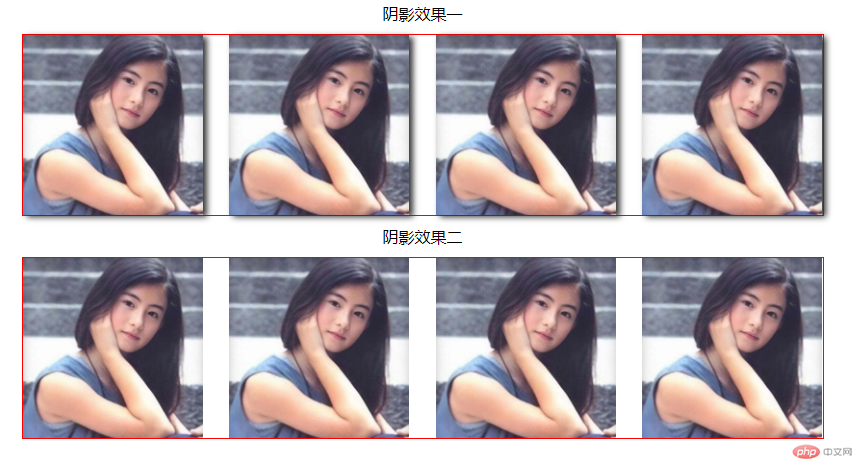
Based on the results, if we observe carefully, we will find that the first effect is in line with our intention, but the second The inner shadow effect of the two is not realized, why?
Is the style invalid? Next, modify the code slightly, remove the last picture and see
<!DOCTYPE html>
<html lang="en">
<head>
    <meta charset="UTF-8">
    <meta name="viewport" content="width=device-width, initial-scale=1.0">
    <title>带阴影图片展示列表</title>
    <link rel="stylesheet" href="css/index.css" />
</head>
<body>
    <div class="container">
        <!-- 阴影效果一 -->
        <p>阴影效果一</p>
        <ul class="shadow">
            <li class="boxshadow1"><img  src="/static/imghwm/default1.png"  data-src="https://img.php.cn/upload/image/482/463/257/1591261208779336.png"  class="lazy"   / alt="CSS3 border shadow implements 2 image list display effects - case analysis (code example)" ></li>
            <li class="boxshadow1"><img  src="/static/imghwm/default1.png"  data-src="https://img.php.cn/upload/image/482/463/257/1591261208779336.png"  class="lazy"   / alt="CSS3 border shadow implements 2 image list display effects - case analysis (code example)" ></li>
            <li class="boxshadow1"><img  src="/static/imghwm/default1.png"  data-src="https://img.php.cn/upload/image/482/463/257/1591261208779336.png"  class="lazy"   / alt="CSS3 border shadow implements 2 image list display effects - case analysis (code example)" ></li>
            <li class="lastitem boxshadow1"><img  src="/static/imghwm/default1.png"  data-src="https://img.php.cn/upload/image/482/463/257/1591261208779336.png"  class="lazy"   / alt="CSS3 border shadow implements 2 image list display effects - case analysis (code example)" ></li>
            <li class="clear" ></li>
        </ul>

        <!-- 阴影效果二 -->
        <p>阴影效果二</p>
        <ul class="shadow">
            <li class="boxshadow2"><img  src="/static/imghwm/default1.png"  data-src="https://img.php.cn/upload/image/482/463/257/1591261208779336.png"  class="lazy"   / alt="CSS3 border shadow implements 2 image list display effects - case analysis (code example)" ></li>
            <li class="boxshadow2"><img  src="/static/imghwm/default1.png"  data-src="https://img.php.cn/upload/image/482/463/257/1591261208779336.png"  class="lazy"   / alt="CSS3 border shadow implements 2 image list display effects - case analysis (code example)" ></li>
            <li class="boxshadow2"><img  src="/static/imghwm/default1.png"  data-src="https://img.php.cn/upload/image/482/463/257/1591261208779336.png"  class="lazy"   / alt="CSS3 border shadow implements 2 image list display effects - case analysis (code example)" ></li>
            <li class="lastitem boxshadow2">
                <!-- <img  src="/static/imghwm/default1.png"  data-src="https://img.php.cn/upload/image/482/463/257/1591261208779336.png"  class="lazy"   / alt="CSS3 border shadow implements 2 image list display effects - case analysis (code example)" > -->
            </li>
            <li class="clear" ></li>
        </ul>
    </div>
</body>
</html>
The running effect is as follows:
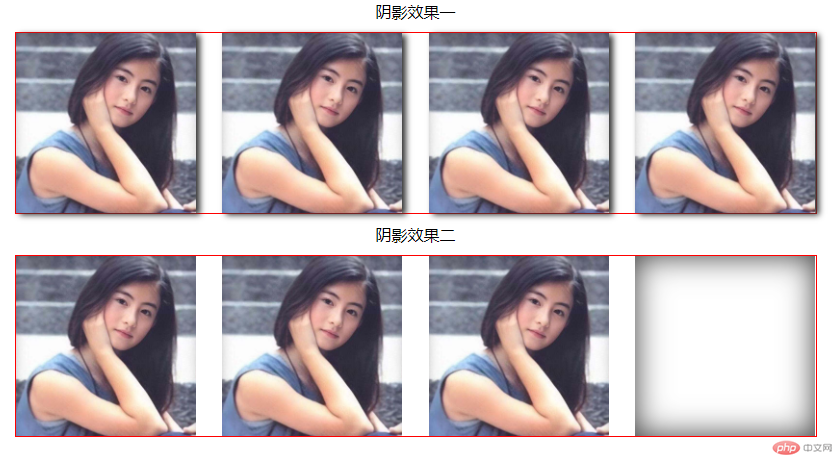
说明什么呢?说明样式其实是对的,确实是内阴影的效果,但是为什么加上图片就看不到内阴影的效果了呢,这里是重点
当要为图片设置内阴影的时候,如果只是设置图片外层的容器阴影,它的阴影效果会被图片遮住,所以需要为图片再设置position: relative;z-index:-1;才可以
接下来我们试试,在index.css中修改img样式如下:
.boxshadow2 img{
    position: relative;
    z-index:-1;
    width: 100%;
}
然后再来运行看下:
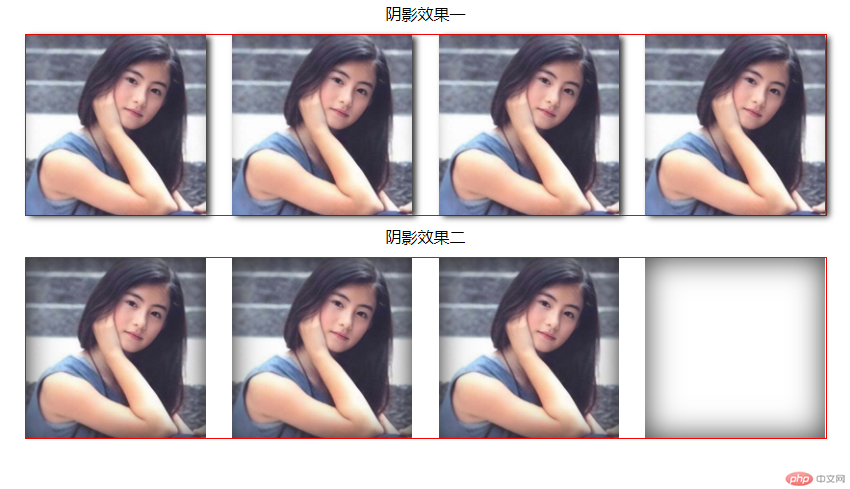
我们发现内阴影的效果就出来了,好接下来,去掉红色边框,恢复最后一张图片
index.css修改后代码下
.container *{
    padding:0;
    margin: 0;
}
p{ text-align: center; }
.shadow{
    width:800px;
    margin:10px auto;
    /* border:1px solid red; */
}

.shadow li{
    list-style: none;
    float: left;
    width: 180px;
    height: 180px;
    margin-right: 26.6px;

}
.shadow li.lastitem{
    margin-right: 0;
}
.shadow li.clear{
    clear: both;
    float: none;
    width: 0;
    height: 0;
}
.shadow li img{width:100%;}

/* 阴影 */
.boxshadow1{box-shadow:4px 2px 6px #333333; }

.boxshadow2{
    box-shadow: 0px 0px 30px  #333333 inset;
}
.boxshadow2 img{
    position: relative;
    z-index:-1;
    width: 100%;
}
index.html代码如下:
<!DOCTYPE html>
<html lang="en">
<head>
    <meta charset="UTF-8">
    <meta name="viewport" content="width=device-width, initial-scale=1.0">
    <title>带阴影图片展示列表</title>
    <link rel="stylesheet" href="css/index.css" />
</head>
<body>
    <div class="container">
        <!-- 阴影效果一 -->
        <p>阴影效果一</p>
        <ul class="shadow">
            <li class="boxshadow1"><img  src="images/CSS3 border shadow implements 2 image list display effects - case analysis (code example)" / alt="CSS3 border shadow implements 2 image list display effects - case analysis (code example)" ></li>
            <li class="boxshadow1"><img  src="images/CSS3 border shadow implements 2 image list display effects - case analysis (code example)" / alt="CSS3 border shadow implements 2 image list display effects - case analysis (code example)" ></li>
            <li class="boxshadow1"><img  src="images/CSS3 border shadow implements 2 image list display effects - case analysis (code example)" / alt="CSS3 border shadow implements 2 image list display effects - case analysis (code example)" ></li>
            <li class="lastitem boxshadow1"><img  src="images/CSS3 border shadow implements 2 image list display effects - case analysis (code example)" / alt="CSS3 border shadow implements 2 image list display effects - case analysis (code example)" ></li>
            <li class="clear" ></li>
        </ul>

        <!-- 阴影效果二 -->
        <p>阴影效果二</p>
        <ul class="shadow">
            <li class="boxshadow2"><img  src="images/CSS3 border shadow implements 2 image list display effects - case analysis (code example)" / alt="CSS3 border shadow implements 2 image list display effects - case analysis (code example)" ></li>
            <li class="boxshadow2"><img  src="images/CSS3 border shadow implements 2 image list display effects - case analysis (code example)" / alt="CSS3 border shadow implements 2 image list display effects - case analysis (code example)" ></li>
            <li class="boxshadow2"><img  src="images/CSS3 border shadow implements 2 image list display effects - case analysis (code example)" / alt="CSS3 border shadow implements 2 image list display effects - case analysis (code example)" ></li>
            <li class="lastitem boxshadow2">
                <img  src="images/CSS3 border shadow implements 2 image list display effects - case analysis (code example)" / alt="CSS3 border shadow implements 2 image list display effects - case analysis (code example)" >
            </li>
            <li class="clear" ></li>
        </ul>
    </div>
</body>
</html>
运行结果如下:
到此为止,效果就全部实现了
总结:
1、通过案例讲解了box-shadow内阴影,外阴影的两种用法
外阴影语法:box-shadow:x-offset y-offset 模糊度 颜色
内阴影语法,在上面语法的基础上+inset
x-offset,y-offset的值可正可负
x-offset为正表示向右,负数向左
y-offset为正表示向下,负数向上
2、要注意为图片添加内阴影,可以通过设置position:relative,z-index实现
希望本文能给大家带来一定的帮助,谢谢!!!
The above is the detailed content of CSS3 border shadow implements 2 image list display effects - case analysis (code example). For more information, please follow other related articles on the PHP Chinese website!


)