Home >Operation and Maintenance >Windows Operation and Maintenance >How to set the number of processors in win7 system boot advanced options
How to set the number of processors in win7 system boot advanced options
- 王林Original
- 2020-04-30 09:59:3322977browse

1. First open the run dialog box in the start menu, then enter "msconfig" and press Enter to open the system configuration

2. In the pop-up interface, switch to the "Boot" tab, and then click "Advanced Options"

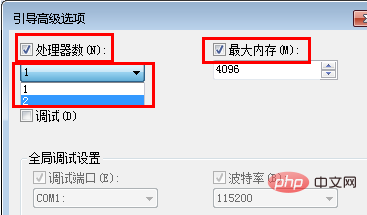
3. In the pop-up boot advanced options, Check the "Number of Processors" and "Maximum Memory", then set the number of processors (the number of processors is usually 2, 4, 8), and then click the OK button to exit.

Recommended tutorial: windows tutorial
The above is the detailed content of How to set the number of processors in win7 system boot advanced options. For more information, please follow other related articles on the PHP Chinese website!

