How to set up the startup disk?
When starting the e68a84e799bee5baa6e997aee7ad9431333234333337 computer, press DEL, enter the BIOS, and then select "ADVANCE SETUP". Then, set first to CD-ROM.
Finally, move the cursor to SAVE.
one. Enter the CMOS Setup main menu. After turning on the computer power, when the BIOS starts to perform POST (Power On Self Test), press the "Del" key to enter the CMOS Setup main menu. In the main menu, you can select different setting options, press the up, down, left and right arrow keys to select, and press the "Enter" key to enter the submenu.
Select the advanced BIOS features (advanced bios features) to enter. The following are 1st Boot Device/2nd Boot Device/3rd Boot Device (first boot device/second boot device/third boot device) Three items allow you to set the boot device startup sequence for the BIOS to load the operating system. The setting value is:
Floppy The system first attempts to boot from the floppy drive
LS120 The system first attempts to boot from the LS120
HDD-0 The system first attempts to boot from the first hard disk
SCSI The system first attempts to boot from SCSI
CDROM The system first attempts to boot from the CD-ROM drive
HDD-1 The system first tries to boot from the second hard drive
HDD-2 The system first tries to boot from the third hard drive
HDD-3 The system first tries to boot from the fourth hard drive
ZIP The system first attempts to boot from ATAPI ZIP
LAN The system first attempts to boot from the network
Disabled Disable this sequence
The above is the detailed content of How to set up the startup disk. For more information, please follow other related articles on the PHP Chinese website!
 CentOS安装指南Feb 29, 2024 pm 02:00 PM
在安装CentOS系统时,需要按照特定顺序执行一系列步骤。本文将详细讲解CentOS的安装过程,以帮助您成功完成安装。准备工作在开始安装CentOS之前,您需要准备好以下工作:1.下载最新的CentOS镜像文件,可以从官方网站或镜像站点下载。2.制作启动盘,可以使用U盘或光盘来制作。3.确保您的计算机满足CentOS的最低系统要求,包括CPU、内存和硬盘空间等。安装过程1.将制作好的启动盘插入计算机,启动计算机并选择从启动盘启动。2.进入CentOS安装界面后,选择安装语言和时区等基本设置。3.
 华硕主板第一启动盘放Feb 05, 2024 pm 05:40 PM
准备工作:1、下载新毛桃u盘启动盘制作工具并安装,然后将8G及以上的U盘制作成U盘启动盘。制作期间,U盘将被格式化,请备份重要文件。若需安装系统在C盘,请勿将重要文件存放在C盘或桌面。由于版权问题,新毛桃不提供系统下载服务。因此,用户需要在互联网上自行搜索并下载所需的Win11系统镜像。随后,将该镜像存入U盘启动盘中,以便安装操作系统。第一步:安装以华硕电脑主板为例:按F8进入安装界面——选UEFI_——点OK【如图所示】第二步:选择我没有产品密匙——勾选协议——下一步如图所示第三步:我们选自定
 u盘制作启动盘还能存东西吗Feb 11, 2024 pm 05:30 PM
制作u盘启动盘教程,我们今天讲一下如何制作一个pe启动盘,并且用它来安装系统准备八g以上的存储设备,最好16g或32g,因为现代系统镜像较大,容量稍大会更好。然后就去搜索一个pe的制作工具,我这里用的是u深度然后直接下载安装就可以了,下载安装完以后,打开软件选择我们插入的u盘在制作过程中,点击一键制作即可开始制作。请注意,如果你安装了360等软件,需要先退出,因为它们可能会占用U盘,导致制作失败。我们制作完了以后呢,就把镜像考到这个u盘启动盘里面,我这里已经考好了使用U盘重装系统或解决其他问题非
 u盘如何启动盘Feb 15, 2024 pm 06:10 PM
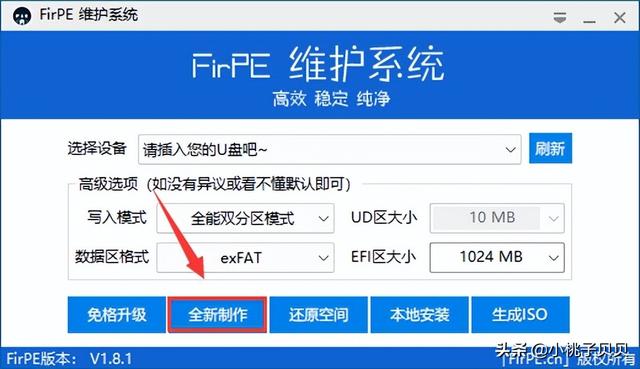
最好用的u盘启动盘使用教程,首先,打开百度搜索输入进入站点,找到新毛桃打开下载保存文件到电脑,下载完毕后,找到文件,插入u盘,运行文件打开工具会看到已识别到u盘,这里很简单,直接点全新制作,制作前请备份好u盘理念的重要文件点击确定在这里等待时间比较长等待进度到百分之100后,会看到提示,操作已完成,点击确定退出工具打开资源管理器,会看到u盘可用容量已变小到这里,就已经制作完成了,我们来测试下插入u盘,打开电脑,按快捷启动键,进入启动项列表,选择启动u盘回车这里就选择win8pe进入回车,进入启动
 u大师启动盘装驱动Feb 11, 2024 pm 05:00 PM
PE是WindowsPreinstallationEnvironment(Windows预安装环境)的简称。在PE中,可以轻松地安装Windows操作系统。三方PE加入了许多功能,如:预安装驱动、修复启动引导,当电脑系统出现故障时可以进入PE系统,对系统进行修复;但是有的三方PE中内置了推广软件,要是用了这种PE安装系统,在开机时,你就会发现系统已经被安装上了很多推广软件,令人反感。纯净好用的PE系统不多,微PE工具箱、优启通,都是好用且纯净的PE系统。还有一个PE系统——FirPE,它也无推广
 如何更改 Mac 的启动盘May 25, 2023 pm 05:37 PM
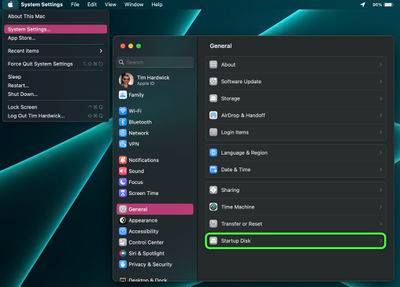
启动盘在Mac上,单击菜单栏中的苹果符号(),然后选择系统设置...。单击边栏中的常规。选择右边的启动盘。单击要使用的磁盘的图标。如果需要,输入您的管理员密码或使用TouchID确认更改。单击重新启动...。选择网络启动卷时,Apple警告用户确保他们选择网络启动卷而不是网络安装映像。这是因为选择网络安装映像会重新安装您的系统软件并可能擦除磁盘内容。
 hp启动盘按f几Feb 03, 2023 pm 02:09 PM
hp启动盘按f9,具体操作方法是:1、按F9快捷键进入BIOS;2、进入BIOS界面后,把“安全启动模式”改为禁用,将“传统模式”改为启用,然后按F10保存更改并重启电脑;3、再按F9弹出启动项,选择U盘即可。
 怎么使用启动盘还原系统文件Feb 11, 2024 pm 03:06 PM
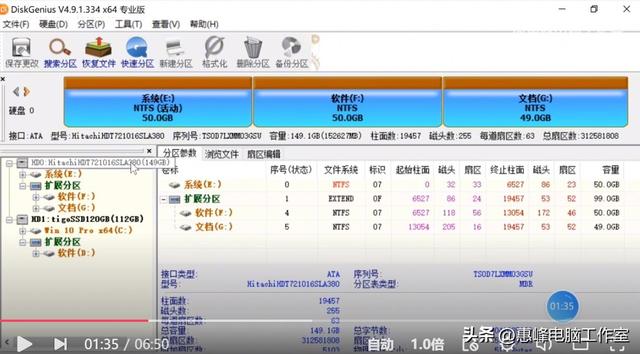
分区表的备份与还原重建主引导记录首先介绍什么是分区表。分区表是记录当前磁盘分区模式的一个文件,里面包含和电脑磁盘相关的所有资料。如果电脑磁盘分区出现了问题,那么资料也全部丢失。这时候我们就可以通过这个备份的分区表来恢复磁盘分区,将电脑磁盘分区的相关文件还原。使用备份分区表,在分区表没有问题的时候做一个备份,以备不时之需。使用diskgenius的备份分区表,还原分区表,可以对分区表进行操作。选择要备份分区表的硬盘打开diskgenius软件,选择要备份分区表的硬盘,做测试选择了160G的机械硬盘


Hot AI Tools

Undresser.AI Undress
AI-powered app for creating realistic nude photos

AI Clothes Remover
Online AI tool for removing clothes from photos.

Undress AI Tool
Undress images for free

Clothoff.io
AI clothes remover

AI Hentai Generator
Generate AI Hentai for free.

Hot Article

Hot Tools

Atom editor mac version download
The most popular open source editor

DVWA
Damn Vulnerable Web App (DVWA) is a PHP/MySQL web application that is very vulnerable. Its main goals are to be an aid for security professionals to test their skills and tools in a legal environment, to help web developers better understand the process of securing web applications, and to help teachers/students teach/learn in a classroom environment Web application security. The goal of DVWA is to practice some of the most common web vulnerabilities through a simple and straightforward interface, with varying degrees of difficulty. Please note that this software

VSCode Windows 64-bit Download
A free and powerful IDE editor launched by Microsoft

SecLists
SecLists is the ultimate security tester's companion. It is a collection of various types of lists that are frequently used during security assessments, all in one place. SecLists helps make security testing more efficient and productive by conveniently providing all the lists a security tester might need. List types include usernames, passwords, URLs, fuzzing payloads, sensitive data patterns, web shells, and more. The tester can simply pull this repository onto a new test machine and he will have access to every type of list he needs.

SAP NetWeaver Server Adapter for Eclipse
Integrate Eclipse with SAP NetWeaver application server.


