今天为大家分享一篇教程,绝对让你大开眼界,可以你好用到哭的PS火焰效果动作技巧,好了,有需要的朋友快快来学习吧 今天小编为大家分享你好用到哭的PS火焰效果动作技巧,教程非常实用,推荐到脚本之家,大家快快来学习吧!
效果如下图:

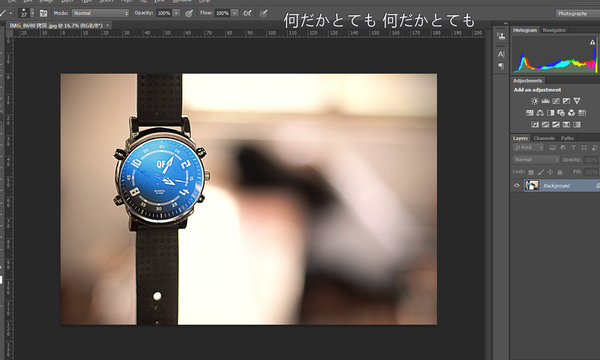
原图,没有任何槽点及G点。
巴拉巴拉能量 ,主要看气质的奥义封印炎爆秘术。

何止高大上,简直翻身农奴把歌唱,巴扎黑
而这一切只需一个动作就可以搞定(托腮凝视认真脸)
重要的事情说三遍
一个动作
一个动作
一个动作
动作的传送门:http://www.php.cn/(支持cs3 5 6,及cc+)
第一式,师夷长技以制夷
首先针对那些PS新手,甚至是零基础的美图羞羞党弱弱科普下PS动作,动作即是PS操作时录制下步骤,就酱。
因为这个动作是源于国外大神的手笔,所以录制的环境也是在英语语境里,所以在使用这个动作之前 ,第一步骤是改语言。
来,打开PS安装位置,找到locales 文件夹,及其子目录下zh cn,点开其下support files-tw10428,更改名称
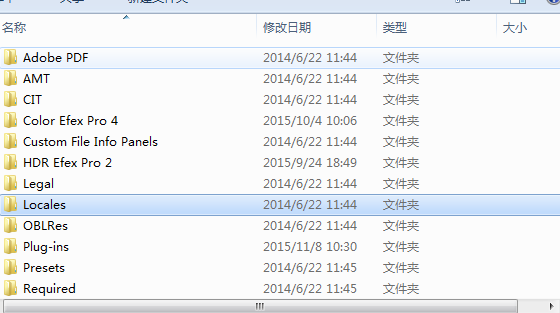
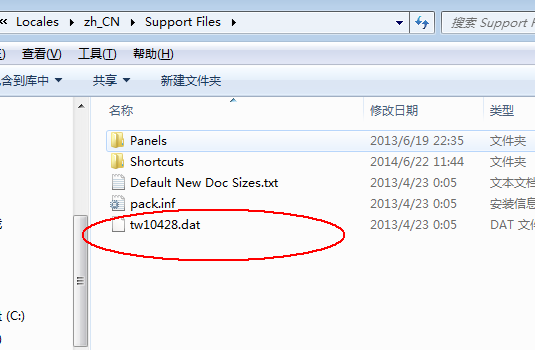
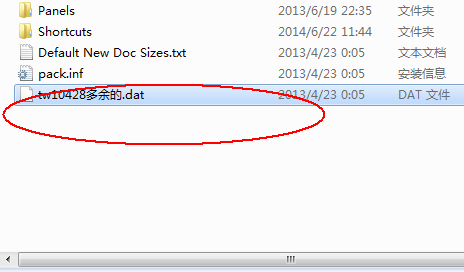
我是这么更改,为了方便还原,当你需要中文操作界面时,就改回原名,很简单。
第二式
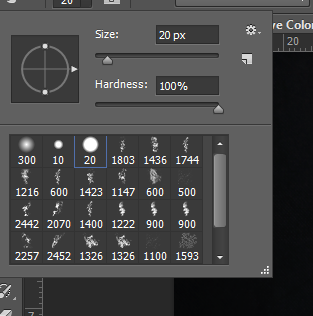
下载了云盘里的动作文件,在文件夹里有个笔刷文件,得导入到ps,注意措辞,是替换笔刷,Replace brushes,点击左上角笔刷位置,再点击右上角小小的设置图标,出现以下列表。
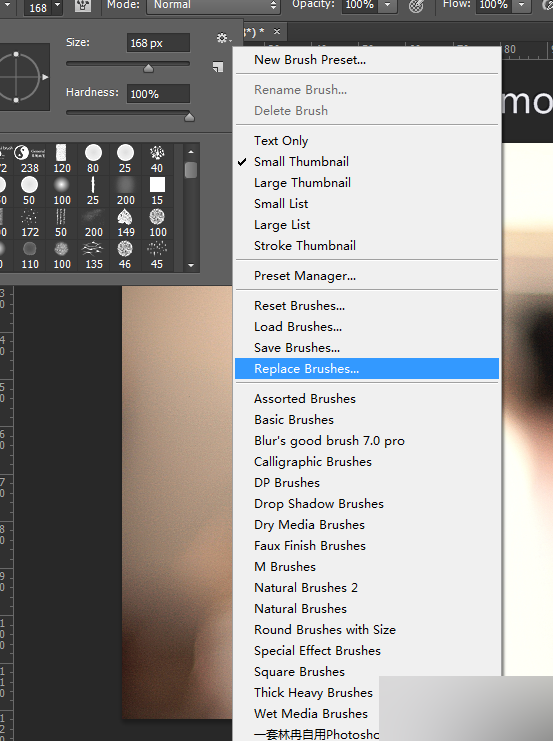
蓝后进入,选择firestorm burshes。
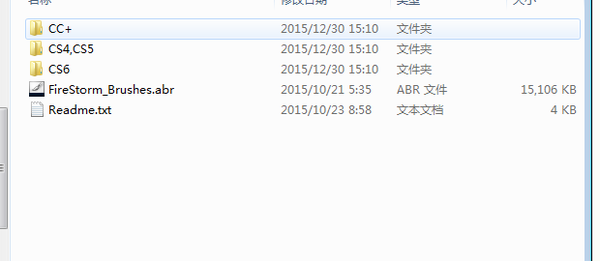
第三式
好了到了最关键载入的一步,打开图片,注意得是那种高质量的图片,建议1500px – 3500px,像网上随便扒来的图片就不要浪费感情,因为该火焰效果特别逼真,可以扣细节的那种,烟雾及其火花都特别细腻,相对说需要大图才能承载。
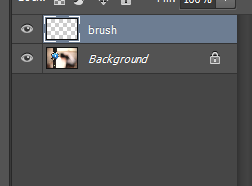
新建图层,ctrl +shift+n,然后命名图层为brush,一定得拼正确,否则无法识别。
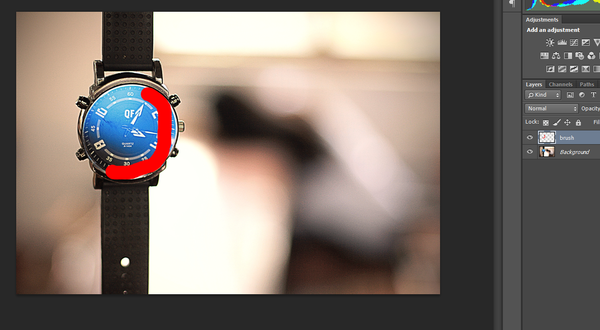
接下来,在该图层上需要添加火焰特效的地方用笔刷画画,笔刷使用第3个笔刷
这一步开始导入动作,alt+f9快捷键导出动作面板,点击该面板右上角位置的小图标,出现上列表,按Load actions,打开所下载的动作文件,按照PS版本载入动作。

该面板会有5种效果预置,分别右,左,上,下,中
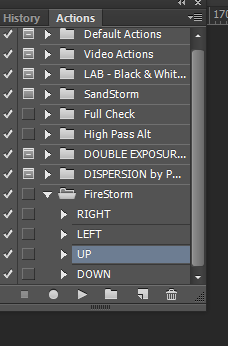
点击该键,PS会自动运行。
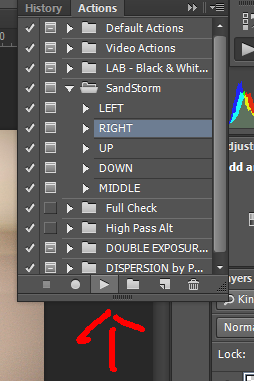
因为该图右边是留白部分,所以效果选择right,右,在这图层文件组里,还可以选择烟雾,火花及其效果,可做修改,更贴近现实。
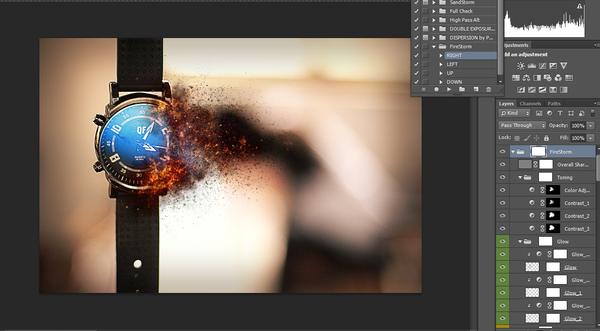
该效果可广泛应用于海报设计,某宝美工,摄影后期刚需就不说了。
教程结束,以上就是让你好用到哭的PS火焰效果动作介绍,大家学会了吗?希望能对大家有所帮助!
 Photoshop: Exploring Pricing Models and OptionsMay 02, 2025 am 12:12 AM
Photoshop offers two pricing models: single purchase and subscription service. 1. Single purchase: Pay $699 in one lump sum, permanent use, but no updates and cloud services. 2. Subscription service: $20.99 per month or $239.88 per year, and the latest version and cloud services are available. 3. Enterprise plan: $33.99 per user per month, including team management and additional cloud storage. 4. Educational Offer: Students and teachers are $19.99 per month, including multiple CreativeCloud applications.
 Photoshop: Mastering Layers and CompositionMay 01, 2025 am 12:05 AM
The method to create a new layer in Photoshop is: 1. Click the "New Layer" button at the bottom of the layer panel; 2. Use the shortcut keys Ctrl Shift N (Windows) or Command Shift N (Mac). The layers are like transparent sheets on canvas, allowing design elements to be managed separately, non-destructive editing and experimenting, and improving design levels.
 Photoshop Applications: From Photo Editing to Digital ArtApr 30, 2025 am 12:10 AM
Photoshop is widely used in the fields of image processing and digital art, and is suitable for photo editing and digital art creation. 1. Photo editing: Adjust brightness and contrast Use the "Brightness/Contrast" tool. 2. Digital art: Use brush tools to create paintings. 3. Basic usage: Use the "Red Eye Tool" to remove red eyes. 4. Advanced usage: Use layers and masks for image synthesis. 5. Debug: Recover the lost layers by checking the layer panel. 6. Performance optimization: Adjust memory usage to improve running speed.
 Photoshop's Core Function: Image Editing and ManipulationApr 29, 2025 am 12:17 AM
Photoshop's core functions are image editing and operation, including adjusting the color, brightness, contrast of images, applying filter effects, cropping and adjusting image size, performing image synthesis, etc. 1. Adjust brightness and contrast: Open the image, select the "Adjust" option in the "Image" menu, select "Brightness/Contrast", and adjust the slider. 2. Use the color level adjustment layer and layer mask: Click the "Create a new fill or adjust layer" button, select "Scale", adjust the color level, add a layer mask, and use the brush tool to control the adjustment effect.
 Photoshop: The Power of Raster Graphics EditingApr 28, 2025 am 12:13 AM
Photoshop is a powerful tool for handling raster graphics, and its core functions include layers and masks, filters and adjustments. 1. Layers and masks allow independent editing and non-destructive modifications. 2. Filters and adjustments can quickly change the appearance of the image, but they should be used with caution to avoid affecting the image quality. By mastering these functions and advanced skills, you can greatly improve your image editing and creative abilities.
 Photoshop: A Versatile Tool for Image ManipulationApr 27, 2025 am 12:13 AM
Photoshop is so powerful in the field of image processing because of its versatility and intuitive operating interface. 1) It can handle various tasks from basic adjustment to complex synthesis, such as adjusting brightness and contrast. 2) Working based on layers and masks allows non-destructive editing. 3) Examples of usage include adjusting color balance and creating layer masks. 4) Common errors such as excessive editing can be avoided through the History panel. 5) Performance optimization suggestions include the use of smart objects and shortcut keys.
 Photoshop Trials and Alternatives: Exploring Free AccessApr 26, 2025 am 12:23 AM
Photoshop offers a free 7-day trial period. To maximize the use of the trial period, 1) sign up for multiple Adobe accounts, 2) use the student or education version, and 3) subscribe to Adobe CreativeCloud. Free alternatives include: 1) GIMP, 2) Photopea, 3) Krita, these software can meet daily image editing needs.
 Photoshop for Photographers: Enhancing and Retouching ImagesApr 25, 2025 am 12:01 AM
Enhance and retouching photos in Photoshop can be achieved by adjusting brightness and contrast, using the Repair Brush Tool. 1) Adjust brightness and contrast: Increase brightness and contrast to improve underexposed photos through the Image->Adjustments->Brightness/Contrast menu. 2) Use the Repair Brush Tool: Select HealingBrushTool in the toolbar and apply to remove miscellaneous points or scars in the image.


Hot AI Tools

Undresser.AI Undress
AI-powered app for creating realistic nude photos

AI Clothes Remover
Online AI tool for removing clothes from photos.

Undress AI Tool
Undress images for free

Clothoff.io
AI clothes remover

Video Face Swap
Swap faces in any video effortlessly with our completely free AI face swap tool!

Hot Article

Hot Tools

SublimeText3 Linux new version
SublimeText3 Linux latest version

SublimeText3 Chinese version
Chinese version, very easy to use

Dreamweaver CS6
Visual web development tools

EditPlus Chinese cracked version
Small size, syntax highlighting, does not support code prompt function

WebStorm Mac version
Useful JavaScript development tools


