Home >Web Front-end >CSS Tutorial >How to upload and download images processed by CSS filters and blending modes?
How to upload and download images processed by CSS filters and blending modes?
- (*-*)浩Original
- 2019-09-03 11:05:373264browse

1. Use CSS filters and blending modes online PS (recommended learning: CSS video tutorial)
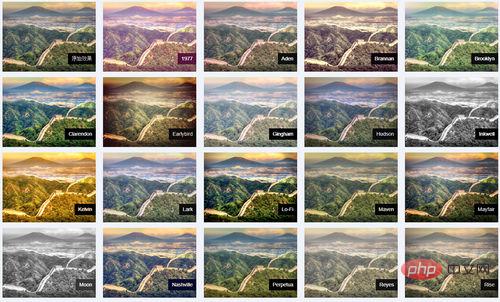
Use CSS filters and blending modes can achieve a variety of image processing effects. For example, the CSSgram project has many built-in image processing effects. Some of the effects are shown in the following thumbnails:

Enter On the demo page, you can also click the button here to change your local materials and view the corresponding image effects:


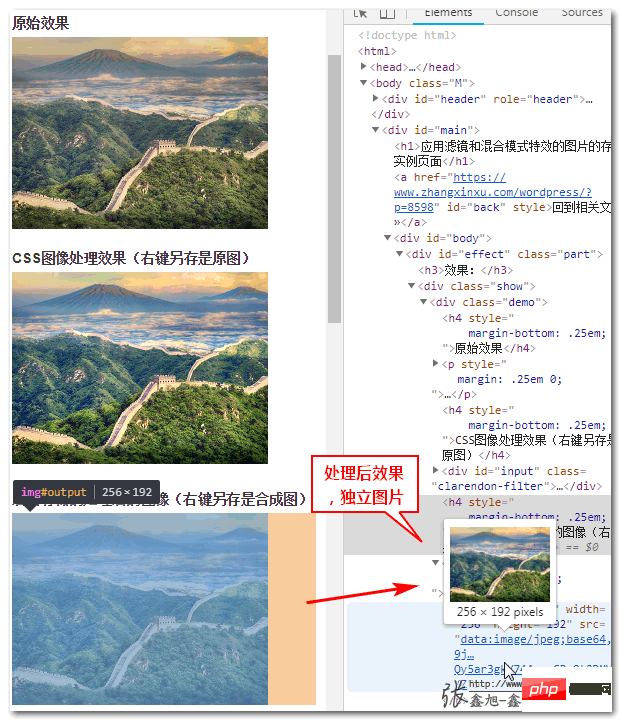
Although the effect presented is good, it also brings Another problem, although it looks like a processed image visually, if we right-click and save image as, we will find that it is still the original image.
If the user feels that the effect of a certain image processing is great and wants to save it to his own machine, he will be blocked.
In other words, we made an image processing tool based on CSS filters and blending modes. Finally, we need to upload these processed images to the background and use them as an independent  element. will also be hindered.
what to do? Do we have to give up such good features and still use canvas to process images?
No need, there is actually a way to get the CSS-processed image.
2. SVG foreignObject element and visual storage
There is a
<svg xmlns="http://www.w3.org/2000/svg">
  <foreignObject width="120" height="50">
      <body xmlns="http://www.w3.org/1999/xhtml">
        <p>文字。</p>
      </body>
    </foreignObject>
</svg>
And SVG is essentially an image, that is to say, we only need to put the HTML code and CSS code related to image processing in the  image, and then draw it to the canvas, so that you can get a pure processed bitmap image.
Although the last image on the demo page and the CSS-processed image look the same, they are essentially different. One is an original image (try right-clicking and saving as), and the other is essentially a composite image (try right-clicking and save as). -Save as), as shown in the screenshot below:

So, next, whether you want to download to the local machine or upload to the server is not a problem.
Regarding the pure front-end download of images, you can refer to part 3 of my previous article: "JS front-end creates html or json files and downloads".
Regarding uploading, you can transfer the base64 data of the image canvas.toDataURL() or the Blob data of canvas.toBlob():
// canvas转为blob并上传canvas.toBlob(function (blob) {    // 图片ajax上传
    var xhr = new XMLHttpRequest();    // 文件上传成功
    xhr.onload = function() {
         // xhr.responseText就是返回的数据
    };    // 开始上传
    xhr.open("POST", 'upload.php', true);
    xhr.send(blob);
}, 'image/jpeg');
3. How should I upload the image to the project? used in?
In the demo page above, I wrote a method called cssRenderImage2PureImage(), which can turn the CSS image processing result similar to the following code structure into a picture:
<div id="input" class="clarendon-filter">
    <img  src="/static/imghwm/default1.png"  data-src="./example.jpg"  class="lazy"   alt="How to upload and download images processed by CSS filters and blending modes?" >
</div>
.clarendon-filter {
filter: contrast(1.2) saturate(1.35);
display: inline-block;
position: relative;
}
.clarendon-filter::before {
content: '';
display: block;
height: 100%;
width: 100%;
top: 0; left: 0;
position: absolute;
background: rgba(127,187,227,.2);
mix-blend-mode: overlay;
pointer-events: none;
}cssRenderImage2PureImage() method syntax:
cssRenderImage2PureImage(dom, callback);
Among them:
dom required parameters. DOM object. callback optional parameter. Function. The callback method supports one parameter, which is the base64 information of the synthesized image.
Example:
cssRenderImage2PureImage(input, function (url) {    // url就是合成后的图片base64地址
    // 你可以对url做你任何你想做的事情……});
4. Other instructions and concluding remarks
cssRenderImage2PureImage method is highly customized, if the DOM structure processed by your CSS filter is different Different, you need to adjust the code in the cssRenderImage2PureImage method according to your project scenario; the
Please play this technology under the Chrome browser.
The above is the detailed content of How to upload and download images processed by CSS filters and blending modes?. For more information, please follow other related articles on the PHP Chinese website!

