Home >Common Problem >How to set up ASUS motherboard startup items
How to set up ASUS motherboard startup items
- angryTomOriginal
- 2019-08-21 15:39:1844692browse

Taiwan ASUS Computer Co., Ltd. is currently the world's largest motherboard manufacturer, the world's third largest graphics card manufacturer, and one of the world's leading 3C solution providers. To provide individual and corporate users with the most innovative products and application solutions. Now we will introduce to you how to set up the ASUS motherboard.
Recommended tutorial: Computer Frequently Asked Questions Tutorial
1. Restart, press Del to enter the BIOS, and find Advanced Bios Features (BIOS parameter settings) Press Enter to enter the Advanced Bios Features (BIOS parameter settings) interface.

2. First Boot Device The normal boot sequence setting is: First Boot Device is set to HDD-O (hard disk boot) Second Boot Device is set to CDROM (optical drive boot) Third Boot Device is set to FIOPPY (floppy drive).
When reinstalling the system and need to boot from the CD-ROM drive, press DEL to enter the BIOS settings, find First Boot Device, and set it to CDROM (CD-ROM drive startup). The method is to use the keyboard direction keyboard to select First Boot Device and use PgUp or PgDn flip the page to change HDD-O to CDROM, press ESC, press F10, then press Y, press Enter, and save.

The 1st Boot Device [1st FLOPPY DRIVE] is a hard disk boot, and the 3rd Boot Device [PS-ASUS CD-S360] is a CD boot.
Extended information:
At present, there are generally two methods to adjust the BIOS startup sequence. One is the shortcut key during startup, and the other is Adjust the boot sequence in the BIOS. This is currently a popular method that provides shortcut keys in the BIOS self-test interface. For this ASUS motherboard, press F8 to adjust the startup sequence.
This is a more traditional BIOS setting interface. Below we will introduce the two setting methods in detail. Of course, it is impossible for the editor to try all the BIOS startup setting interfaces and list them, so Perfecting this tutorial also requires your help. If you know your own motherboard, please take a photo of your boot sequence adjustment interface and send it to our Mylab forum, and you can win points for big prizes.
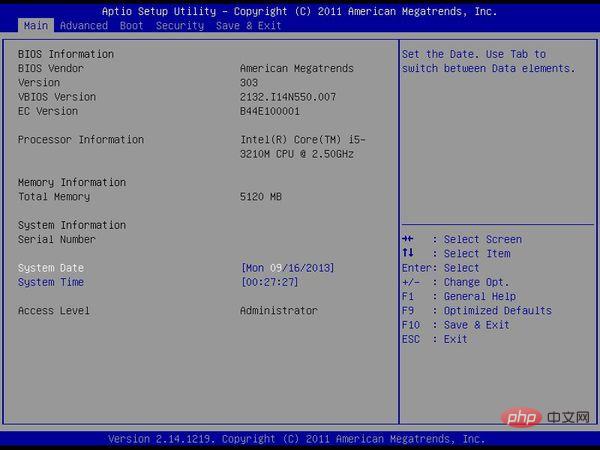
Traditional BIOS adjustment: a bit complicated but very common. There are currently two mainstream BIOSes, AMI and AWARD. Let’s take a look at where the boot menus of the two BIOS interfaces are hidden. The first is the AWARD interface. To adjust the startup sequence of AWARD, you only need to set First Boot Second... (Second) Third... (Third) in the Advanced BIOS Feature (Advanced BIOS Properties). For example, the first boot device setting It is an optical drive, the second boot device is set to a USB flash drive, and the third boot device is set to a hard drive.
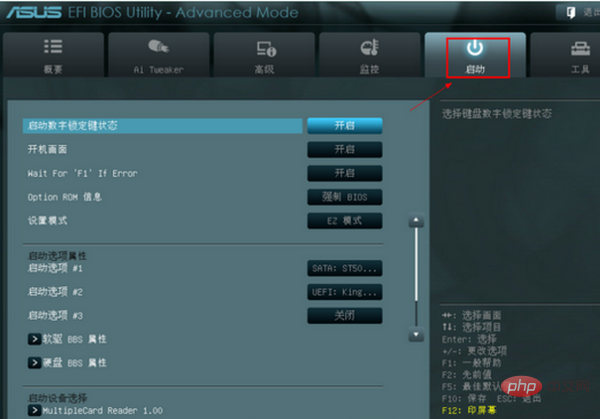
AMI’s BIOS has a separate BOOT option on the menu, and the boot sequence is also set here
What’s more user-friendly about this BIOS is that there are several options for several devices plugged into the motherboard. , and the device name is directly displayed when adjusting the order. In the picture above, our motherboard only has a hard disk and a USB flash drive plugged in, so there are only these two options. Just select the USB one in 1st Boot Device.
Boot menu: Each manufacturer has the same one. The first step is to select the shortcut keys for the boot sequence interface. There are basically no duplicates: In addition to selecting the shortcut keys, the styles of the pop-up menus are also different:
The boot menu that pops up on Zotac Mini H55 displays the specific name of the device. As shown in the picture above, the first one is the Seagate hard drive, the second one is the U disk, and the third one is the mobile hard disk, which is more intuitive.
This one pops up from the Gigabyte motherboard. It is selected according to the device category, which is not very intuitive. For example, USB HDD, USB FDD and the like are easy to confuse. Generally, everyone does not know what LS120 is.
The above is the detailed content of How to set up ASUS motherboard startup items. For more information, please follow other related articles on the PHP Chinese website!

