Home >Common Problem >How to use Apple notebook shortcut keys
How to use Apple notebook shortcut keys
- 爱喝马黛茶的安东尼Original
- 2019-07-29 16:22:536725browse

First classification: Enable shortcut keys
Press the key or key combination until the desired function appears (for example, hold down Option during startup until Boot Manager appears, or hold down Shift until Safe Boot appears). Tip: If startup doesn't work and you're using a third-party keyboard, connect an Apple keyboard and try again.
Key or key combination function:
Option to display all bootable volumes (boot management program)
Shift to perform secure boot (boot in safe mode)
CBoot from a bootable disk (DVD, CD)
TBoot in FireWire target disk mode
NBoot from a NetBoot server
XForce Mac OS X to boot ( If a non-Mac OS
##The second category: Finder shortcut key combination functionCommand-A selects all items in the front Finder window (if no window is open, select the desktop content)
Option-Command-ADeselect all items
Command-CCopy selected items/text to Clipboard
Shift-Command-C to open the Computer windowCommand-D to copy selected itemsShift-Command-D to open the desktop folderCommand- ELaunch Command-F Find anything matching Spotlight properties Shift-Command-F Find matches for Spotlight file names Option-Command-F Navigate to Open Search bar in the Spotlight windowShift-Command-GGo to folderShift-Command-HOpen the personal folder of the currently logged in user accountCommand- I Show IntroductionOption-Command-I Show Inspector
Control-Command-I Get Summary Information
Shift-Command- IOpen iDisk
Command-J to bring up the "Display" options
Command-4 is displayed in Cover Flow mode (Mac OS X 10.5 or Later versions)
Command-, (Command plus comma key) opens Finder preferences
Command-` (accent key - above the Tab key in the American English keyboard layout) Cycles on Finder window
Command-Shift-?Open Mac Help
Option-Shift-Command-Esc (hold for three seconds) - Mac OSX v10.5, v10.6 or higher only Version Force quit the frontmost application
Command-[Back
Command-]Forward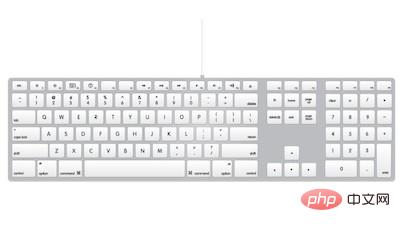
Related recommendations: "
FAQ"
The third category: Applications and other Mac OS X keyboard commandsCommand-;Find misspelled words in the document
Command-, open the preferences window of the front application (provided the application supports this shortcut key)
Option-Control-Command-, Reduce screen contrast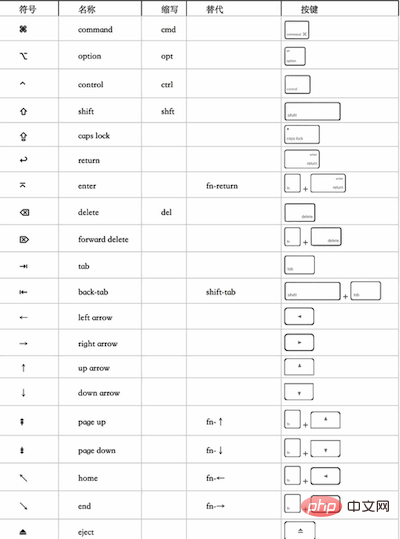
Command-?Open the application's help in the help display program
Option-Command-/Turn font smoothing on or offShift-Command-=Enlarge selected item
Shift-Command-3Capture screen to fileShift-Control-Command-3 Snap screen to clipboard
Shift-Command-4 Snap selection to file
Shift-Control-Command-4 Snap selection Content snaps to clipboard
Command-A Highlight all items in the document or window, or highlight all characters in a text field
Command-B Bold the selection Text or toggle text bold on/off
Command-C copies selected data to clipboard
Shift-Command-C displays the Color window
Option -Command-CCopy the style of the selected text
Control-Command-CCopy the formatting of the selected item and save it to the folder
Option-Command-DShow or hide the Dock
Command-Control DDisplay the definition of the selected word in the dictionary application
Command-EFind using the selection
Command-FOpen the Find window

Option-Command-F moves to the search bar control;
Command-G finds the next occurrence of the selection
Shift-Command -GFind the previous position where the selection occurred
Command-HHide the currently running application window
Option-Command-HHide all other running application windows
Command-I Show selected text in italics or toggle text italics on/off
Option-Command-I Show the inspector window
Command-J Scroll to the selection
Command-M Minimize active window to Dock
Option-Command-M Minimize all windows of active application to Dock
Command-N on front Create a new document in the application
Command-O displays a dialog box for selecting a document to open in the front application
Command-P displays the Print dialog box
Shift-Command-P displays the dialog box for specifying printing parameters (page setup)
Command-Q exits the front application
Command-S stores the active document
Shift-Command-S displays the "Save As" dialog box
Command-T displays the "Font" window
Option-Command-TShow or hide the toolbar
Command-U underlines the selected text or turns on/off the underlining function
Command-V pastes the clipboard content at the insertion point
Option-Command-V The object's style is applied to the selected object (Paste Style)
Option-Shift-Command-VApply the style of the surrounding text to the inserted object (Paste and Match Style)
Control-Command -V applies formatting to the selected objects (Paste Ruler command)
Command-WClose the frontmost window
Shift-Command-WClose the file and its associated windows
Option-Command-WClose all windows of the application without exiting it
Command-XRemove the selection and save it to the clipboard
Command-ZRestore the previous command (some Applications allow multiple reverts)
Shift-Command-Z redo the previous command (some applications allow multiple redos)
Control-right arrow focuses within a view (such as a table) Another value or cell
Control-Left Arrow focuses another value or cell within a view (such as a table)
Control-Down Arrow focuses another value or cell within a view (such as a table) One value or cell
Control-Up Arrow focuses another value or cell within a view (such as a table)
Command-Right Arrow moves the text insertion point to the end of the current line
Command-Left Arrow moves the text insertion point to the beginning of the current line
Command-Down Arrow moves the text insertion point to the end of the document

Command-Up Arrow moves the text insertion point to the beginning of the document
Shift-Command-Right Arrow selects the text (*) between the insertion point and the end of the current line
Shift-Command-Left Arrow selects the text between the insertion point and the beginning of the current line (*)
Shift-Right Arrow extends the text selection range to the right by one character (*)
Shift-Left Arrow extends the text selection one character to the left (*)
Shift-Command-Up Arrow selects text between the insertion point and the beginning of the document (*)
Shift-Command -Down arrow selects text between the insertion point and the end of the document (*)
Shift-Up arrow extends text selection to the nearest character edge at the same horizontal position on the previous line (*)
Shift-Down Arrow extends the text selection range to the nearest character edge (*) at the same horizontal position on the next line
Shift-Option-Right Arrow extends the text selection range to the end of the current word, press again to extend Go to the end of the next word (*)
Shift-Option-Left Arrow will expand the text selection range to the beginning of the current word, press it again to expand to the beginning of the next word (*)
Shift-Option-Down Arrow extends the text selection to the end of the current paragraph, press it again to extend to the end of the next paragraph (*)
Shift-Option-Up Arrow selects text The range extends to the beginning of the current paragraph. Press it again to extend to the beginning of the next paragraph (*)
Control-Spacebar switches between the current input source and the previous input source
Option-Control-Spacebar switches between all enabled input sources
Option-Command-esc force quit
(*) Note: If no text is selected, expansion starts from the insertion point. If you select text by dragging, it expands from the edge of the selection. Inverting the selection deselects the corresponding portion.
4. Key combination function
Command-F5 or turn VoiceOver on or off
fn Command-F5
Control Option-F8 or open the VoiceOver utility
fn Control Option-F8
Control Option-F7 or display the VoiceOver menu
fn Control Option- F7
Control Option-; Enable/disable VoiceOver control option lock
or fn Control Option-;
Option-Command-8 or turn on the zoom function
fn Command-F11
Option-Command-Zoom in
Option-Command- - (minus sign) Zoom out
Option-Control-Command-8Invert/Revert Screen Color
Control Option-Command-,Reduce Contrast
Control Option-Command-.Increase Contrast
Note: You may need to enable " Use the F1, F2, etc. keys as standard function keys" to make VoiceOver menus and utilities work properly.

Fifth Category: Universal Assistance - Mouse Keys
After turning on mouse keys in the "Universal Assistance" preferences, You can then move the mouse pointer using keys on your keyboard or numeric keypad. If your computer does not have a numeric keypad, use the Fn (function) key.
Key combination function
8 Move up
2 Move down
4 Move left
6 Move right
1 Move diagonally to the lower left corner
3 Move diagonally to the lower right corner
7 Move diagonally to the upper left corner
9 Move diagonally Move the line to the upper right corner
5 Press the mouse button
0 Press and hold the mouse button
. (Period on the numeric keypad) Release the held mouse button
The above is the detailed content of How to use Apple notebook shortcut keys. For more information, please follow other related articles on the PHP Chinese website!

