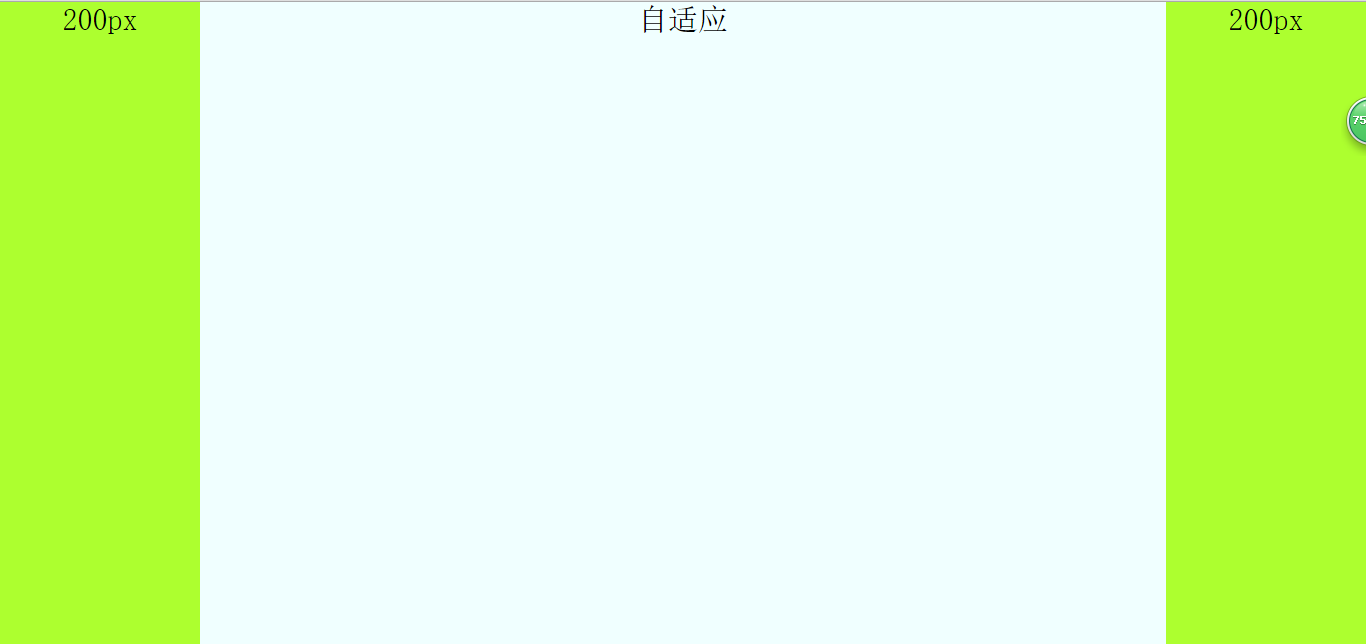
自适应布局分两类:高度和宽度,方法有很多,我用三列布局举例,我就列几个通俗易懂的例子呗,懂了三列的,两列的原理一样,呵呵哒。
效果图如下:高度自适应——宽度自适应


1,高度自适应布局
原理就是把每个模块设置为绝对定位,然后设置中间自适应的模块的top和bottom属性的值分别为头部模块和底部模块的高,然后中间模块的高度就自适应了。代码如下:
html代码:
<span style="color: #0000ff;"><span style="color: #800000;">body</span><span style="color: #0000ff;">></span>
        <span style="color: #0000ff;"><span style="color: #800000;">div </span><span style="color: #ff0000;">class</span><span style="color: #0000ff;">="top"</span><span style="color: #0000ff;">></span><span style="color: #000000;">
            120px
        </span><span style="color: #0000ff;"></span><span style="color: #800000;">div</span><span style="color: #0000ff;">></span>
        <span style="color: #0000ff;"><span style="color: #800000;">div </span><span style="color: #ff0000;">class</span><span style="color: #0000ff;">="main"</span><span style="color: #0000ff;">></span><span style="color: #000000;">
            自适应
        </span><span style="color: #0000ff;"></span><span style="color: #800000;">div</span><span style="color: #0000ff;">></span>
        <span style="color: #0000ff;"><span style="color: #800000;">div </span><span style="color: #ff0000;">class</span><span style="color: #0000ff;">="bottom"</span><span style="color: #0000ff;">></span><span style="color: #000000;">
            120px
        </span><span style="color: #0000ff;"></span><span style="color: #800000;">div</span><span style="color: #0000ff;">></span>
<span style="color: #0000ff;"></span><span style="color: #800000;">body</span><span style="color: #0000ff;">></span></span></span></span></span>
css代码:
<span style="color: #800000;">.top</span>{<span style="color: #ff0000;">
    width</span>:<span style="color: #0000ff;"> 100%</span>;<span style="color: #ff0000;">
    height</span>:<span style="color: #0000ff;"> 120px</span>;<span style="color: #ff0000;">
    position</span>:<span style="color: #0000ff;"> absolute</span>;<span style="color: #ff0000;">
    background-color</span>:<span style="color: #0000ff;"> greenyellow</span>;

}<span style="color: #800000;">
.main</span>{<span style="color: #ff0000;">
    position</span>:<span style="color: #0000ff;"> absolute</span>;<span style="color: #ff0000;">
    width</span>:<span style="color: #0000ff;"> 100%</span>;<span style="color: #ff0000;">
    top</span>:<span style="color: #0000ff;"> 120px</span>;<span style="color: #ff0000;">
    bottom</span>:<span style="color: #0000ff;"> 120px</span>;<span style="color: #ff0000;">
    background-color</span>:<span style="color: #0000ff;"> azure</span>;<span style="color: #ff0000;">
    height</span>:<span style="color: #0000ff;"> auto</span>;
}<span style="color: #800000;">
.bottom</span>{<span style="color: #ff0000;">
    position</span>:<span style="color: #0000ff;"> absolute</span>;<span style="color: #ff0000;">
    bottom</span>:<span style="color: #0000ff;"> 0</span>;//别漏了<span style="color: #ff0000;">
    width</span>:<span style="color: #0000ff;"> 100%</span>;<span style="color: #ff0000;">
    height</span>:<span style="color: #0000ff;"> 120px</span>;<span style="color: #ff0000;">
    background-color</span>:<span style="color: #0000ff;">greenyellow </span>;
}
2,宽度自适应,有三种方法,分别是用绝对定位;利用margin,中间模块先渲染;自身浮动。
a,用绝对定位来设置宽度自适应布局,原理:针对自适应模块使用绝对定位,在把left和right设置为左右两列的宽,其实原理和高度自适应一样,另外左右两列分别左右浮动。
html代码:
<span style="color: #0000ff;"><span style="color: #800000;">body</span><span style="color: #0000ff;">></span>
        <span style="color: #0000ff;"><span style="color: #800000;">div </span><span style="color: #ff0000;">class</span><span style="color: #0000ff;">="left"</span><span style="color: #0000ff;">></span><span style="color: #000000;">
            200px
        </span><span style="color: #0000ff;"></span><span style="color: #800000;">div</span><span style="color: #0000ff;">></span>
        <span style="color: #0000ff;"><span style="color: #800000;">div </span><span style="color: #ff0000;">class</span><span style="color: #0000ff;">="main"</span><span style="color: #0000ff;">></span><span style="color: #000000;">
            自适应
        </span><span style="color: #0000ff;"></span><span style="color: #800000;">div</span><span style="color: #0000ff;">></span>
        <span style="color: #0000ff;"><span style="color: #800000;">div </span><span style="color: #ff0000;">class</span><span style="color: #0000ff;">="right"</span><span style="color: #0000ff;">></span><span style="color: #000000;">
            200px
        </span><span style="color: #0000ff;"></span><span style="color: #800000;">div</span><span style="color: #0000ff;">></span>
<span style="color: #0000ff;"></span><span style="color: #800000;">body</span><span style="color: #0000ff;">></span></span></span></span></span>
css代码:
<span style="color: #800000;">html,
body </span>{<span style="color: #ff0000;">
    margin</span>:<span style="color: #0000ff;"> 0</span>;<span style="color: #ff0000;">
    height</span>:<span style="color: #0000ff;"> 100%</span>;<span style="color: #ff0000;">
    padding</span>:<span style="color: #0000ff;"> 0</span>;<span style="color: #ff0000;">
    font-size</span>:<span style="color: #0000ff;"> 30px</span>;<span style="color: #ff0000;">
    font-weight</span>:<span style="color: #0000ff;"> 500</span>;<span style="color: #ff0000;">
    text-align</span>:<span style="color: #0000ff;"> center</span>;
}<span style="color: #800000;">

.left,
.right </span>{<span style="color: #ff0000;">
    width</span>:<span style="color: #0000ff;"> 200px</span>;<span style="color: #ff0000;">
    display</span>:<span style="color: #0000ff;"> inline</span>;<span style="color: #ff0000;">
    height</span>:<span style="color: #0000ff;"> 100%</span>;<span style="color: #ff0000;">
    background-color</span>:<span style="color: #0000ff;"> greenyellow</span>;
}<span style="color: #800000;">

.left </span>{<span style="color: #ff0000;">
    float</span>:<span style="color: #0000ff;"> left</span>;
}<span style="color: #800000;">

.right </span>{<span style="color: #ff0000;">
    float</span>:<span style="color: #0000ff;"> right</span>;
}<span style="color: #800000;">

.main </span>{<span style="color: #ff0000;">
    position</span>:<span style="color: #0000ff;"> absolute</span>;<span style="color: #ff0000;">
    left</span>:<span style="color: #0000ff;"> 200px</span>;<span style="color: #ff0000;">
    right</span>:<span style="color: #0000ff;"> 200px</span>;<span style="color: #ff0000;">
    height</span>:<span style="color: #0000ff;"> 100%</span>;<span style="color: #ff0000;">
    background-color</span>:<span style="color: #0000ff;"> azure</span>;<span style="color: #ff0000;">
    display</span>:<span style="color: #0000ff;"> inline</span>;
}
b,中间一列优先渲染的自适应三列布局,优先渲染(加载)的关键:内容在html里面必须放在前面。自适应的div必须放在left和right前面且包含在一个父div里。父div,left和right模块都向左浮动,然后对自适应的div(就是父div里的子div)设置margin:0 200px,然后对left的margin-left的属性值设置为100%的负数,就是margin-left:-100%;对right的margin-left的属性值设置为自身宽度的负数,就是margin-left:-200px。
注意:自适应的div必须放在left和right前面且包含在一个父div里。
html代码:
<span style="color: #0000ff;"><span style="color: #800000;">body</span><span style="color: #0000ff;">></span>
        <span style="color: #0000ff;"><span style="color: #800000;">div </span><span style="color: #ff0000;">class</span><span style="color: #0000ff;">="main"</span><span style="color: #0000ff;">></span> <span style="color: #008000;"><!--</span><span style="color: #008000;">看清楚,这里用一个父div包住</span><span style="color: #008000;">--></span>
            <span style="color: #0000ff;"><span style="color: #800000;">div </span><span style="color: #ff0000;">class</span><span style="color: #0000ff;">="content"</span><span style="color: #0000ff;">></span><span style="color: #000000;">
                自适应
            </span><span style="color: #0000ff;"></span><span style="color: #800000;">div</span><span style="color: #0000ff;">></span>
        <span style="color: #0000ff;"></span><span style="color: #800000;">div</span><span style="color: #0000ff;">></span>
        <span style="color: #0000ff;"><span style="color: #800000;">div </span><span style="color: #ff0000;">class</span><span style="color: #0000ff;">="left"</span><span style="color: #0000ff;">></span><span style="color: #000000;">
            200px
        </span><span style="color: #0000ff;"></span><span style="color: #800000;">div</span><span style="color: #0000ff;">></span>
        <span style="color: #0000ff;"><span style="color: #800000;">div </span><span style="color: #ff0000;">class</span><span style="color: #0000ff;">="right"</span><span style="color: #0000ff;">></span><span style="color: #000000;">
            200px
        </span><span style="color: #0000ff;"></span><span style="color: #800000;">div</span><span style="color: #0000ff;">></span>
<span style="color: #0000ff;"></span><span style="color: #800000;">body</span><span style="color: #0000ff;">></span></span></span></span></span></span>
css代码:
<span style="color: #800000;">html,
body </span>{<span style="color: #ff0000;">
    margin</span>:<span style="color: #0000ff;"> 0</span>;<span style="color: #ff0000;">
    height</span>:<span style="color: #0000ff;"> 100%</span>;<span style="color: #ff0000;">
    padding</span>:<span style="color: #0000ff;"> 0</span>;<span style="color: #ff0000;">
    font-size</span>:<span style="color: #0000ff;"> 30px</span>;<span style="color: #ff0000;">
    font-weight</span>:<span style="color: #0000ff;"> 500</span>;<span style="color: #ff0000;">
    text-align</span>:<span style="color: #0000ff;"> center</span>;
}<span style="color: #800000;">

.main </span>{<span style="color: #ff0000;">
    width</span>:<span style="color: #0000ff;"> 100%</span>;<span style="color: #ff0000;">
    height</span>:<span style="color: #0000ff;"> 100%</span>;<span style="color: #ff0000;">
    float</span>:<span style="color: #0000ff;"> left</span>;
}<span style="color: #800000;">

.main .content </span>{<span style="color: #ff0000;">
    margin</span>:<span style="color: #0000ff;"> 0 200px</span>;<span style="color: #ff0000;">
    background-color</span>:<span style="color: #0000ff;"> azure</span>;<span style="color: #ff0000;">
    height</span>:<span style="color: #0000ff;"> 100%</span>;
}<span style="color: #800000;">

.left,
.right </span>{<span style="color: #ff0000;">
    width</span>:<span style="color: #0000ff;"> 200px</span>;<span style="color: #ff0000;">
    height</span>:<span style="color: #0000ff;"> 100%</span>;<span style="color: #ff0000;">
    float</span>:<span style="color: #0000ff;"> left</span>;<span style="color: #ff0000;">
    background-color</span>:<span style="color: #0000ff;"> greenyellow</span>;
}<span style="color: #800000;">

.left </span>{<span style="color: #ff0000;">
    margin-left</span>:<span style="color: #0000ff;"> -100%</span>;<span style="color: #ff0000;"> //important
</span>}<span style="color: #800000;">

.right </span>{<span style="color: #ff0000;">
    margin-left</span>:<span style="color: #0000ff;"> -200px</span>;<span style="color: #ff0000;"> //important
</span>}
c,自身浮动,原理:中间列设置margin属性,就是把左右列分别左右浮动。注意:使用这个方法布局自适应的话,必须把自适应的那一列在html中放在left和right后面。
html代码:
<span style="color: #0000ff;"><span style="color: #800000;">body</span><span style="color: #0000ff;">></span>
        <span style="color: #0000ff;"><span style="color: #800000;">div </span><span style="color: #ff0000;">class</span><span style="color: #0000ff;">="left"</span><span style="color: #0000ff;">></span><span style="color: #000000;">
            200px
        </span><span style="color: #0000ff;"></span><span style="color: #800000;">div</span><span style="color: #0000ff;">></span>
        <span style="color: #0000ff;"><span style="color: #800000;">div </span><span style="color: #ff0000;">class</span><span style="color: #0000ff;">="right"</span><span style="color: #0000ff;">></span><span style="color: #000000;">
            200px
        </span><span style="color: #0000ff;"></span><span style="color: #800000;">div</span><span style="color: #0000ff;">></span>
        <span style="color: #0000ff;"><span style="color: #800000;">div </span><span style="color: #ff0000;">class</span><span style="color: #0000ff;">="main"</span><span style="color: #0000ff;">></span><span style="color: #000000;">
            自适应
        </span><span style="color: #0000ff;"></span><span style="color: #800000;">div</span><span style="color: #0000ff;">></span>
<span style="color: #0000ff;"></span><span style="color: #800000;">body</span><span style="color: #0000ff;">></span></span></span></span></span>
css代码:
<span style="color: #800000;">html,
body </span>{<span style="color: #ff0000;">
    margin</span>:<span style="color: #0000ff;"> 0</span>;<span style="color: #ff0000;">
    height</span>:<span style="color: #0000ff;"> 100%</span>;<span style="color: #ff0000;">
    padding</span>:<span style="color: #0000ff;"> 0</span>;<span style="color: #ff0000;">
    font-size</span>:<span style="color: #0000ff;"> 30px</span>;<span style="color: #ff0000;">
    font-weight</span>:<span style="color: #0000ff;"> 500</span>;<span style="color: #ff0000;">
    text-align</span>:<span style="color: #0000ff;"> center</span>;
}<span style="color: #800000;">
.main </span>{<span style="color: #ff0000;">
    margin</span>:<span style="color: #0000ff;"> 0 200px</span>;<span style="color: #ff0000;">
    height</span>:<span style="color: #0000ff;"> 100%</span>;<span style="color: #ff0000;">
    background-color</span>:<span style="color: #0000ff;"> azure</span>;
}<span style="color: #800000;">
.left,
.right </span>{<span style="color: #ff0000;">
    width</span>:<span style="color: #0000ff;"> 200px</span>;<span style="color: #ff0000;">
    height</span>:<span style="color: #0000ff;"> 100%</span>;<span style="color: #ff0000;">
    background-color</span>:<span style="color: #0000ff;"> greenyellow</span>;
}<span style="color: #800000;">
.left </span>{<span style="color: #ff0000;">
    float</span>:<span style="color: #0000ff;"> left</span>;
}<span style="color: #800000;">
.right </span>{<span style="color: #ff0000;">
    float</span>:<span style="color: #0000ff;"> right</span>;
}
 HTML, CSS, and JavaScript: Examples and Practical ApplicationsMay 09, 2025 am 12:01 AM
The roles of HTML, CSS and JavaScript in web development are: 1. HTML is used to build web page structure; 2. CSS is used to beautify the appearance of web pages; 3. JavaScript is used to achieve dynamic interaction. Through tags, styles and scripts, these three together build the core functions of modern web pages.
 How do you set the lang attribute on the tag? Why is this important?May 08, 2025 am 12:03 AM
Setting the lang attributes of a tag is a key step in optimizing web accessibility and SEO. 1) Set the lang attribute in the tag, such as. 2) In multilingual content, set lang attributes for different language parts, such as. 3) Use language codes that comply with ISO639-1 standards, such as "en", "fr", "zh", etc. Correctly setting the lang attribute can improve the accessibility of web pages and search engine rankings.
 What is the purpose of HTML attributes?May 07, 2025 am 12:01 AM
HTMLattributesareessentialforenhancingwebelements'functionalityandappearance.Theyaddinformationtodefinebehavior,appearance,andinteraction,makingwebsitesinteractive,responsive,andvisuallyappealing.Attributeslikesrc,href,class,type,anddisabledtransform
 How do you create a list in HTML?May 06, 2025 am 12:01 AM
TocreatealistinHTML,useforunorderedlistsandfororderedlists:1)Forunorderedlists,wrapitemsinanduseforeachitem,renderingasabulletedlist.2)Fororderedlists,useandfornumberedlists,customizablewiththetypeattributefordifferentnumberingstyles.
 HTML in Action: Examples of Website StructureMay 05, 2025 am 12:03 AM
HTML is used to build websites with clear structure. 1) Use tags such as, and define the website structure. 2) Examples show the structure of blogs and e-commerce websites. 3) Avoid common mistakes such as incorrect label nesting. 4) Optimize performance by reducing HTTP requests and using semantic tags.
 How do you insert an image into an HTML page?May 04, 2025 am 12:02 AM
ToinsertanimageintoanHTMLpage,usethetagwithsrcandaltattributes.1)UsealttextforaccessibilityandSEO.2)Implementsrcsetforresponsiveimages.3)Applylazyloadingwithloading="lazy"tooptimizeperformance.4)OptimizeimagesusingtoolslikeImageOptimtoreduc
 HTML's Purpose: Enabling Web Browsers to Display ContentMay 03, 2025 am 12:03 AM
The core purpose of HTML is to enable the browser to understand and display web content. 1. HTML defines the web page structure and content through tags, such as, to, etc. 2. HTML5 enhances multimedia support and introduces and tags. 3.HTML provides form elements to support user interaction. 4. Optimizing HTML code can improve web page performance, such as reducing HTTP requests and compressing HTML.
 Why are HTML tags important for web development?May 02, 2025 am 12:03 AM
HTMLtagsareessentialforwebdevelopmentastheystructureandenhancewebpages.1)Theydefinelayout,semantics,andinteractivity.2)SemantictagsimproveaccessibilityandSEO.3)Properuseoftagscanoptimizeperformanceandensurecross-browsercompatibility.


Hot AI Tools

Undresser.AI Undress
AI-powered app for creating realistic nude photos

AI Clothes Remover
Online AI tool for removing clothes from photos.

Undress AI Tool
Undress images for free

Clothoff.io
AI clothes remover

Video Face Swap
Swap faces in any video effortlessly with our completely free AI face swap tool!

Hot Article

Hot Tools

SublimeText3 English version
Recommended: Win version, supports code prompts!

SAP NetWeaver Server Adapter for Eclipse
Integrate Eclipse with SAP NetWeaver application server.

WebStorm Mac version
Useful JavaScript development tools

MinGW - Minimalist GNU for Windows
This project is in the process of being migrated to osdn.net/projects/mingw, you can continue to follow us there. MinGW: A native Windows port of the GNU Compiler Collection (GCC), freely distributable import libraries and header files for building native Windows applications; includes extensions to the MSVC runtime to support C99 functionality. All MinGW software can run on 64-bit Windows platforms.

SublimeText3 Linux new version
SublimeText3 Linux latest version


