


This article brings you a detailed introduction to JavaScript DOM. It has certain reference value. Friends in need can refer to it. I hope it will be helpful to you.
Javascript DOM (Document Object Model) is an interface that allows developers to manipulate the content, structure, and style of the page. In this article, we will understand what DOM is and how to manipulate it using Javascript. This article can also serve as a reference for basic DOM manipulation.
What is DOM?
Basically a web page consists of HTML and CSS documents. The description that browsers use to create documents is called the Document Object Model (DOM). It enables Javascript to access and manipulate the elements and styles of the page. The model is built in an object-based tree structure and defines:
- HTML elements as objects
- Properties and events of HTML elements
- Methods to access HTML elements

HTML DOM Model
The position of an element is called a node. Not only do elements get nodes, but attributes of elements and text also have nodes of their own (property nodes and text nodes).
DOM document
The DOM document is the owner of all other objects in the web page. This means that if you want to access any object on the web page, you must start here. It also contains many important properties and methods that allow us to access and modify our own pages.
Finding HTML Elements
Now that we understand what a DOM document is, we can start getting our first HTML element. There are many different methods that can be used with the Javascript DOM, but these are the most common:
Get element by ID
getElementById() The method is used to get a single element by its id. Let's look at an example:
var title = document.getElementById(‘header-title’);
We get the element with the id header-title and save it to a variable.
Get elements by class name
You can also use the getElementsByClassName() method to get multiple objects, which returns an array of elements.
var items = document.getElementsByClassName(‘list-items’);
Here we get all the items of class list-items and save them into variables.
Get elements by tag name
You can also use the getElementsByTagName() method to get elements by tag name.
var listItems = document.getElementsByTagName(‘li’);
Here we get all the li elements in the HTML document and save them into variables.
Queryselector
querySelector() Method returns the first element that matches the specified CSS selector. This means you can get elements by id, class, tag and all other valid CSS selectors. Here I've listed some of the most commonly used options.
Get by id:
var header = document.querySelector(‘#header’)
Get by class:
var items = document.querySelector(‘.list-items’)
Get by label:
var headings = document.querySelector(‘h1’);
Get more specific elements:
We can also use CSS Selectors to get more specific elements.
document.querySelector(“h1.heading”);
In this example, we search for both tags and classes and return the first element passed to the CSS Selector.
Queryselectorall
querySelectorAll() method is exactly the same as querySelector() except that it returns all elements that match the CSS Selector.
var heading = document.querySelectorAll(‘h1.heading’);
In this example, we get all the h1 tags belonging to the heading class and store them in an array.
Changing HTML Elements
HTML DOM allows us to modify the content and style of HTML elements by changing their attributes.
Change HTML
The innerHTML attribute can be used to modify the content of an HTML element.
document.getElementById(“#header”).innerHTML = “Hello World!”;
In this example, we get the element with id header and set its content to "Hello World!".
InnerHTML can also put tags inside another tag.
document.getElementsByTagName("div").innerHTML = "<h1 id="Hello-World">Hello World!</h1>"
Put h1 tags into all existing divs here.
Change the value of the attribute
You can also use DOM to change the value of the attribute.
document.getElementsByTag(“img”).src = “test.jpg”;
In this example, we change the src of all <img alt="Detailed introduction to JavaScript DOM" > tags to test.jpg.
Change Style
To change the style of an HTML element, you need to change the style attribute of the element. Here is an example syntax for changing the style:
document.getElementById(id).style.property = new style
Next look at an example where we take an element and change the bottom border to a solid black line:
document.getElementsByTag(“h1”).style.borderBottom = “solid 3px #000”;
The CSS property needs to be camelcase instead of normal css property name to write. In this example, we use borderBottom instead of border-bottom.
Adding and Removing Elements
Now let’s see how to add new elements and remove existing elements.
Add element
var div = document.createElement(‘div’);
Here we create a div element using the createElement() method which takes the tag name as a parameter and saves it into a variable. Then you just need to give it some content and insert it into the DOM document.
var content = document.createTextNode("Hello World!");
p.appendChild(newContent);
document.body.insertBefore(p, currentp);
这里用了 createTextNode() 方法创建内容,该方法用字符串作参数,然后在文档中已经存在的 div 之前插入新的 div 元素。
删除元素
var elem = document.querySelector('#header');
elem.parentNode.removeChild(elem);
本例中我们得到一个元素并使用 removeChild() 方法将其删除。
替换元素
现在让我们来看看怎样替换一个项目。
var p = document.querySelector('#p');
var newp = document.createElement(‘p’);
newp.innerHTML = "Hello World2"
p.parentNode.replaceChild(newp, p);
这里我们使用 replaceChild() 方法替换元素。第一个参数是新元素,第二个参数是要替换的元素。
直接写入HTML输出流
还可以使用 write() 方法将 HTML 表达式和 JavaScript 直接写入 HTML 输出流。
document.write(“<h1 id="Hello-World">Hello World!</h1><p>This is a paragraph!</p>”);
我们也可以把像日期对象这样的参数传给 JavaScript 表达式。
document.write(Date());
write() 方法还可以使用多个参数,这些参数会按其出现的顺序附加到文档中。
事件处理
HTML DOM 允许 Javascript 对 HTML 事件做出反应。下面列出了一些比较重要的事件:
- 鼠标点击
- 页面加载
- 鼠标移动
- 输入字段更改
分配事件
可以用标记上的属性直接在 HTML 代码中定义事件。以下是 onclick 事件的例子:
<h1 id="Click-me">Click me!</h1>
在此例中,单击按钮时,<h1></h1> 的文本将被改为 “Hello!”。
还可以在触发事件时调用函数,如下一个例子所示。
<h1 id="Click-me">Click me!</h1>
这里我们在单击按钮时调用 changeText() 方法,并将该元素作为属性传递。
还可以用 Javascript 代码为多个元素分配相同的事件。
document.getElementById(“btn”).onclick = changeText();
指定事件监听器
接下来看看怎样为 HTML 元素分配事件监听器。
document.getElementById(“btn”)addEventListener('click', runEvent);
这里我们刚刚指定了一个 click 事件,在单击 btn 元素时调用 runEvent 方法。
当然还可以把多个事件指定给单个元素:
document.getElementById(“btn”)addEventListener('mouseover', runEvent);
节点关系
DOM Document 中的节点之间具有层次关系。这意味着节点的结构类似于树。我们用 parent,sibling 和 child 等术语来描述节点之间的关系。
顶级节点称为根节点,是唯一一个没有父节点的节点。普通 HTML 文档中的根是 标记,因为它没有父标记,并且是文档的顶部标记。
在节点之间导航
可以用以下属性在节点之间导航:
- parentNode
- childNodes
- firstChild
- lastChild
- nextSibling
下面是得到 h1 的父元素的例子。
var parent = document.getElementById(“heading”).parentNode
总结
望本文能帮助你理解 Javascript DOM 以及如何用它来操作页面上的元素。
本篇文章到这里就已经全部结束了,更多其他精彩内容可以关注PHP中文网的的JavaScript教程视频栏目!!!
The above is the detailed content of Detailed introduction to JavaScript DOM. For more information, please follow other related articles on the PHP Chinese website!


 5个常见的JavaScript内存错误Aug 25, 2022 am 10:27 AM
JavaScript 不提供任何内存管理操作。相反,内存由 JavaScript VM 通过内存回收过程管理,该过程称为垃圾收集。
 实战:vscode中开发一个支持vue文件跳转到定义的插件Nov 16, 2022 pm 08:43 PM
vscode自身是支持vue文件组件跳转到定义的,但是支持的力度是非常弱的。我们在vue-cli的配置的下,可以写很多灵活的用法,这样可以提升我们的生产效率。但是正是这些灵活的写法,导致了vscode自身提供的功能无法支持跳转到文件定义。为了兼容这些灵活的写法,提高工作效率,所以写了一个vscode支持vue文件跳转到定义的插件。
 Node.js 19正式发布,聊聊它的 6 大特性!Nov 16, 2022 pm 08:34 PM
Node 19已正式发布,下面本篇文章就来带大家详解了解一下Node.js 19的 6 大特性,希望对大家有所帮助!

 聊聊如何选择一个最好的Node.js Docker镜像?Dec 13, 2022 pm 08:00 PM
选择一个Node的Docker镜像看起来像是一件小事,但是镜像的大小和潜在漏洞可能会对你的CI/CD流程和安全造成重大的影响。那我们如何选择一个最好Node.js Docker镜像呢?

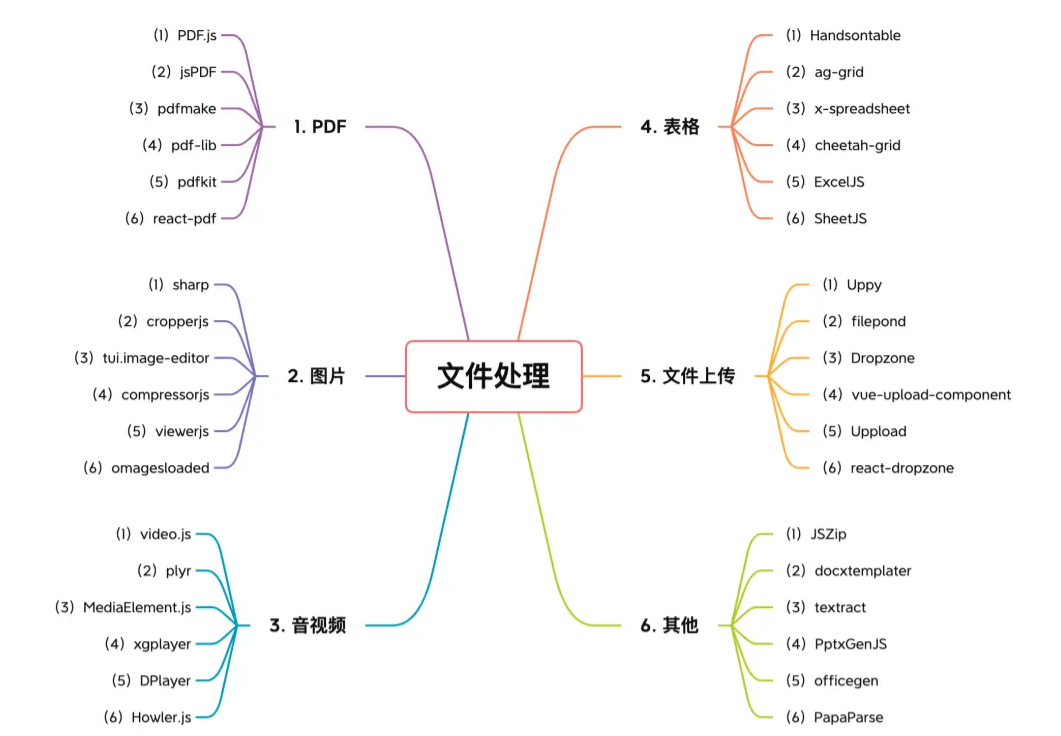 【6大类】实用的前端处理文件的工具库,快来收藏吧!Jul 15, 2022 pm 02:58 PM
本篇文章给大家整理和分享几个前端文件处理相关的实用工具库,共分成6大类一一介绍给大家,希望对大家有所帮助。


Hot AI Tools

Undresser.AI Undress
AI-powered app for creating realistic nude photos

AI Clothes Remover
Online AI tool for removing clothes from photos.

Undress AI Tool
Undress images for free

Clothoff.io
AI clothes remover

AI Hentai Generator
Generate AI Hentai for free.

Hot Article
Hot Tools

SAP NetWeaver Server Adapter for Eclipse
Integrate Eclipse with SAP NetWeaver application server.

EditPlus Chinese cracked version
Small size, syntax highlighting, does not support code prompt function

Dreamweaver Mac version
Visual web development tools

Notepad++7.3.1
Easy-to-use and free code editor

VSCode Windows 64-bit Download
A free and powerful IDE editor launched by Microsoft

