


Latest Laravel Mall Practical Video Tutorial")
Below I will create insert, update, delete and view and product pagination example. You just create new products, view products, edit products and remove products from the list.Step 1: Install Laravel 5.6
You can run the create-project command in the terminal to install Laravel:composer create-project --prefer-dist laravel/laravel blog(Related recommendations: "
How to install the Laravel framework through composer?》)
Step 2: Database configuration
After completing the installation, we will provide crud for laravel 5.6 The application performs database configuration such as database name, username, password, etc. So, let’s open the .env file and fill in the relevant information as follows: .envDB_CONNECTION=mysql DB_HOST=127.0.0.1 DB_PORT=3306 DB_DATABASE=here your database name(blog) DB_USERNAME=here database username(root) DB_PASSWORD=here database password(root)
Step 3: Create Product Table and Model
We will create crud application for product. So we have to create the migrations of the product table using Laravel 5.6 php artisan command, first use the following command:php artisan make:migration create_products_table --create=productsAfter executing this command, you can create the migrations in the path
database/migrations A file is found and the following code must be placed in the migrations file for creating the products table.
<?php
use Illuminate\Support\Facades\Schema;
use Illuminate\Database\Schema\Blueprint;
use Illuminate\Database\Migrations\Migration;
class CreateProductsTable extends Migration
{
/**
* Run the migrations.
*
* @return void
*/
public function up()
{
Schema::create('products', function (Blueprint $table) {
$table->increments('id');
$table->string('name');
$table->text('detail');
$table->timestamps();
});
}
/**
* Reverse the migrations.
*
* @return void
*/
public function down()
{
Schema::dropIfExists('products');
}
}
Step 4: Add resource routing
In this step, we need to add resource routing for the product crud application. So open routes/web.php file and add the following routes. routes/web.phpRoute::resource('products','ProductController');
Step 5: Create ProductController
Now, we should create a new controller ProductController. So run the following command and create a new controller. The following controller is used to create the resource controller. Create ProductControllerphp artisan make:controller ProductController --resource --model=ProductAfter the following command, you will find the new file in this path app/Http/Controllers/ProductController.php. In this controller, 7 methods will be created by default as follows:1)index()2)create()3)store()4)show()5)edit()6)update()7)destroy( )So, let’s copy the code below and put it in the ProductController.php file. app/Http/Controllers/ProductController.php
<?php
namespace App\Http\Controllers;
use App\Product;
use Illuminate\Http\Request;
class ProductController extends Controller
{
/**
* Display a listing of the resource.
*
* @return \Illuminate\Http\Response
*/
public function index()
{
$products = Product::latest()->paginate(5);
return view('products.index',compact('products'))
->with('i', (request()->input('page', 1) - 1) * 5);
}
/**
* Show the form for creating a new resource.
*
* @return \Illuminate\Http\Response
*/
public function create()
{
return view('products.create');
}
/**
* Store a newly created resource in storage.
*
* @param \Illuminate\Http\Request $request
* @return \Illuminate\Http\Response
*/
public function store(Request $request)
{
request()->validate([
'name' => 'required',
'detail' => 'required',
]);
Product::create($request->all());
return redirect()->route('products.index')
->with('success','Product created successfully.');
}
/**
* Display the specified resource.
*
* @param \App\Product $product
* @return \Illuminate\Http\Response
*/
public function show(Product $product)
{
return view('products.show',compact('product'));
}
/**
* Show the form for editing the specified resource.
*
* @param \App\Product $product
* @return \Illuminate\Http\Response
*/
public function edit(Product $product)
{
return view('products.edit',compact('product'));
}
/**
* Update the specified resource in storage.
*
* @param \Illuminate\Http\Request $request
* @param \App\Product $product
* @return \Illuminate\Http\Response
*/
public function update(Request $request, Product $product)
{
request()->validate([
'name' => 'required',
'detail' => 'required',
]);
$product->update($request->all());
return redirect()->route('products.index')
->with('success','Product updated successfully');
}
/**
* Remove the specified resource from storage.
*
* @param \App\Product $product
* @return \Illuminate\Http\Response
*/
public function destroy(Product $product)
{
$product->delete();
return redirect()->route('products.index')
->with('success','Product deleted successfully');
}
}OK, after running the following command, you will find app/Product.php and put the following content into the Product.php file :app/Product.php<?php
namespace App;
use Illuminate\Database\Eloquent\Model;
class Product extends Model
{
/**
* The attributes that are mass assignable.
*
* @var array
*/
protected $fillable = [
'name', 'detail'
];
}
Step 6: Create Blade file
Now we enter the final step. In this step, we just need to create the blade file. So we mainly need to create the layout file, then create a new folder "products", and then create the blade file of the crud app. Finally, you need to create the following blade files: 1) layout.blade.php2) index.blade.php3) show.blade.php4) form.blade.php5) create.blade.php6) edit.blade.phpLet us create the following file and put Enter the code below. resources/views/products/layout.blade.php<!DOCTYPE html>
<html>
<head>
<title>Laravel 5.6 CRUD Application</title>
<link href="https://cdnjs.cloudflare.com/ajax/libs/twitter-bootstrap/4.0.0-alpha/css/bootstrap.css" rel="stylesheet">
</head>
<body>
<div class="container">
@yield('content')
</div>
</body>
</html>resources/views/products/index.blade.php@extends('products.layout')
@section('content')
<div class="row">
<div class="col-lg-12 margin-tb">
<div class="pull-left">
<h2 id="Laravel-nbsp-nbsp-CRUD-nbsp-Example-nbsp-from-nbsp-scratch">Laravel 5.6 CRUD Example from scratch</h2>
</div>
<div class="pull-right">
<a class="btn btn-success" href="{{ route('products.create') }}"> Create New Product</a>
</div>
</div>
</div>
@if ($message = Session::get('success'))
<div class="alert alert-success">
<p>{{ $message }}</p>
</div>
@endif
<table class="table table-bordered">
<tr>
<th>No</th>
<th>Name</th>
<th>Details</th>
<th width="280px">Action</th>
</tr>
@foreach ($products as $product)
<tr>
<td>{{ ++$i }}</td>
<td>{{ $product->name }}</td>
<td>{{ $product->detail }}</td>
<td>
<form action="{{ route('products.destroy',$product->id) }}" method="POST">
<a class="btn btn-info" href="{{ route('products.show',$product->id) }}">Show</a>
<a class="btn btn-primary" href="{{ route('products.edit',$product->id) }}">Edit</a>
@csrf
@method('DELETE')
<button type="submit" class="btn btn-danger">Delete</button>
</form>
</td>
</tr>
@endforeach
</table>
{!! $products->links() !!}
@endsectionresources/views/products/show. blade.php@extends('products.layout')
@section('content')
<div class="row">
<div class="col-lg-12 margin-tb">
<div class="pull-left">
<h2 id="nbsp-Show-nbsp-Product"> Show Product</h2>
</div>
<div class="pull-right">
<a class="btn btn-primary" href="{{ route('products.index') }}"> Back</a>
</div>
</div>
</div>
<div class="row">
<div class="col-xs-12 col-sm-12 col-md-12">
<div class="form-group">
<strong>Name:</strong>
{{ $product->name }}
</div>
</div>
<div class="col-xs-12 col-sm-12 col-md-12">
<div class="form-group">
<strong>Details:</strong>
{{ $product->detail }}
</div>
</div>
</div>
@endsectionresources/views/products/create.blade.php@extends('products.layout')
@section('content')
<div class="row">
<div class="col-lg-12 margin-tb">
<div class="pull-left">
<h2 id="Add-nbsp-New-nbsp-Product">Add New Product</h2>
</div>
<div class="pull-right">
<a class="btn btn-primary" href="{{ route('products.index') }}"> Back</a>
</div>
</div>
</div>
@if ($errors->any())
<div class="alert alert-danger">
<strong>Whoops!</strong> There were some problems with your input.<br><br>
<ul>
@foreach ($errors->all() as $error)
<li>{{ $error }}</li>
@endforeach
</ul>
</div>
@endif
<form action="{{ route('products.store') }}" method="POST">
@csrf
<div class="row">
<div class="col-xs-12 col-sm-12 col-md-12">
<div class="form-group">
<strong>Name:</strong>
<input type="text" name="name" class="form-control" placeholder="Name">
</div>
</div>
<div class="col-xs-12 col-sm-12 col-md-12">
<div class="form-group">
<strong>Detail:</strong>
<textarea class="form-control" style="height:150px" name="detail" placeholder="Detail"></textarea>
</div>
</div>
<div class="col-xs-12 col-sm-12 col-md-12 text-center">
<button type="submit" class="btn btn-primary">Submit</button>
</div>
</div>
</form>
@endsectionresources/views/products/edit.blade.php@extends('products.layout')
@section('content')
<div class="row">
<div class="col-lg-12 margin-tb">
<div class="pull-left">
<h2 id="Edit-nbsp-Product">Edit Product</h2>
</div>
<div class="pull-right">
<a class="btn btn-primary" href="{{ route('products.index') }}"> Back</a>
</div>
</div>
</div>
@if ($errors->any())
<div class="alert alert-danger">
<strong>Whoops!</strong> There were some problems with your input.<br><br>
<ul>
@foreach ($errors->all() as $error)
<li>{{ $error }}</li>
@endforeach
</ul>
</div>
@endif
<form action="{{ route('products.update',$product->id) }}" method="POST">
@csrf
@method('PUT')
<div class="row">
<div class="col-xs-12 col-sm-12 col-md-12">
<div class="form-group">
<strong>Name:</strong>
<input type="text" name="name" value="{{ $product->name }}" class="form-control" placeholder="Name">
</div>
</div>
<div class="col-xs-12 col-sm-12 col-md-12">
<div class="form-group">
<strong>Detail:</strong>
<textarea class="form-control" style="height:150px" name="detail" placeholder="Detail">{{ $product->detail }}</textarea>
</div>
</div>
<div class="col-xs-12 col-sm-12 col-md-12 text-center">
<button type="submit" class="btn btn-primary">Submit</button>
</div>
</div>
</form>
@endsectionNow, we are ready Run our crud application example, so run the following command to quickly run:php artisan serveFinally you can open the following URL on the browser to view the test:
http://localhost:8000/productsThis article is Regarding the CURD operations in Laravel 5.6, namely create, read, update and delete operations, I hope it will be helpful to friends in need!
The above is the detailed content of CURD operations in Laravel 5.6 (detailed code examples). For more information, please follow other related articles on the PHP Chinese website!

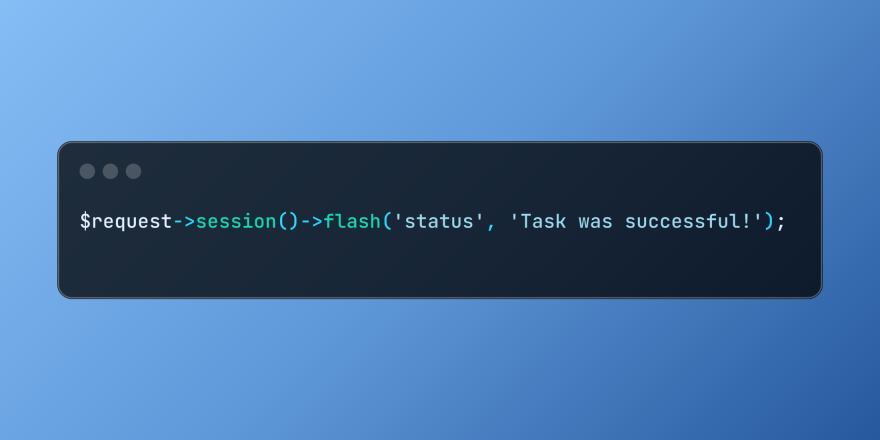 Working with Flash Session Data in LaravelMar 12, 2025 pm 05:08 PM
Laravel simplifies handling temporary session data using its intuitive flash methods. This is perfect for displaying brief messages, alerts, or notifications within your application. Data persists only for the subsequent request by default: $request-
 cURL in PHP: How to Use the PHP cURL Extension in REST APIsMar 14, 2025 am 11:42 AM
The PHP Client URL (cURL) extension is a powerful tool for developers, enabling seamless interaction with remote servers and REST APIs. By leveraging libcurl, a well-respected multi-protocol file transfer library, PHP cURL facilitates efficient execution of various network protocols, including HTTP, HTTPS, and FTP. This extension offers granular control over HTTP requests, supports multiple concurrent operations, and provides built-in security features.
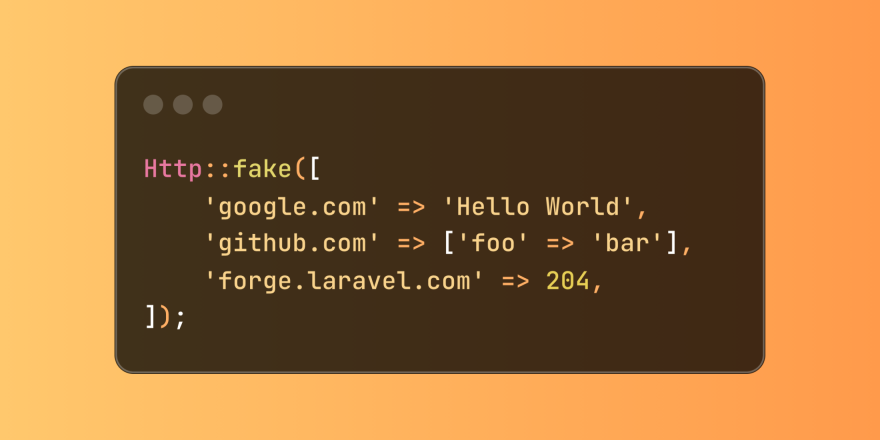 Simplified HTTP Response Mocking in Laravel TestsMar 12, 2025 pm 05:09 PM
Laravel provides concise HTTP response simulation syntax, simplifying HTTP interaction testing. This approach significantly reduces code redundancy while making your test simulation more intuitive. The basic implementation provides a variety of response type shortcuts: use Illuminate\Support\Facades\Http; Http::fake([ 'google.com' => 'Hello World', 'github.com' => ['foo' => 'bar'], 'forge.laravel.com' =>
 PHP Logging: Best Practices for PHP Log AnalysisMar 10, 2025 pm 02:32 PM
PHP logging is essential for monitoring and debugging web applications, as well as capturing critical events, errors, and runtime behavior. It provides valuable insights into system performance, helps identify issues, and supports faster troubleshoot
 12 Best PHP Chat Scripts on CodeCanyonMar 13, 2025 pm 12:08 PM
Do you want to provide real-time, instant solutions to your customers' most pressing problems? Live chat lets you have real-time conversations with customers and resolve their problems instantly. It allows you to provide faster service to your custom
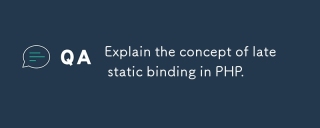 Explain the concept of late static binding in PHP.Mar 21, 2025 pm 01:33 PM
Article discusses late static binding (LSB) in PHP, introduced in PHP 5.3, allowing runtime resolution of static method calls for more flexible inheritance.Main issue: LSB vs. traditional polymorphism; LSB's practical applications and potential perfo
 Customizing/Extending Frameworks: How to add custom functionality.Mar 28, 2025 pm 05:12 PM
The article discusses adding custom functionality to frameworks, focusing on understanding architecture, identifying extension points, and best practices for integration and debugging.
 Alipay PHP SDK transfer error: How to solve the problem of 'Cannot declare class SignData'?Apr 01, 2025 am 07:21 AM
Alipay PHP...


Hot AI Tools

Undresser.AI Undress
AI-powered app for creating realistic nude photos

AI Clothes Remover
Online AI tool for removing clothes from photos.

Undress AI Tool
Undress images for free

Clothoff.io
AI clothes remover

AI Hentai Generator
Generate AI Hentai for free.

Hot Article
Hot Tools

WebStorm Mac version
Useful JavaScript development tools

SAP NetWeaver Server Adapter for Eclipse
Integrate Eclipse with SAP NetWeaver application server.

MantisBT
Mantis is an easy-to-deploy web-based defect tracking tool designed to aid in product defect tracking. It requires PHP, MySQL and a web server. Check out our demo and hosting services.

SublimeText3 Chinese version
Chinese version, very easy to use

Dreamweaver Mac version
Visual web development tools

