


This article brings you a graphic tutorial on how to implement hot deployment of SpringBoot in IntelliJ IDEA. It has certain reference value. Friends in need can refer to it. I hope it will be helpful to you.
During the actual development process, the code is often modified to restart the application. Each manual restart is troublesome and has low development efficiency, so hot deployment is very necessary for development. This article will introduce how to restart the application in IntelliJ IDEA (version 2018.2 .5) Implement hot deployment of SpringBoot project.
This article uses spring-boot-devtools to implement hot deployment. Just follow the following two steps to complete it.
1. Modify pom.xml
spring-boot-devtools is a module that serves developers, the most important function of which is hot deployment. The principle is to restart the application after discovering changes in the code, but it is faster than manually stopping and restarting. The underlying principle is to use two ClassLoaders. One ClassLoader loads classes that will not change (third-party Jar packages), and the other ClassLoader loads classes that will change, called restart ClassLoader. In this way, when there are code changes, the original The restart ClassLoader is discarded and a restart ClassLoader is re-created. Since there are fewer classes to be loaded, a faster restart time is achieved. That is, devtools will monitor file changes under the classpath and will immediately restart the application (occurring at the time of saving)
After configuring spring-boot-devtools, the specific pom.xml file content is as follows:
org.springframework.boot
spring-boot-starter-web
org.springframework.boot
spring-boot-starter-test
test
<!-- 引入热部署jar包 -->
org.springframework.boot
spring-boot-devtools
<!-- optional=true,依赖不会传递,该项目依赖devtools;之后依赖该项目的项目如果想要使用devtools,需要重新引入 -->
true
<!-- 引入热部署依赖插件 -->
org.springframework.boot
spring-boot-maven-plugin
<!-- IntelliJ IDEA本地测试去掉fork也生效 -->
true
2 . Turn on idea automatic compilation and automake function
(1). Settings --> Compile --> Build project automatically --> Check

idea settings automatic compilation screenshot
(2). CTRL SHIFT ALT / --> Find Registry --> Find and check compiler.automake.allow.when.app.running

idea settings compile.automake screenshot
After completing the above two steps, you can implement hot start in IntelliJ IDEA.
Warm reminder: After turning on the idea automatic compilation and automake functions, you must restart IntelliJ IDEA
The above is the detailed content of Graphical tutorial on how SpringBoot implements hot deployment in IntelliJ IDEA. For more information, please follow other related articles on the PHP Chinese website!

 怎么使用SpringBoot+Canal实现数据库实时监控May 10, 2023 pm 06:25 PM
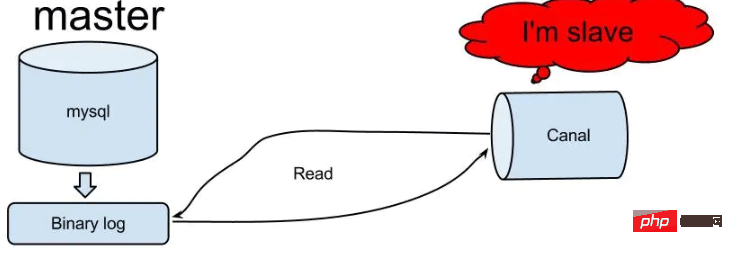
Canal工作原理Canal模拟MySQLslave的交互协议,伪装自己为MySQLslave,向MySQLmaster发送dump协议MySQLmaster收到dump请求,开始推送binarylog给slave(也就是Canal)Canal解析binarylog对象(原始为byte流)MySQL打开binlog模式在MySQL配置文件my.cnf设置如下信息:[mysqld]#打开binloglog-bin=mysql-bin#选择ROW(行)模式binlog-format=ROW#配置My
 Spring Boot怎么使用SSE方式向前端推送数据May 10, 2023 pm 05:31 PM
前言SSE简单的来说就是服务器主动向前端推送数据的一种技术,它是单向的,也就是说前端是不能向服务器发送数据的。SSE适用于消息推送,监控等只需要服务器推送数据的场景中,下面是使用SpringBoot来实现一个简单的模拟向前端推动进度数据,前端页面接受后展示进度条。服务端在SpringBoot中使用时需要注意,最好使用SpringWeb提供的SseEmitter这个类来进行操作,我在刚开始时使用网上说的将Content-Type设置为text-stream这种方式发现每次前端每次都会重新创建接。最
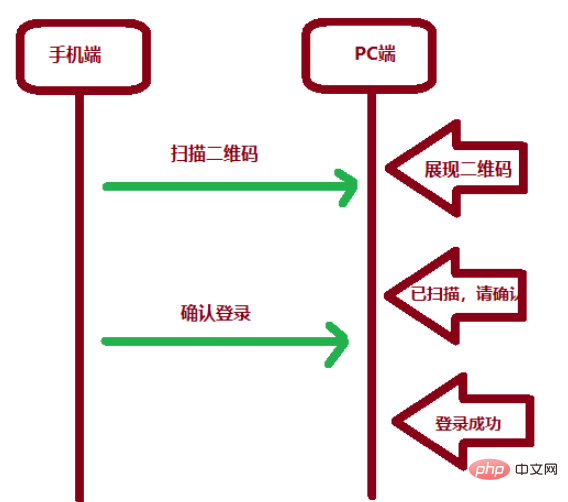 SpringBoot怎么实现二维码扫码登录May 10, 2023 pm 08:25 PM
一、手机扫二维码登录的原理二维码扫码登录是一种基于OAuth3.0协议的授权登录方式。在这种方式下,应用程序不需要获取用户的用户名和密码,只需要获取用户的授权即可。二维码扫码登录主要有以下几个步骤:应用程序生成一个二维码,并将该二维码展示给用户。用户使用扫码工具扫描该二维码,并在授权页面中授权。用户授权后,应用程序会获取一个授权码。应用程序使用该授权码向授权服务器请求访问令牌。授权服务器返回一个访问令牌给应用程序。应用程序使用该访问令牌访问资源服务器。通过以上步骤,二维码扫码登录可以实现用户的快
 SpringBoot/Spring AOP默认动态代理方式是什么May 10, 2023 pm 03:52 PM
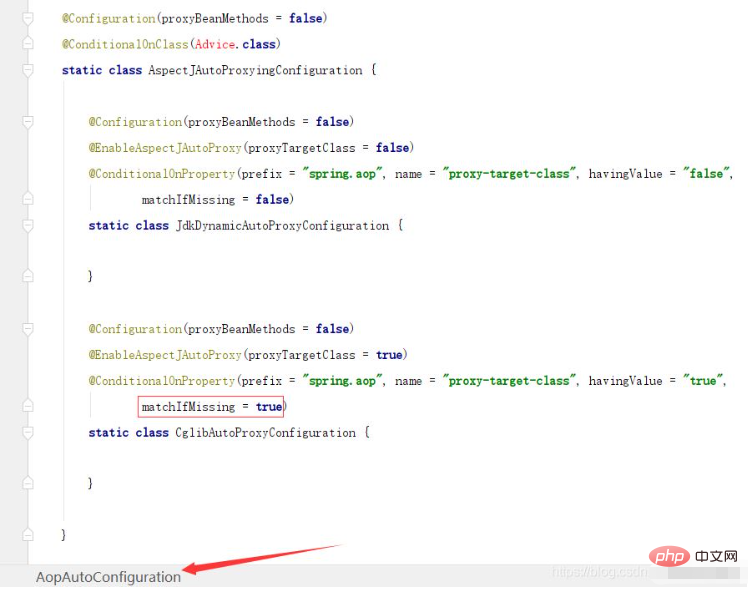
1.springboot2.x及以上版本在SpringBoot2.xAOP中会默认使用Cglib来实现,但是Spring5中默认还是使用jdk动态代理。SpringAOP默认使用JDK动态代理,如果对象没有实现接口,则使用CGLIB代理。当然,也可以强制使用CGLIB代理。在SpringBoot中,通过AopAutoConfiguration来自动装配AOP.2.Springboot1.xSpringboot1.xAOP默认还是使用JDK动态代理的3.SpringBoot2.x为何默认使用Cgl
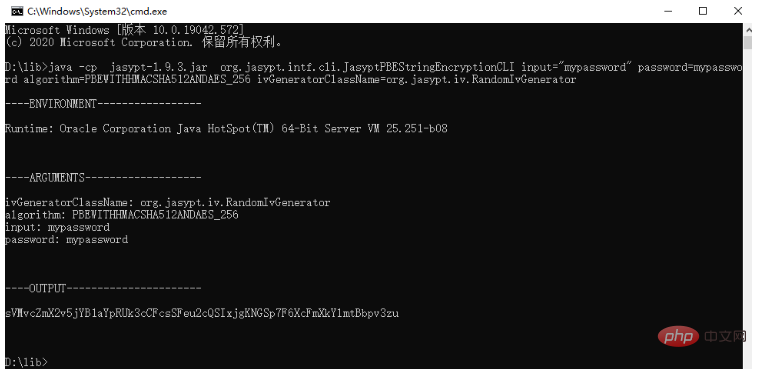 spring boot怎么对敏感信息进行加解密May 10, 2023 pm 02:46 PM
我们使用jasypt最新版本对敏感信息进行加解密。1.在项目pom文件中加入如下依赖:com.github.ulisesbocchiojasypt-spring-boot-starter3.0.32.创建加解密公用类:packagecom.myproject.common.utils;importorg.jasypt.encryption.pbe.PooledPBEStringEncryptor;importorg.jasypt.encryption.pbe.config.SimpleStrin
 使用Java SpringBoot集成POI实现Word文档导出Apr 21, 2023 pm 12:19 PM
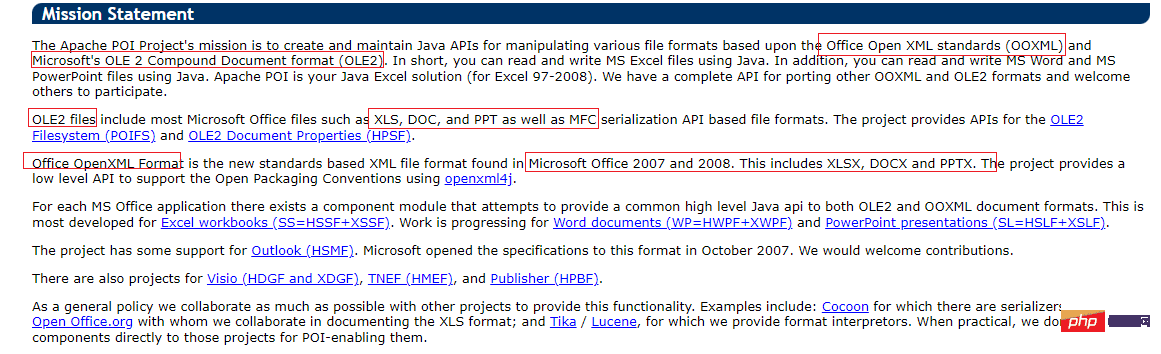
知识准备需要理解ApachePOI遵循的标准(OfficeOpenXML(OOXML)标准和微软的OLE2复合文档格式(OLE2)),这将对应着API的依赖包。什么是POIApachePOI是用Java编写的免费开源的跨平台的JavaAPI,ApachePOI提供API给Java程序对MicrosoftOffice格式档案读和写的功能。POI为“PoorObfuscationImplementation”的首字母缩写,意为“简洁版的模糊实现”。ApachePOI是创建和维护操作各种符合Offic
 springboot怎么整合shiro实现多验证登录功能May 10, 2023 pm 04:19 PM
1.首先新建一个shiroConfigshiro的配置类,代码如下:@ConfigurationpublicclassSpringShiroConfig{/***@paramrealms这儿使用接口集合是为了实现多验证登录时使用的*@return*/@BeanpublicSecurityManagersecurityManager(Collectionrealms){DefaultWebSecurityManagersManager=newDefaultWebSecurityManager();
 SpringBoot项目打包发布到外部tomcat遇到的问题怎么解决May 10, 2023 pm 05:49 PM
先说遇到问题的情景:初次尝试使用springboot框架写了个小web项目,在IntellijIDEA中能正常启动运行。使用maven运行install,生成war包,发布到本机的tomcat下,出现异常,主要的异常信息是.......LifeCycleException。经各种搜索,找到答案。springboot因为内嵌tomcat容器,所以可以通过打包为jar包的方法将项目发布,但是如何将springboot项目打包成可发布到tomcat中的war包项目呢?1.既然需要打包成war包项目,首


Hot AI Tools

Undresser.AI Undress
AI-powered app for creating realistic nude photos

AI Clothes Remover
Online AI tool for removing clothes from photos.

Undress AI Tool
Undress images for free

Clothoff.io
AI clothes remover

AI Hentai Generator
Generate AI Hentai for free.

Hot Article
Hot Tools

SublimeText3 Chinese version
Chinese version, very easy to use

Dreamweaver Mac version
Visual web development tools

WebStorm Mac version
Useful JavaScript development tools

Notepad++7.3.1
Easy-to-use and free code editor

SecLists
SecLists is the ultimate security tester's companion. It is a collection of various types of lists that are frequently used during security assessments, all in one place. SecLists helps make security testing more efficient and productive by conveniently providing all the lists a security tester might need. List types include usernames, passwords, URLs, fuzzing payloads, sensitive data patterns, web shells, and more. The tester can simply pull this repository onto a new test machine and he will have access to every type of list he needs.

