Home >Web Front-end >JS Tutorial >Detailed code explanation of image upload, compression, splicing and rotation based on input under vue
Detailed code explanation of image upload, compression, splicing and rotation based on input under vue
- 不言forward
- 2018-11-26 14:41:452959browse
This article brings you an introduction to the implementation code of PHP queue. It has certain reference value. Friends in need can refer to it. I hope it will be helpful to you.
As a front-end staff, I believe that when developing systems, you often encounter the need to save uploaded images for users. When many novices encounter this problem, Everyone will be shocked, thinking it will be a difficult problem. When you finish reading this article, you will find that you are doing it blindly. The truth is that simple. Let’s get to the point:
Image file upload
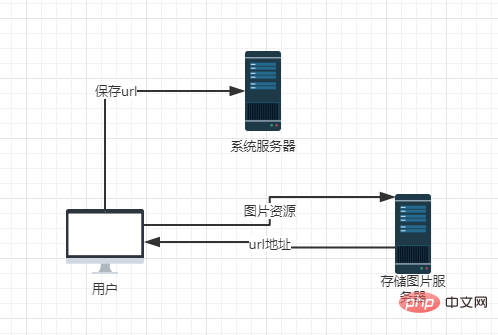
Many projects now save images in the system. Most of them just save the URL of the corresponding image in the system database, while the actual image resources will be placed on image servers such as Alibaba. , of course, there are also some projects that choose to save image strings in base64 format in their own databases. Here are some specific implementations of these two methods. The implementation is illustrated with a vue instance:

First, we need to obtain image resources from the user. At this time, we need to use the <input> tag of html, the type value is file, and the input tag is specified as the file type. Form input, and set its accept attribute to "image/*", specifying that only image resource files will be accepted;
<input>
Next, we will get the file selected by the user. When the user selects the file , the change event of the input tag will be triggered. We can obtain the image file by listening to the event and obtaining the event object event:
<input>
After clicking to obtain the file, we can obtain $ through the $event object. event.target.files[0] to obtain the image resource file object. As for why the index value is added, it is because the file upload input form supports multiple file uploads. You only need to add the multiple attribute to the input tag; we can take a look. Some attributes of the image file object:

After observation, we found that there is a size attribute in the file object, indicating the size of the image. We can verify the Whether the value of the attribute is empty is used to check whether the file has been obtained by us for the specified operation;
fileChange(el, index) {
    if (!el.target.files[0].size) return;
}
At this point, we have obtained the file object we want. Next, we implement the image compression function and name it For the compress function:
Image Compression
First of all, we need to compress our image resources. The first step must be to obtain the image resources, and then simply verify them;
 compress(event) {
        var file = event.target.files;
        var reader = new FileReader(), imgFile = file[0];
        if (imgFile.type.indexOf('image') == 0) {
          reader.readAsDataURL(imgFile);
        } else {
          this.$Message.infor('文件类型仅为图片')
        }
 }
Some people here may not understand the FileReader object. The FileReader object allows Web applications to asynchronously read the contents of files (or raw data buffers) stored on the user's computer. Use a File or Blob object to specify the content to be read. The file or data fetched, here we mainly use it to monitor onload to determine whether the reading is completed. When the reading is completed, we assign the reading result to our newly created Image object as the object for subsequent compression; this is the time , we will find that the result we read is actually a string in base64 format
(very long..., I just mean it)

At this point, we will find that the base64 string appears here. It can be copied as a value to the src attribute of the  tag. It can also achieve the goal of rendering the image, so some people choose to save it. Pictures in this format; however, it is not a mainstream method, and it will also cause our database to be too redundant;
 compress(event) {
        var file = event.target.files;
        var reader = new FileReader(), imgFile = file[0];
        if (imgFile.type.indexOf('image') == 0) {
          reader.readAsDataURL(imgFile);
        } else {
          this.$Message.infor('文件类型仅为图片')
        }
        let img = new Image();
        reader.onload = function (e) {
          img.src = e.target.result;
        };
 }
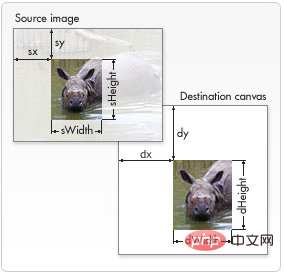
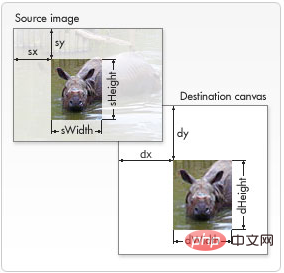
To compress pictures, we mainly use canvas to achieve this function, through canvas.getContext(' 2d').drawImage() method redraws the image, and uses the canvas.toDataURL(type, encoderOptions) method to return a dataURI containing the image display, type is the image format, encoderOptions is the clarity of the image, increments from 0 to 1, this compression The process is not difficult to understand. The idea is to obtain the height and width of the image, calculate its pixel size, and compare it with a limit value set by yourself to see if our size needs to be compressed. For example, the ratio in the example represents the width and height of the image. Compression ratio, we can modify the file size of the image without changing the width and height, and redraw the image through drawImage(image, sx, sy, sWidth, sHeight, dx, dy, dWidth, dHeight), which can pass in nine The parameters respectively represent the elements drawn into the context, the X coordinate of the upper left corner of the rectangular selection box of the source image, the Y coordinate of the upper left corner of the rectangular selection box of the source image, the width of the rectangular selection box of the source image, and the rectangular selection box of the source image. The height of the target canvas, the upper left corner of the target canvas is at the position of the X axis on the target canvas, the upper left corner of the target canvas is at the position of the Y axis on the target canvas, the width of the image drawn on the target canvas, and the height of the image drawn on the target canvas;

整个函数实现如下:
compress(event) {
        var file = event.target.files;
        var reader = new FileReader(), imgFile = file[0];
        if (imgFile.type.indexOf('image') == 0) {
          reader.readAsDataURL(imgFile);
        } else {
          this.$Message.infor('文件类型仅为图片')
        }
        let img = new Image();
        reader.onload = function (e) {
          img.src = e.target.result;
        };
        var imgP = new Promise((resolve, reject) => {
          img.onload = () => {
            var canvas = document.createElement("canvas");
            var ctx = canvas.getContext('2d');
            //    瓦片canvas
            var tCanvas = document.createElement("canvas");
            var tctx = tCanvas.getContext("2d");
            var initSize = img.src.length;
            var width = img.width;
            var height = img.height;
            //图片像素大于400万像素,计算压缩到400万以下
            var ratio;
            if ((ratio = width * height / 4000000) > 1) {
              ratio = Math.sqrt(ratio);
              width /= ratio;
              height /= ratio;
            } else {
              ratio = 1;
            }
            canvas.width = width;
            canvas.height = height;
            ctx.fillStyle = "#fff";
            ctx.fillRect(0, 0, canvas.width, canvas.height);
            //如果图片太大则使用瓦片绘制
            var count;
            if ((count = width * height / 1000000 > 1)) {
              count = ~~(Math.sqrt(count) + 1);//计算分成的瓦片数
              var nw = ~~(width / count);
              var nh = ~~(height / count);
              tCanvas.width = nw;
              tCanvas.height = nh;
              for (var i = 0; i <h2>图片拼接</h2><p>需要注意的一点了,上面压缩的过程使用了瓦片绘制,可能会导致拼接过程中不紧凑而产生一条间隙,这个只需要调整一下绘制瓦片的坐标位置即可,该思想同样可以用于处理图片拼接的问题,可按照上面思路进行拼接,这里就不再举例子说明了,瓦片绘制就是图片拼接的过程;</p><h2>图片旋转</h2><p>压缩和拼接都讲完啦,在对图片进行处理,大家都有自己的见解了,或许你们还会这么说,那如果我上传图片的时候,像把那些横着排的照片,也放成竖起来,要怎么处理,竟调整图片放置的方向,该怎么处理,这就需要用到canvas的rotate方法去实现了,老方法,我们先获取图片对象,因为之前的压缩是放回一个promise对象,data参数为img的base64格式,所以我们把旋转函数的参数定义为图片来源;</p><pre class="brush:php;toolbar:false">rotate(imgData) {
        var img = new Image();
        img.src = imgData;
        var imgR = new Promise((resolve, reject) => {
         img.onload = ()=>{
            console.log(img.width)
             console.log(img.naturalWidth)
          }
        })
      },
这里需要注意的是,每次我们新建一个image对象,想要获取其一些响应的属性值,一定要在onload方法中,确保图片已经加载完毕,上面的console中输出了两个值,width和naturalWidth,在某中条件下,他们会是相等的,比如我们上面,也会存在不一致的时候,因为naturalWidth返回的依然是图片的真实尺寸,而width返回的是给img标签规定的尺寸,所以我们需要获取的是naturalWidth;
rotate(imgData) {
        var img = new Image();
        img.src = imgData;
        var imgR = new Promise((resolve, reject) => {
          img.onload = () => {
            let degree = 0, drawHeight, drawWidth;
            drawHeight = img.naturalHeight;
            drawWidth = img.naturalWidth;
            let maxSide = Math.max(drawWidth, drawHeight);
            if (maxSide === drawWidth) {//判断需要旋转的角度
              degree = 90;
            } else {
              degree = 360;
            }
            var canvas = document.createElement('canvas');
            canvas.width = drawWidth;
            canvas.height = drawHeight;
            var context = canvas.getContext('2d');
            context.translate(drawWidth/2,drawHeight/2)//这一行和下下一行的作用是修改选择中心
            context.rotate(degree*Math.PI/180);//旋转图片
            context.translate(-drawWidth/2,-drawHeight/2)//这一行和上上一行的作用是修改选择中心
            context.drawImage(img, 0, 0, drawWidth, drawHeight);
            var ndata = canvas.toDataURL('image/jpeg', 1);
            context.width = context.height = 0;
            resolve(ndata)

          }
        })

        return Promise.all([imgR])
      }
旋转效果如下,宽大于高的,即是横排的图片,就会发生旋转;

总结
在vue下利用canvas实现上述功能后,发现了canvas在图片处理这块的强大功能,对于前端上传图片性能的优化会有很大的帮助;经过上述的时间,发现要实现用户的上传图片前的裁剪功能,以及可以利用canvas来实现,主要是利用drawImage控制裁剪的长度,起点坐标就可以实现,着实好用!
The above is the detailed content of Detailed code explanation of image upload, compression, splicing and rotation based on input under vue. For more information, please follow other related articles on the PHP Chinese website!

