Home >Backend Development >Python Tutorial >Implementation method of Django book character adaptation system in python (backend)
Implementation method of Django book character adaptation system in python (backend)
- 不言forward
- 2018-11-15 15:18:213058browse
The content of this article is about the implementation method (backend) of the Django book character adaptation system in python. It has certain reference value. Friends in need can refer to it. I hope it will be helpful to you.
Django
There are many different web frameworks under Python. Django is the most representative of the heavyweight players. Many successful websites and apps are based on Django.
Django is an open source web application framework written in Python.
Django Basics
Version: Django 1.10
Use Pycharm to create a new project Django, named FirstDjango
There are FirstDjango directory, templates directory, manage.py File
Run the manage.py file similar to the flask_script command line
 python manage.py makemigrations   #相当于初始化数据库表
 python manage.py migrate #相当于数据库迁移命令,这里的数据库存储都是放在db.sqlite3文件里
 python manage.py createsuperuser #创建超级用户,生成db.sqlite3文件
 python manage.py runserver 7899 #默认端口号:8000
Visit http://127.0.0.1:7899/, you can see the It worked page, but the APP has not actually been run yet

Modify language, time zone (setting.py)
# LANGUAGE_CODE = 'en-us'
LANGUAGE_CODE = 'zh-hans'

# TIME_ZONE = 'UTC'
TIME_ZONE = 'Asia/Shanghai'
Django is different from flask in that you don’t need to restart the program every time you modify the code.
http://127.0.0.1:7899/admin/, you can access the background management
Here you can add new users and new groups. New users and groups can be assigned rights, but they cannot execute Super user's distribution permission function
Example: Add 'Can add group' to the add_group group'
Create user normal, belong to the add_group group, and check the employee status (indicate whether the user can log in to this management site).
When logging in to the background management as a normal user, there will only be an option to add a group.

Create your own application (app) -- book
terminal input
python manage.py startapp book
will Generate the book/directory in the current project
After creating your own application file, first register the application setting.py in the project
INSTALLED_APPS = [
    'django.contrib.admin',
    'django.contrib.auth',
    'django.contrib.contenttypes',
    'django.contrib.sessions',
    'django.contrib.messages',
    'django.contrib.staticfiles',
    'book',
]
Start writing the database structure (model.py)
First determine what the database tables are: books, characters.
Then determine the structure of each table. The attributes of the book are: id, title, publication time, abstract, cover. Character attributes: id, name, gender, introduction, book.
Finally determine the relationship between the tables: there are multiple characters in a book, write foreign keys in the character database table
In the Django framework structure, there is no need to write reverse references like flask
# book/models.py
from django.db import models

# Create your models here.
class BookInfo(models.Model):
    # 这里不需要写id,Django框架默认会生成id,并作为主键pk
    btitle = models.CharField(max_length=100,unique=True,verbose_name='书籍标题')     # 表示在后台管理中这一栏的中文显示
    bpub_time  = models.DateField(verbose_name='出版时间')
    # bcontent = models.TextField(default='摘要',verbose_name='书籍摘要')
    # bimg = models.ImageField(default=None,upload_to='static/uploads/')
    class Meta:    ##表示这个数据库表在后台中的中文显示,因为英语区分单复数,所以需要写上单复数的中文显示
        verbose_name = '书籍信息'
        verbose_name_plural = '书籍信息'
    def __str__(self):
        return '%s' %(self.btitle)

class HeroInfo(models.Model):
    hname = models.CharField(max_length=50,verbose_name='人物姓名')
    hgender = models.BooleanField(default=True,verbose_name='人物性别')
    # 任务简介
    hcontent = models.TextField(verbose_name='人物简介')
    # 多的一端写外键
    hbook = models.ForeignKey(BookInfo,verbose_name='所属书籍')
    @property
    def gender(self):
        if self.hgender:
            return '男'
        else:
            return '女'
    class Meta:
        verbose_name = '人物信息'
        verbose_name_plural = '人物信息'
    def __str__(self):
        return '%s' %(self.hname)
Use sqlite3 file type database
Django uses sqlit3 database by default, which can be viewed in the project’s setting.py file
DATABASES = {
    'default': {
         'ENGINE': 'django.db.backends.sqlite3',
         'NAME': os.path.join(BASE_DIR, 'db.sqlite3'),
     }
}
After writing the models.py file of the application book, we start to create Database
python manage.py makemigrations
python manage.py migrate
How to enter the sqlite3 database table
python manage.py shell #打开类似数据库交互命令的窗口
1. Adding data to the database
>>> from book.models import BookInfo,HeroInfo
>>> from datetime import date
>>> book1 = BookInfo(btitle='小王子',bpub_time=date(1942,5,13))
>>> book1.save()
2. Searching the database
>>> BookInfo.objects.all()
<queryset>]></queryset>
Search based on specified information
>>> book = BookInfo.objects.get(id=1)
>>> book.btitle
'小王子'
3. Modification of database data
>>> book1.btitle = '安徒生童话'
>>> book1.save()
>>> book = BookInfo.objects.get(id=1)
>>> book.btitle
'安徒生童话'
4. Deletion of database data
>>> book = BookInfo.objects.get(id=1)
>>> book.delete()
(1, {'book.HeroInfo': 0, 'book.BookInfo': 1})
>>> book = BookInfo.objects.all()
>>>
5. Between database tables Association
First, create database table information without foreign keys
>>> book1 = BookInfo(btitle='小王子',bpub_time=date(1942,5,13))
>>> book2 = BookInfo(btitle='睡美人',bpub_time=date(1952,6,29))
>>> book1.save()
>>> book2.save()
Then, create database table information with foreign keys
1. Create characters directly according to the data table structure
>>> hero1 = HeroInfo(hname='小王子',hgender=True,hcontent='小王子没有被成人那骗人的世界所征服',hbook=book1)
>>> hero1 = HeroInfo(hname='玫瑰花',hgender=False,hcontent='玫瑰花的虚荣心伤害了小王子对她的感情',hbook=book1)
>>> hero1.save()
>>> hero2.save()
2. Add characters based on the character information corresponding to known books
>>> book1 = BookInfo.objects.get(id=2)
>>> book1.heroinfo_set.all()
<queryset>, <heroinfo:>]>
>>> book1.heroinfo_set.create(hname='小狐狸',hgender=True,hcontent='肉眼看不见事务的本质,只有用心灵才能洞察一切')
<heroinfo:></heroinfo:></heroinfo:></queryset>
There are two ways to query character information
1. Directly search according to the character database table
>>> HeroInfo.objects.all()
<queryset>, <heroinfo:>]></heroinfo:></queryset>
2. Find based on the relationship with the data object
>>> book1 = BookInfo.objects.get(id=2)
>>> book1.heroinfo_set.all()
<queryset>, <heroinfo:>]>
>>></heroinfo:></queryset>
Use the mysql file type database
Modify the database configuration in the setting.py file
# Database
# https://docs.djangoproject.com/en/1.10/ref/settings/#databases

DATABASES = {
    'default': {
        # 'ENGINE': 'django.db.backends.sqlite3',
        # 'NAME': os.path.join(BASE_DIR, 'db.sqlite3'),
        'ENGINE': 'django.db.backends.mysql',
        'NAME': 'firstdjango',    #数据库名称,若没有的话,先在数据库中建立
        'USER': 'root',
        'PASSWORD': 'sheen',
        'HOST': 'localhost',
        'PORT': '3306',
    }
}
If you directly initialize the database here, an error will be reported
django.core.exceptions.ImproperlyConfigured: Error loading MySQLdb module: No module named 'MySQLdb'
You need to set the __init__.py file of the project
# \PycharmProjects\FristDjango\FristDjango\__init__.py
import pymysql
pymysql.install_as_MySQLdb()
Run the command on the terminal, in the mysql database, just All table information can be viewed
 python manage.py makemigrations
 python manage.py migrate
Operation of the database by the site
It is particularly inconvenient to operate the database through commands. We implement the operation of the database through the background management web page
First, you need to register the database table in the admin.py file
#book/admin
from django.contrib import admin
from book.models import BookInfo,HeroInfo
# Register your models here.
admin.site.register(BookInfo)
admin.site.register(HeroInfo)

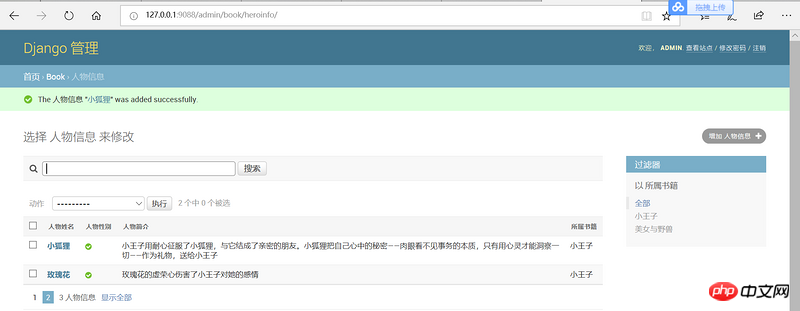
The book information only displays the title, and the character information only displays the name, which is not conducive to viewing. Modify the registered table structure
#book/admin.py
from django.contrib import admin
from book.models import BookInfo,HeroInfo
# Register your models here.
class BookInfoAdmin(admin.ModelAdmin):
    list_display = ['btitle','bpub_time']
class HeroInfoAdmin(admin.ModelAdmin):
    list_display = ['hname','hgender','hcontent','hbook']   #显示栏
    list_filter = ['hbook'] #过滤器
    search_fields = ['hname','hbook']   #搜索栏
    list_per_page = 2   #每页显示多少条数据
admin.site.register(BookInfo,BookInfoAdmin)
admin.site.register(HeroInfo,HeroInfoAdmin)

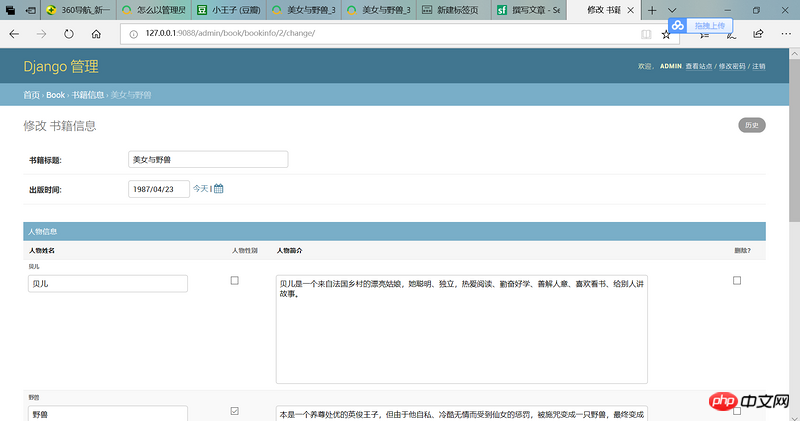
How to add characters directly to the book table, web page display effect: If you jump to the book details page, you can add characters directly
Add the HeroInline class and modify the BookInfoAdmin Class
# book/admin.py
class HeroInline(admin.TabularInline):
    model = HeroInfo
    extra = 2   #每次增加两个添加人物的表单


class BookInfoAdmin(admin.ModelAdmin):
    list_display = ['btitle','bpub_time']
    inlines = [HeroInline]

The above is the detailed content of Implementation method of Django book character adaptation system in python (backend). For more information, please follow other related articles on the PHP Chinese website!

