Home >Web Front-end >CSS Tutorial >Tips and tricks to implement custom selection boxes with css (code example)
Tips and tricks to implement custom selection boxes with css (code example)
- 不言Original
- 2018-11-06 10:36:482295browse
Most people will find it a bit troublesome to style the selection box, but this article will help you. You can basically delete the original selection as much as possible, and then use div wrapping for styling (applicable to IE8 ), without further ado, let’s get straight into the text.
This method seems very simple. You can set the style according to your own needs (recommended course: css video tutorial)
The code is as follows:
HTML:
<div class="select-style">
  <select>
    <option value="city1">合肥</option>
    <option value="city2">南京</option>
    <option value="city3">芜湖</option>
    <option value="city4">杭州</option>
  </select></div>
CSS:
.select-style {
    border: 1px solid #ccc;
    width: 120px;
    border-radius: 3px;
    overflow: hidden;
    background: #fafafa url("image/greatwall.jpg") no-repeat 90% 50%;
    }
    .select-style select {
    padding: 5px 8px;
    width: 130%;
    border: none;
    box-shadow: none;
    background: transparent;
    background-image: none;
    -webkit-appearance: none;
    color: lightblue;
    }
    .select-style select:focus {
    outline: none;
    }
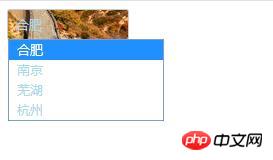
The effect is as follows:

The above is the detailed content of Tips and tricks to implement custom selection boxes with css (code example). For more information, please follow other related articles on the PHP Chinese website!

