Home >Backend Development >Python Tutorial >The principle and implementation of K-nearest neighbor algorithm in python (source code attached)
The principle and implementation of K-nearest neighbor algorithm in python (source code attached)
- 不言forward
- 2018-10-27 14:21:554257browse
The content this article brings to you is about the principle and implementation of the K-nearest neighbor algorithm in Python (source code attached). It has certain reference value. Friends in need can refer to it. I hope it will be helpful to you.
The k-nearest neighbor algorithm performs classification by measuring the distance between different feature values.
k-Nearest Neighbor Algorithm Principle
For a training sample set with labels, after inputting new data without labels, each feature of the new data is concentrated with the sample The characteristics corresponding to the data are compared, and the top k most similar data in the sample data set are selected according to the algorithm, and the classification with the most occurrences among the k most similar data is selected as the classification of the new data.
k-Nearest Neighbor Algorithm Implementation
Here is only the prediction of a single new data, and the prediction of multiple new data at the same time is placed later.
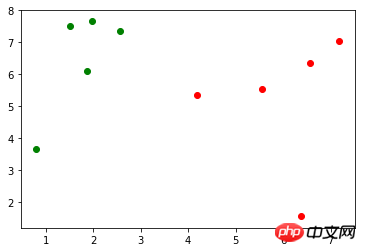
Assume that there is a training sample set X_train (X_train.shape=(10, 2)), the corresponding mark y_train (y_train.shape=(10,), including 0, 1), use matplotlib.pyplot to draw It is represented as follows (green dots represent mark 0, red dots represent mark 1):

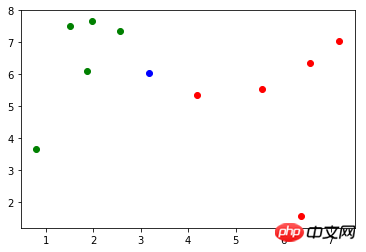
There is a new data: x (x = np.array([3.18557125, 6.03119673])), the drawing representation is as follows (blue points):

First, use Euler distance The formula calculates the distance from x to each sample in Has any impact on the order of the original data:
import math

distances = [math.sqrt(np.sum((x_train - x) ** 2)) for x_train in X_train]
Third, take the marks corresponding to the k nearest samples: <pre class="brush:php;toolbar:false">import numpy as np
nearest = np.argsort(distances)</pre>Finally, take the marks corresponding to the k nearest samples Make statistics and find the predicted classification with the largest proportion of marks, which is x. The predicted classification in this example is 0:
topK_y = [y_train[i] for i in nearest[:k]]
Encapsulate the above code into a method:
from collections import Counter

votes = Counter(topK_y)
votes.most_common(1)[0][0]
K-nearest neighbor algorithm in Scikit Learn
A typical machine learning algorithm process is to use the training data set to train (fit) the model through the machine learning algorithm, and use this model to predict the input sample result.
For the k-nearest neighbor algorithm, it is a special algorithm without a model, but we regard its training data set as a model . This is how it is handled in Scikit Learn. 
The k-nearest neighbor algorithm in Scikit Learn is in the neighbors module. When initializing, the parameter n_neighbors is 6, which is the above The k: import numpy as np
import math
from collections import Counter
def kNN(k, X_train, y_train, x):
distances = [math.sqrt(np.sum((x_train - x) ** 2)) for x_train in X_train]
nearest = np.argsort(distances)
topK_y = [y_train[i] for i in nearest[:k]]
votes = Counter(topK_y)
return votes.most_common(1)[0][0]
method "trains" the classifier based on the training data set, which returns the classifier itself:
from sklearn.neighbors import KNeighborsClassifier

kNN_classifier = KNeighborsClassifier(n_neighbors=6)
predict( ) method predicts the result of the input. This method requires that the parameter type passed in is a matrix. Therefore, the
operation is performed on x first: <pre class="brush:php;toolbar:false">kNN_classifier.fit(X_train, y_train)</pre>y_predict value is 0, which is consistent with the result of the kNN method implemented previously.
Define a KNNClassifier class, and its constructor method passes in the parameter k, which represents the most similar data selected during prediction. Number: X_predict = x.reshape(1, -1)
y_predict = kNN_classifier.predict(X_predict)
The method trains the classifier and returns the classifier itself:
class KNNClassifier:
    def __init__(self, k):
        self.k = k
        self._X_train = None
        self._y_train = None
predict() The method is the data set to be tested To make a prediction, the parameter X_predict type is a matrix. This method uses list analysis to traverse X_predict and calls the
method once for each data to be tested. <pre class="brush:php;toolbar:false">def fit(self, X_train, y_train):
self._X_train = X_train
self._y_train = y_train
return self</pre>Algorithm accuracy
Problems with the model
The model was trained through the training sample set, but it was not I don’t know how good this model is, but there are two problems.
If the model is bad, the predicted results are not what we want. At the same time, in actual situations, it is difficult to obtain the real label and test the model.
When training the model, the training samples do not contain all the markers.
For the first question, a certain proportion (such as 20%) of the data in the sample set is usually used as test data, and the remaining data is used as training data.
Take the iris data provided in Scikit Learn as an example, which contains 150 samples.
def predict(self, X_predict):
    y_predict = [self._predict(x) for x in X_predict]
    return np.array(y_predict)

def _predict(self, x):
    distances = [math.sqrt(np.sum((x_train - x) ** 2))
                 for x_train in self._X_train]
    nearest = np.argsort(distances)

    topK_y = [self._y_train[i] for i in nearest[:self.k]]
    votes = Counter(topK_y)

    return votes.most_common(1)[0][0]
Now divide the sample into 20% sample test data and 80% proportion training data:
import numpy as np
from sklearn import datasets

iris = datasets.load_iris()
X = iris.data
y = iris.target
Use X_train and y_train as training data for training the model, X_test and y_test as test data for verification Model accuracy.
For the second question, take the iris data provided in Scikit Learn as an example. The content of the y mark is:
array([0, 0, 0, 0, 0, 0, 0, 0, 0, 0, 0, 0, 0, 0, 0, 0, 0, 0, 0, 0, 0, 0,
       0, 0, 0, 0, 0, 0, 0, 0, 0, 0, 0, 0, 0, 0, 0, 0, 0, 0, 0, 0, 0, 0,
       0, 0, 0, 0, 0, 0, 1, 1, 1, 1, 1, 1, 1, 1, 1, 1, 1, 1, 1, 1, 1, 1,
       1, 1, 1, 1, 1, 1, 1, 1, 1, 1, 1, 1, 1, 1, 1, 1, 1, 1, 1, 1, 1, 1,
       1, 1, 1, 1, 1, 1, 1, 1, 1, 1, 1, 1, 2, 2, 2, 2, 2, 2, 2, 2, 2, 2,
       2, 2, 2, 2, 2, 2, 2, 2, 2, 2, 2, 2, 2, 2, 2, 2, 2, 2, 2, 2, 2, 2,
       2, 2, 2, 2, 2, 2, 2, 2, 2, 2, 2, 2, 2, 2, 2, 2, 2, 2])
发现0、1、2是以顺序存储的,在将样本划分为训练数据和测试数据过程中,如果训练数据中才对标记只包含0、1,这样的训练数据对于模型的训练将是致命的。以此,应将样本数据先进行随机处理。
np.random.permutation() 方法传入一个整数 n,会返回一个区间在 [0, n) 且随机排序的一维数组。将 X 的长度作为参数传入,返回 X 索引的随机数组:
shuffle_indexes = np.random.permutation(len(X))
将随机化的索引数组分为训练数据的索引与测试数据的索引两部分:
test_ratio = 0.2
test_size = int(len(X) * test_ratio)

test_indexes = shuffle_indexes[:test_size]
train_indexes = shuffle_indexes[test_size:]
再通过两部分的索引将样本数据分为训练数据和测试数据:
X_train = X[train_indexes]
y_train = y[train_indexes]

X_test = X[test_indexes]
y_test = y[test_indexes]
可以将两个问题的解决方案封装到一个方法中,seed 表示随机数种子,作用在 np.random 中:
import numpy as np

def train_test_split(X, y, test_ratio=0.2, seed=None):
    if seed:
        np.random.seed(seed)
    shuffle_indexes = np.random.permutation(len(X))

    test_size = int(len(X) * test_ratio)
    test_indexes = shuffle_indexes[:test_size]
    train_indexes = shuffle_indexes[test_size:]

    X_train = X[train_indexes]
    y_train = y[train_indexes]

    X_test = X[test_indexes]
    y_test = y[test_indexes]

    return X_train, X_test, y_train, y_test
Scikit Learn 中封装了 train_test_split() 方法,放在了 model_selection 模块中:
from sklearn.model_selection import train_test_split

X_train, X_test, y_train, y_test = train_test_split(X, y, test_size=0.2)
算法正确率
通过 train_test_split() 方法对样本数据进行了预处理后,开始训练模型,并且对测试数据进行验证:
from sklearn.neighbors import KNeighborsClassifier

kNN_classifier = KNeighborsClassifier(n_neighbors=6)
kNN_classifier.fit(X_train, y_train)
y_predict = kNN_classifier.predict(X_test)
y_predict 是对测试数据 X_test 的预测结果,其中与 y_test 相等的个数除以 y_test 的个数就是该模型的正确率,将其和 y_test 进行比较可以算出模型的正确率:
def accuracy_score(y_true, y_predict):
    return sum(y_predict == y_true) / len(y_true)
调用该方法,返回一个小于等于1的浮点数:
accuracy_score(y_test, y_predict)
同样在 Scikit Learn 的 metrics 模块中封装了 accuracy_score() 方法:
from sklearn.metrics import accuracy_score

accuracy_score(y_test, y_predict)
Scikit Learn 中的 KNeighborsClassifier 类的父类 ClassifierMixin 中有一个 score() 方法,里面就调用了 accuracy_score() 方法,将测试数据 X_test 和 y_test 作为参数传入该方法中,可以直接计算出算法正确率。
class ClassifierMixin(object):
    def score(self, X, y, sample_weight=None):
        from .metrics import accuracy_score
        return accuracy_score(y, self.predict(X), sample_weight=sample_weight)
超参数
前文中提到的 k 是一种超参数,超参数是在算法运行前需要决定的参数。 Scikit Learn 中 k-近邻算法包含了许多超参数,在初始化构造函数中都有指定:
def __init__(self, n_neighbors=5,
             weights='uniform', algorithm='auto', leaf_size=30,
             p=2, metric='minkowski', metric_params=None, n_jobs=None,
             **kwargs):
    # code here
这些超参数的含义在源代码和官方文档[scikit-learn.org]中都有说明。
算法优缺点
k-近邻算法是一个比较简单的算法,有其优点但也有缺点。
优点是思想简单,但效果强大, 天然的适合多分类问题。
缺点是效率低下,比如一个训练集有 m 个样本,n 个特征,则预测一个新的数据的算法复杂度为 O(m*n);同时该算法可能产生维数灾难,当维数很大时,两个点之间的距离可能也很大,如 (0,0,0,...,0) 和 (1,1,1,...,1)(10000维)之间的距离为100。
源码地址
The above is the detailed content of The principle and implementation of K-nearest neighbor algorithm in python (source code attached). For more information, please follow other related articles on the PHP Chinese website!

