Home >Web Front-end >JS Tutorial >Introduction to the production process of vue components (with code)
Introduction to the production process of vue components (with code)
- 不言forward
- 2018-10-16 14:26:152474browse
This article brings you an introduction to the production process of vue components (with code). It has certain reference value. Friends in need can refer to it. I hope it will be helpful to you.
Componentization is a very important part of front-end development. Decoupling it from the business can improve the code reuse rate of the project. What's more important is that we can also package and publish. As the saying goes, the power of collective is great. It is precisely because of many open source contributors that the current world is possible.
An engineer who doesn’t want to build wheels cannot be a qualified porter. Let's take a look at the process of vue components from development to packaging and release, and configure the Github homepage.
This article takes the vue-clock2 component as an example, welcome to star^_^~~ Project addressTarget framework: vue
Packaging tool: webpack
Release source: npm
Code hosting: github
Project structure
|-- node_modules
|-- src
| |-- index.js
| |-- vue-clock.vue
|-- docs
| |-- index.html
| |-- index.css
|-- dist
src: Component related code.
node_modules: component dependency package.
docs: Documentation, the component can be as simple as a single page, or vuepress can be used.
#dist: The content of the packaged component. Generally, the main entry of package.json points to the file in this folder.
Component development
vue component development is relatively easy, create a vue-clock.vue File, component related logic implementation.
This component mainly implements a clock style that displays the corresponding time based on the time attribute input.
    <p>
        </p><p></p>
        <p></p>
        <p></p>
        <b>
            <span>{{h}}</span>
        </b>
Draw the style of a clock through elements, and rotate each time point based on the transform attribute of css3.
Because the hour hand of the clock does not jump directly to the next point, it is necessary to calculate the rotation angle of the clock hand at different minutes.
Subsequently, the case where no time is specified is added, the current time is displayed and automatically updated every minute.
export default {
    data() {
        return {
            timeList: [12, 1, 2, 3, 4, 5, 6, 7, 8, 9, 10, 11],
            hourRotate: "rotatez(0deg)",
            minuteRotate: "rotatez(0deg)"
        };
    },
    props: ["time"],
    watch: {
        time() {
            this.show();
        }
    },
    methods: {
        show() {
            this.showTime();
            if (this._timer) clearInterval(this._timer);
            if (!this.time) {
                this._timer = setInterval(() => {
                    this.showTime();
                }, 60 * 1000);
            }
        },
        showTime() {
            let times;
            if (this.time) {
                times = this.time.split(":");
            } else {
                const now = new Date();
                times = [now.getHours(), now.getMinutes()];
            }

            let hour = +times[0];
            hour = hour > 11 ? hour - 12 : hour;
            let minute = +times[1];
            let hourAngle = hour * 30 + minute * 6 / 360 * 30;
            let minuteAngle = minute * 6;
            this.hourRotate = `rotatez(${hourAngle}deg)`;
            this.minuteRotate = `rotatez(${minuteAngle}deg)`;
        }
    },
    mounted() {
        this.show();
    },
    destroyed() {
        if (this._timer) clearInterval(this._timer);
    }
};
There are also some layout styles of clocks, which can be viewed directly in the project. vue-clock.vue
Then we need to throw the component so that it can be introduced and used in the project.
    // src/index.js
    import Clock from './vue-clock.vue';
    export default Clock;
    if (typeof window !== 'undefined' && window.Vue) {
        window.Vue.component('clock', Clock);
    }
Here, the component development part has been completed. Have a cup of coffee and check the code. We are going to package it and publish it to npm.
Packaging and publishing
Confirm the configuration file output of webpack before packaging.
  output: {
    path: path.resolve(__dirname, './dist'),
    publicPath: '/dist/',
    filename: 'vue-clock.min.js',
    library: 'Clock',
    libraryTarget: 'umd',
    umdNamedDefine: true
  }
Package component files into the dist folder.
npm run build
npm release
Configuration package.json
{
  "name": "vue-clock2",
  "description": "Vue component with clock",
  "version": "1.1.2",
  "author": "bestvist",
  "keywords": [
    "vue",
    "component",
    "clock",
    "time"
  ],
  "main": "dist/vue-clock.min.js",
  "license": "MIT",
  "homepage": "https://bestvist.github.io/vue-clock2/"
}
Login npm
If you use Taobao mirror, you need to correct it first Mirror source.
npm config set registry https://registry.npmjs.org/
// 查看登录人
npm whoami
// 登录
npm login

// 发布
npm publish
If you see similar information, it means the release is successful.
npm notice
+ vue-clock2@1.1.2
Github homepage
Upload the project to github for hosting and configure a basic README.md documentation.
Because the component has been published to npm, several badges can be configured in the README.
// npm 版本
[npm version](https://img.shields.io/npm/v/vue-clock2.svg)

// npm 下载量
[npm download](https://img.shields.io/npm/dt/vue-clock2.svg)
For more badge configurations, please view shields
Then describe the introduction and use of components:
安装:
npm install vue-clock2
使用:
<template>
<clock></clock>
</template>
<script>
import Clock from 'vue-clock2';
export default {
components: { Clock },
data () {
return {
time: '10:40'
}
}
}
</script>
For more detailed interaction or attribute description, please leave it to the documentation Come and solve it.
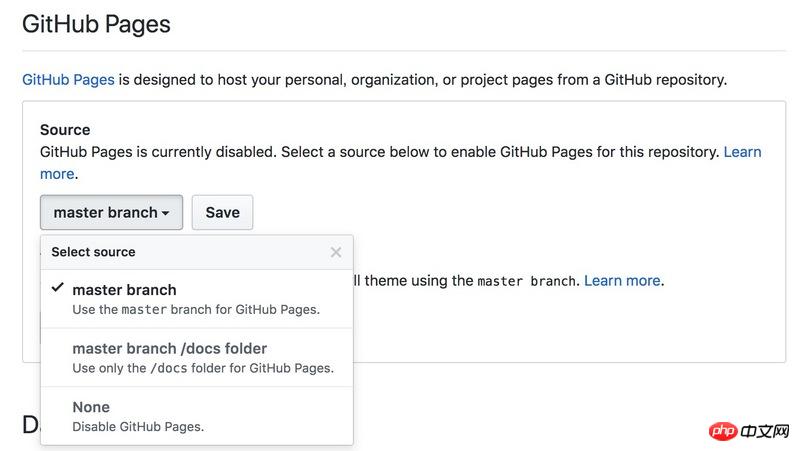
Specify GitHub Pages through settings on the github project

Component documentation description should include:
Component introduction method
Component usage method
A simple example
Component attribute description Description
##SummaryDevelopment-> Release-> Hosting
The production process of a component wheel has been roughly introduced. I hope this article can help you.The above is the detailed content of Introduction to the production process of vue components (with code). For more information, please follow other related articles on the PHP Chinese website!
Related articles
See more- Vue2.0 data two-way binding and form bootstrap+vue component
- Vue component options props
- How to write a ejection ball in the vue component
- The vue component implements the pop-up box click to display and hide functions (with code)
- Vue component publishing to npm step analysis
- Detailed explanation of the steps for using slots to distribute content using vue components

