Home >Operation and Maintenance >Linux Operation and Maintenance >How to export ECS custom image when activating OSS service
How to export ECS custom image when activating OSS service
- 坏嘻嘻Original
- 2018-09-18 15:19:582233browse
The content of this article is about how to export ECS custom images when activating OSS services. It has certain reference value. Friends in need can refer to it. I hope it will be helpful to you.
Export image
Exporting ECS custom images is suitable for local testing or private cloud environment scenarios.
Description
Exporting a custom image is a relatively time-consuming task and requires your patience. The completion time depends on the size of the custom image file and the current number of concurrent export tasks.
Exporting a custom image requires the use of object storage OSS, so a certain amount of OSS storage and download traffic fees will be incurred. For more details, see OSS metering items and billing items.
Restrictions
You need to pay attention to the following restrictions:
Exporting system disk snapshots imaged through the cloud market is not supported Custom image created.
The exported custom image can contain data disk snapshots, but the number of data disks cannot exceed 4, and the maximum capacity of a single data disk cannot exceed 500 GiB.
When using the exported full image to purchase an instance with the same configuration, you need to confirm that the file device recorded in /etc/fstab corresponds to the exported data disk snapshot information.
Prerequisites
Before exporting a custom image, you should have completed the following work:
Submit a work order application Export permissions, and explain the usage scenarios for exporting custom images.
Please ensure that you have activated the OSS service and there is an OSS Bucket available in the region where the custom image is located. For more details, see Creating a Storage Space in OSS.
Operation steps
The steps to export a custom image on the management console are as follows:
Log in to ECS management console.
In the left navigation bar, select Snapshots and Mirroring > Mirroring.
Select a region.
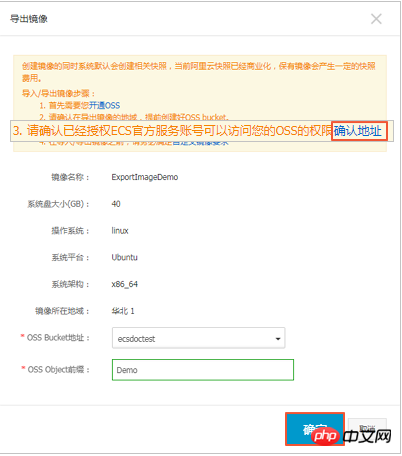
Find the custom image that needs to be exported, and in the Operation column, click Export Image.
In the Export Image dialog box, click Confirm address in step 3 of the prompt message.

In the Cloud Resource Access Authorization window, click Agree to authorize the ECS service to access your OSS resources.
Go back to the home page of the ECS management console. In the Operation column of the custom image list page, click Export Image again.
In the Export Image dialog box:
Select an OSS Bucket in the region where the custom image is located.
Set a prefix for the Object name of the custom image. For example, you can set Demo as the prefix, and the name of the exported custom image file in the OSS Bucket will be Demo-[file name automatically generated by the system].
Click OK to start exporting the custom image.
(Optional) Cancel the export custom image task. Before the task is completed, you can use Task Management to find the task of exporting the custom image in the corresponding region and cancel the export of the custom image.
You can also use ECS API ExportImage and CancelTask to export custom images.
Next step
Log in to the OSS management console to query the results of exporting the custom image.
Note
When the exported custom image contains a data disk snapshot, multiple files will appear in your OSS. The file name with system represents the system disk snapshot, and the file name with data represents the data disk snapshot. The data disk snapshot will have an identifier corresponding to the data disk, that is, the disk's mount point, such as xvdb or xvdc.
After the custom image is successfully exported, obtain the file access address and then download the custom image file. The default format of the image file is RAW.
The above is the detailed content of How to export ECS custom image when activating OSS service. For more information, please follow other related articles on the PHP Chinese website!

