

 JavajavaTutorialThe implementation process of SpringBoot integrating Netty and using Protobuf for data transmission
The content of this article is about the implementation process of SpringBoot integrating Netty and using Protobuf for data transmission. It has certain reference value. Friends in need can refer to it. I hope it will be helpful to you.
Preface
This article mainly introduces the related content of SpringBoot integrating Netty and using Protobuf for data transmission. Protobuf will briefly introduce its usage. As for Netty, it has been briefly introduced in previous articles, so I won’t go into details here.
Protobuf
Introduction
protocolbuffer (hereinafter referred to as PB) is a data exchange format of Google, which is independent of language and platform. Google provides implementations in multiple languages: java, c#, c, go and python. Each implementation includes a compiler and library file for the corresponding language. Since it is a binary format, it is much faster than using xml for data exchange. It can be used for data communication between distributed applications or data exchange in heterogeneous environments. As a binary data transmission format with excellent efficiency and compatibility, it can be used in many fields such as network transmission, configuration files, and data storage.
Official address: https://github.com/google/protobuf
Usage
The usage here only introduces Java-related usage.
First we need to create a proto file, in which we define the files we need to transfer.
For example, we need to define a user's information, which mainly includes number, name, and age fields.
Then the format of the protobuf file is as follows:
Note: proto3 is used here, I have written the relevant comments, here they are No more details. One thing to note is that the names of the proto file and the generated Java file cannot be the same!
syntax = "proto3";
// 生成的包名
option java_package="com.pancm.protobuf";
//生成的java名
option java_outer_classname = "UserInfo";

message UserMsg {

     // ID
     int32 id = 1;

    // 姓名
     string name = 2;

    // 年龄
      int32 age = 3;

     // 状态
     int32 state = 4;
}
After creating the file, we combine the file with protoc .exe (software that generates Java files) is placed in the protobuf folder in the E disk directory, and then enters the dos interface of the directory: protoc.exe --java_out=file absolute path name.
For example:
protoc.exe --java_out=E:\protobuf User.proto
After inputting, press Enter to see the generated Java file in the same directory, and then place the file in the path specified by the file in the project.
Note: I have also integrated the protobuf file software and the test protobuf file into this project and can be obtained directly.
After the Java file is generated, let’s see how to use it.
I will paste the code directly here, and write the comments in the code, which should be easier to understand. . .
Code example:
     // 按照定义的数据结构,创建一个对象
        UserInfo.UserMsg.Builder userInfo = UserInfo.UserMsg.newBuilder();
        userInfo.setId(1);
        userInfo.setName("xuwujing");
        userInfo.setAge(18);
        UserInfo.UserMsg userMsg = userInfo.build();
        // 将数据写到输出流
        ByteArrayOutputStream output = new ByteArrayOutputStream();
        userMsg.writeTo(output);
        // 将数据序列化后发送
        byte[] byteArray = output.toByteArray();
        // 接收到流并读取
        ByteArrayInputStream input = new ByteArrayInputStream(byteArray);
        // 反序列化
        UserInfo.UserMsg userInfo2 = UserInfo.UserMsg.parseFrom(input);
        System.out.println("id:" + userInfo2.getId());
        System.out.println("name:" + userInfo2.getName());
        System.out.println("age:" + userInfo2.getAge());
Note: Here is a note, because protobuf is transmitted through binary, so you need to pay attention to the corresponding encoding. When using protobuf, you also need to pay attention to the maximum byte length of a transmission.
Output result:
id:1
name:xuwujing
age:18
SpringBoot integrates Netty
Note: If you want to get the project directly, you can jump directly to the bottom and use the link Download the project code.
Development preparation
Environment requirements
JDK::1.8
Netty:: 4.0 or above (excluding 5)
Protobuf: 3.0 or above
If you are not familiar with Netty, you can read some articles I wrote before. God, please ignore~. ~
Address: https://blog.csdn.net/column/details/17640.html
First of all, Maven-related dependencies:
<properties>
        <project.build.sourceEncoding>UTF-8</project.build.sourceEncoding>
        <java.version>1.8</java.version>
        <netty.version>4.1.22.Final</netty.version>
        <protobuf.version>3.5.1</protobuf.version>
        <springboot>1.5.9.RELEASE</springboot>
        <fastjson>1.2.41</fastjson>
        <maven.compiler.source>1.8</maven.compiler.source>
        <maven.compiler.target>1.8</maven.compiler.target>
    </properties>


    <dependencies>

        <dependency>
            <groupId>org.springframework.boot</groupId>
            <artifactId>spring-boot-starter</artifactId>
            <version>${springboot}</version>
        </dependency>


        <dependency>
            <groupId>org.springframework.boot</groupId>
            <artifactId>spring-boot-starter-test</artifactId>
            <version>${springboot}</version>
            <scope>test</scope>
        </dependency>

        <dependency>
            <groupId>org.springframework.boot</groupId>
            <artifactId>spring-boot-devtools</artifactId>
            <version>${springboot}</version>
            <optional>true</optional>
        </dependency>


        <dependency>
            <groupId>io.netty</groupId>
            <artifactId>netty-all</artifactId>
            <version>${netty.version}</version>
        </dependency>

        <dependency>
            <groupId>com.google.protobuf</groupId>
            <artifactId>protobuf-java</artifactId>
            <version>${protobuf.version}</version>
        </dependency>

        <dependency>
            <groupId>com.alibaba</groupId>
            <artifactId>fastjson</artifactId>
            <version>${fastjson}</version>
        </dependency>


    <dependency>
            <groupId>junit</groupId>
            <artifactId>junit</artifactId>
            <version>4.12</version>
            <scope>test</scope>
        </dependency>
</dependencies>
After adding the corresponding maven dependencies , there is nothing to add in the configuration file, because it is just a listening port for the time being.
Code writing
The code module is mainly divided into server and client.
Mainly implemented business logic:
After the server starts successfully, the client also starts successfully. At this time, the server will send a message in the format of protobuf to the client, and then the client will respond accordingly response. After the client and server are successfully connected, the client will send a heartbeat command to the server every period of time to tell the server that the client has been saved. If the client does not send information at the specified time, the server will close the connection with the server. The client's connection. When the client cannot connect to the server, it will try to reconnect every once in a while until the reconnection is successful!
Server
First, write the startup class of the server, corresponding The comments are written in detail in the code, so I won’t go into details here. However, it should be noted that in the previous Netty article I wrote, the server was started directly through the main method, so an object was directly new. After integrating with SpringBoot, we need to hand over Netty to springBoot for management, so the corresponding annotations are used here.
The code is as follows:
@Service("nettyServer")
public class NettyServer {
    private static final int port = 9876; // 设置服务端端口
    private static EventLoopGroup boss = new NioEventLoopGroup(); // 通过nio方式来接收连接和处理连接
    private static EventLoopGroup work = new NioEventLoopGroup(); // 通过nio方式来接收连接和处理连接
    private static ServerBootstrap b = new ServerBootstrap();

    @Autowired
    private NettyServerFilter nettyServerFilter;


    public void run() {
        try {
            b.group(boss, work);
            b.channel(NioServerSocketChannel.class);
            b.childHandler(nettyServerFilter); // 设置过滤器
            // 服务器绑定端口监听
            ChannelFuture f = b.bind(port).sync();
            System.out.println("服务端启动成功,端口是:" + port);
            // 监听服务器关闭监听
            f.channel().closeFuture().sync();
        } catch (InterruptedException e) {
            e.printStackTrace();
        } finally {
            // 关闭EventLoopGroup,释放掉所有资源包括创建的线程
            work.shutdownGracefully();
            boss.shutdownGracefully();
        }
    }
}
After the server main class is written, we will set the corresponding filter conditions.
Here you need to inherit the ChannelInitializer class in Netty, and then rewrite the initChannel method to add corresponding settings, such as heartbeat timeout settings, transmission protocol settings, and corresponding business implementations kind.
code show as below:
    @Component
     public class NettyServerFilter extends ChannelInitializer<SocketChannel> {

    @Autowired
    private NettyServerHandler nettyServerHandler;

     @Override
     protected void initChannel(SocketChannel ch) throws Exception {
         ChannelPipeline ph = ch.pipeline();

         //入参说明: 读超时时间、写超时时间、所有类型的超时时间、时间格式
         ph.addLast(new IdleStateHandler(5, 0, 0, TimeUnit.SECONDS));
         // 解码和编码,应和客户端一致
         //传输的协议 Protobuf
         ph.addLast(new ProtobufVarint32FrameDecoder());
         ph.addLast(new ProtobufDecoder(UserMsg.getDefaultInstance()));
         ph.addLast(new ProtobufVarint32LengthFieldPrepender());
         ph.addLast(new ProtobufEncoder());

         //业务逻辑实现类
         ph.addLast("nettyServerHandler", nettyServerHandler);
       }
     }
服务相关的设置的代码写完之后,我们再来编写主要的业务代码。
使用Netty编写业务层的代码,我们需要继承ChannelInboundHandlerAdapter 或SimpleChannelInboundHandler类,在这里顺便说下它们两的区别吧。
继承SimpleChannelInboundHandler类之后,会在接收到数据后会自动release掉数据占用的Bytebuffer资源。并且继承该类需要指定数据格式。
而继承ChannelInboundHandlerAdapter则不会自动释放,需要手动调用ReferenceCountUtil.release()等方法进行释放。继承该类不需要指定数据格式。
所以在这里,个人推荐服务端继承ChannelInboundHandlerAdapter,手动进行释放,防止数据未处理完就自动释放了。而且服务端可能有多个客户端进行连接,并且每一个客户端请求的数据格式都不一致,这时便可以进行相应的处理。
客户端根据情况可以继承SimpleChannelInboundHandler类。好处是直接指定好传输的数据格式,就不需要再进行格式的转换了。
代码如下:
@Service("nettyServerHandler")
public class NettyServerHandler extends ChannelInboundHandlerAdapter {

    /** 空闲次数 */
    private int idle_count = 1;
    /** 发送次数 */
    private int count = 1;


    /**
     * 建立连接时,发送一条消息
     */
    @Override
    public void channelActive(ChannelHandlerContext ctx) throws Exception {
        System.out.println("连接的客户端地址:" + ctx.channel().remoteAddress());
        UserInfo.UserMsg userMsg = UserInfo.UserMsg.newBuilder().setId(1).setAge(18).setName("xuwujing").setState(0)
                .build();
        ctx.writeAndFlush(userMsg);
        super.channelActive(ctx);
    }

    /**
     * 超时处理 如果5秒没有接受客户端的心跳,就触发; 如果超过两次,则直接关闭;
     */
    @Override
    public void userEventTriggered(ChannelHandlerContext ctx, Object obj) throws Exception {
        if (obj instanceof IdleStateEvent) {
            IdleStateEvent event = (IdleStateEvent) obj;
            if (IdleState.READER_IDLE.equals(event.state())) { // 如果读通道处于空闲状态,说明没有接收到心跳命令
                System.out.println("已经5秒没有接收到客户端的信息了");
                if (idle_count > 1) {
                    System.out.println("关闭这个不活跃的channel");
                    ctx.channel().close();
                }
                idle_count++;
            }
        } else {
            super.userEventTriggered(ctx, obj);
        }
    }

    /**
     * 业务逻辑处理
     */
    @Override
    public void channelRead(ChannelHandlerContext ctx, Object msg) throws Exception {
        System.out.println("第" + count + "次" + ",服务端接受的消息:" + msg);
        try {
            // 如果是protobuf类型的数据
          if (msg instanceof UserMsg) {
                UserInfo.UserMsg userState = (UserInfo.UserMsg) msg;
                if (userState.getState() == 1) {
                    System.out.println("客户端业务处理成功!");
                } else if(userState.getState() == 2){
                    System.out.println("接受到客户端发送的心跳!");
                }else{
                    System.out.println("未知命令!");
                }
            } else {
                System.out.println("未知数据!" + msg);
                return;
            }
        } catch (Exception e) {
            e.printStackTrace();
        } finally {
            ReferenceCountUtil.release(msg);
        }
        count++;
    }

    /**
     * 异常处理
     */
    @Override
    public void exceptionCaught(ChannelHandlerContext ctx, Throwable cause) throws Exception {
        cause.printStackTrace();
        ctx.close();
    }
}
还有个服务端的启动类,之前是通过main方法直接启动, 不过这里改成了通过springBoot进行启动,差别不大。
代码如下:
@SpringBootApplication
public class NettyServerApp {

    public static void main(String[] args) {
        // 启动嵌入式的 Tomcat 并初始化 Spring 环境及其各 Spring 组件
        ApplicationContext context = SpringApplication.run(NettyServerApp.class, args);
        NettyServer nettyServer = context.getBean(NettyServer.class);
        nettyServer.run();
    }

}
到这里服务端相应的代码就编写完毕了。
客户端
客户端这边的代码和服务端的很多地方都类似,我就不再过多细说了,主要将一些不同的代码拿出来简单的讲述下。
首先是客户端的主类,基本和服务端的差不多,也就是多了监听的端口和一个监听器(用来监听是否和服务端断开连接,用于重连)。
主要实现的代码逻辑如下:
    public void doConnect(Bootstrap bootstrap, EventLoopGroup eventLoopGroup) {
        ChannelFuture f = null;
        try {
            if (bootstrap != null) {
                bootstrap.group(eventLoopGroup);
                bootstrap.channel(NioSocketChannel.class);
                bootstrap.option(ChannelOption.SO_KEEPALIVE, true);
                bootstrap.handler(nettyClientFilter);
                bootstrap.remoteAddress(host, port);
                f = bootstrap.connect().addListener((ChannelFuture futureListener) -> {
                    final EventLoop eventLoop = futureListener.channel().eventLoop();
                    if (!futureListener.isSuccess()) {
                        System.out.println("与服务端断开连接!在10s之后准备尝试重连!");
                        eventLoop.schedule(() -> doConnect(new Bootstrap(), eventLoop), 10, TimeUnit.SECONDS);
                    }
                });
                if(initFalg){
                    System.out.println("Netty客户端启动成功!");
                    initFalg=false;
                }
                // 阻塞
                f.channel().closeFuture().sync();
            }
        } catch (Exception e) {
            System.out.println("客户端连接失败!"+e.getMessage());
        }
    }
注:监听器这块的实现用的是JDK1.8的写法。
客户端过滤其这块基本和服务端一直。不过需要注意的是,传输协议、编码和解码应该一致,还有心跳的读写时间应该小于服务端所设置的时间。
改动的代码如下:
    ChannelPipeline ph = ch.pipeline();
        /*
         * 解码和编码,应和服务端一致
         * */
        //入参说明: 读超时时间、写超时时间、所有类型的超时时间、时间格式
        ph.addLast(new IdleStateHandler(0, 4, 0, TimeUnit.SECONDS));
客户端的业务代码逻辑。
主要实现的几点逻辑是心跳按时发送以及解析服务发送的protobuf格式的数据。
这里比服务端多个个注解, 该注解Sharable主要是为了多个handler可以被多个channel安全地共享,也就是保证线程安全。
废话就不多说了,代码如下:
    @Service("nettyClientHandler")
    @ChannelHandler.Sharable
    public class NettyClientHandler extends ChannelInboundHandlerAdapter {
    @Autowired
    private NettyClient nettyClient;

    /** 循环次数 */
    private int fcount = 1;

    /**
     * 建立连接时
     */
    @Override
    public void channelActive(ChannelHandlerContext ctx) throws Exception {
        System.out.println("建立连接时:" + new Date());
        ctx.fireChannelActive();
    }

    /**
     * 关闭连接时
     */
    @Override
    public void channelInactive(ChannelHandlerContext ctx) throws Exception {
        System.out.println("关闭连接时:" + new Date());
        final EventLoop eventLoop = ctx.channel().eventLoop();
        nettyClient.doConnect(new Bootstrap(), eventLoop);
        super.channelInactive(ctx);
    }

    /**
     * 心跳请求处理 每4秒发送一次心跳请求;
     *
     */
    @Override
    public void userEventTriggered(ChannelHandlerContext ctx, Object obj) throws Exception {
        System.out.println("循环请求的时间:" + new Date() + ",次数" + fcount);
        if (obj instanceof IdleStateEvent) {
            IdleStateEvent event = (IdleStateEvent) obj;
            if (IdleState.WRITER_IDLE.equals(event.state())) { // 如果写通道处于空闲状态,就发送心跳命令
                UserMsg.Builder userState = UserMsg.newBuilder().setState(2);
                ctx.channel().writeAndFlush(userState);
                fcount++;
            }
        }
    }

    /**
     * 业务逻辑处理
     */
    @Override
    public void channelRead(ChannelHandlerContext ctx, Object msg) throws Exception {
        // 如果不是protobuf类型的数据
        if (!(msg instanceof UserMsg)) {
            System.out.println("未知数据!" + msg);
            return;
        }
        try {

            // 得到protobuf的数据
            UserInfo.UserMsg userMsg = (UserInfo.UserMsg) msg;
            // 进行相应的业务处理。。。
            // 这里就从简了,只是打印而已
            System.out.println(
                    "客户端接受到的用户信息。编号:" + userMsg.getId() + ",姓名:" + userMsg.getName() + ",年龄:" + userMsg.getAge());

            // 这里返回一个已经接受到数据的状态
            UserMsg.Builder userState = UserMsg.newBuilder().setState(1);
            ctx.writeAndFlush(userState);
            System.out.println("成功发送给服务端!");
        } catch (Exception e) {
            e.printStackTrace();
        } finally {
            ReferenceCountUtil.release(msg);
        }
     }
    }
那么到这里客户端的代码也编写完毕了。
功能测试
首先启动服务端,然后再启动客户端。
我们来看看结果是否如上述所说。
服务端输出结果:
服务端启动成功,端口是:9876
连接的客户端地址:/127.0.0.1:53319
第1次,服务端接受的消息:state: 1

客户端业务处理成功!
第2次,服务端接受的消息:state: 2

接受到客户端发送的心跳!
第3次,服务端接受的消息:state: 2

接受到客户端发送的心跳!
第4次,服务端接受的消息:state: 2

接受到客户端发送的心跳!
客户端输入结果:
Netty客户端启动成功!
建立连接时:Mon Jul 16 23:31:58 CST 2018
客户端接受到的用户信息。编号:1,姓名:xuwujing,年龄:18
成功发送给服务端!
循环请求的时间:Mon Jul 16 23:32:02 CST 2018,次数1
循环请求的时间:Mon Jul 16 23:32:06 CST 2018,次数2
循环请求的时间:Mon Jul 16 23:32:10 CST 2018,次数3
循环请求的时间:Mon Jul 16 23:32:14 CST 2018,次数4
通过打印信息可以看出如上述所说。
接下来我们再来看看客户端是否能够实现重连。
先启动客户端,再启动服务端。
客户端输入结果:
Netty客户端启动成功!
与服务端断开连接!在10s之后准备尝试重连!
客户端连接失败!AbstractChannel$CloseFuture@1fbaa3ac(incomplete)
建立连接时:Mon Jul 16 23:41:33 CST 2018
客户端接受到的用户信息。编号:1,姓名:xuwujing,年龄:18
成功发送给服务端!
循环请求的时间:Mon Jul 16 23:41:38 CST 2018,次数1
循环请求的时间:Mon Jul 16 23:41:42 CST 2018,次数2
循环请求的时间:Mon Jul 16 23:41:46 CST 2018,次数3
服务端输出结果:
服务端启动成功,端口是:9876
连接的客户端地址:/127.0.0.1:53492
第1次,服务端接受的消息:state: 1

客户端业务处理成功!
第2次,服务端接受的消息:state: 2

接受到客户端发送的心跳!
第3次,服务端接受的消息:state: 2

接受到客户端发送的心跳!
第4次,服务端接受的消息:state: 2
结果也如上述所说!
关于SpringBoot整合Netty使用Protobuf进行数据传输到这里就结束了。
SpringBoot整合Netty使用Protobuf进行数据传输的项目工程地址:
https://github.com/xuwujing/springBoot-study/tree/master/springboot-netty-protobuf
对了,也有不使用springBoot整合的Netty项目工程地址:
https://github.com/xuwujing/Netty-study/tree/master/Netty-protobuf
相关推荐:
使用Spring Cloud Netflix Zuul代理网关访问后台REST服务的实现(代码)
The above is the detailed content of The implementation process of SpringBoot integrating Netty and using Protobuf for data transmission. For more information, please follow other related articles on the PHP Chinese website!

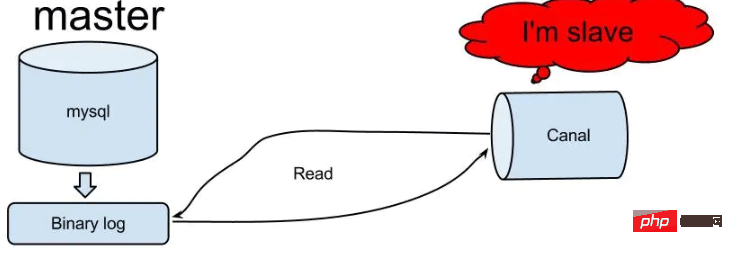 怎么使用SpringBoot+Canal实现数据库实时监控May 10, 2023 pm 06:25 PM
Canal工作原理Canal模拟MySQLslave的交互协议,伪装自己为MySQLslave,向MySQLmaster发送dump协议MySQLmaster收到dump请求,开始推送binarylog给slave(也就是Canal)Canal解析binarylog对象(原始为byte流)MySQL打开binlog模式在MySQL配置文件my.cnf设置如下信息:[mysqld]#打开binloglog-bin=mysql-bin#选择ROW(行)模式binlog-format=ROW#配置My
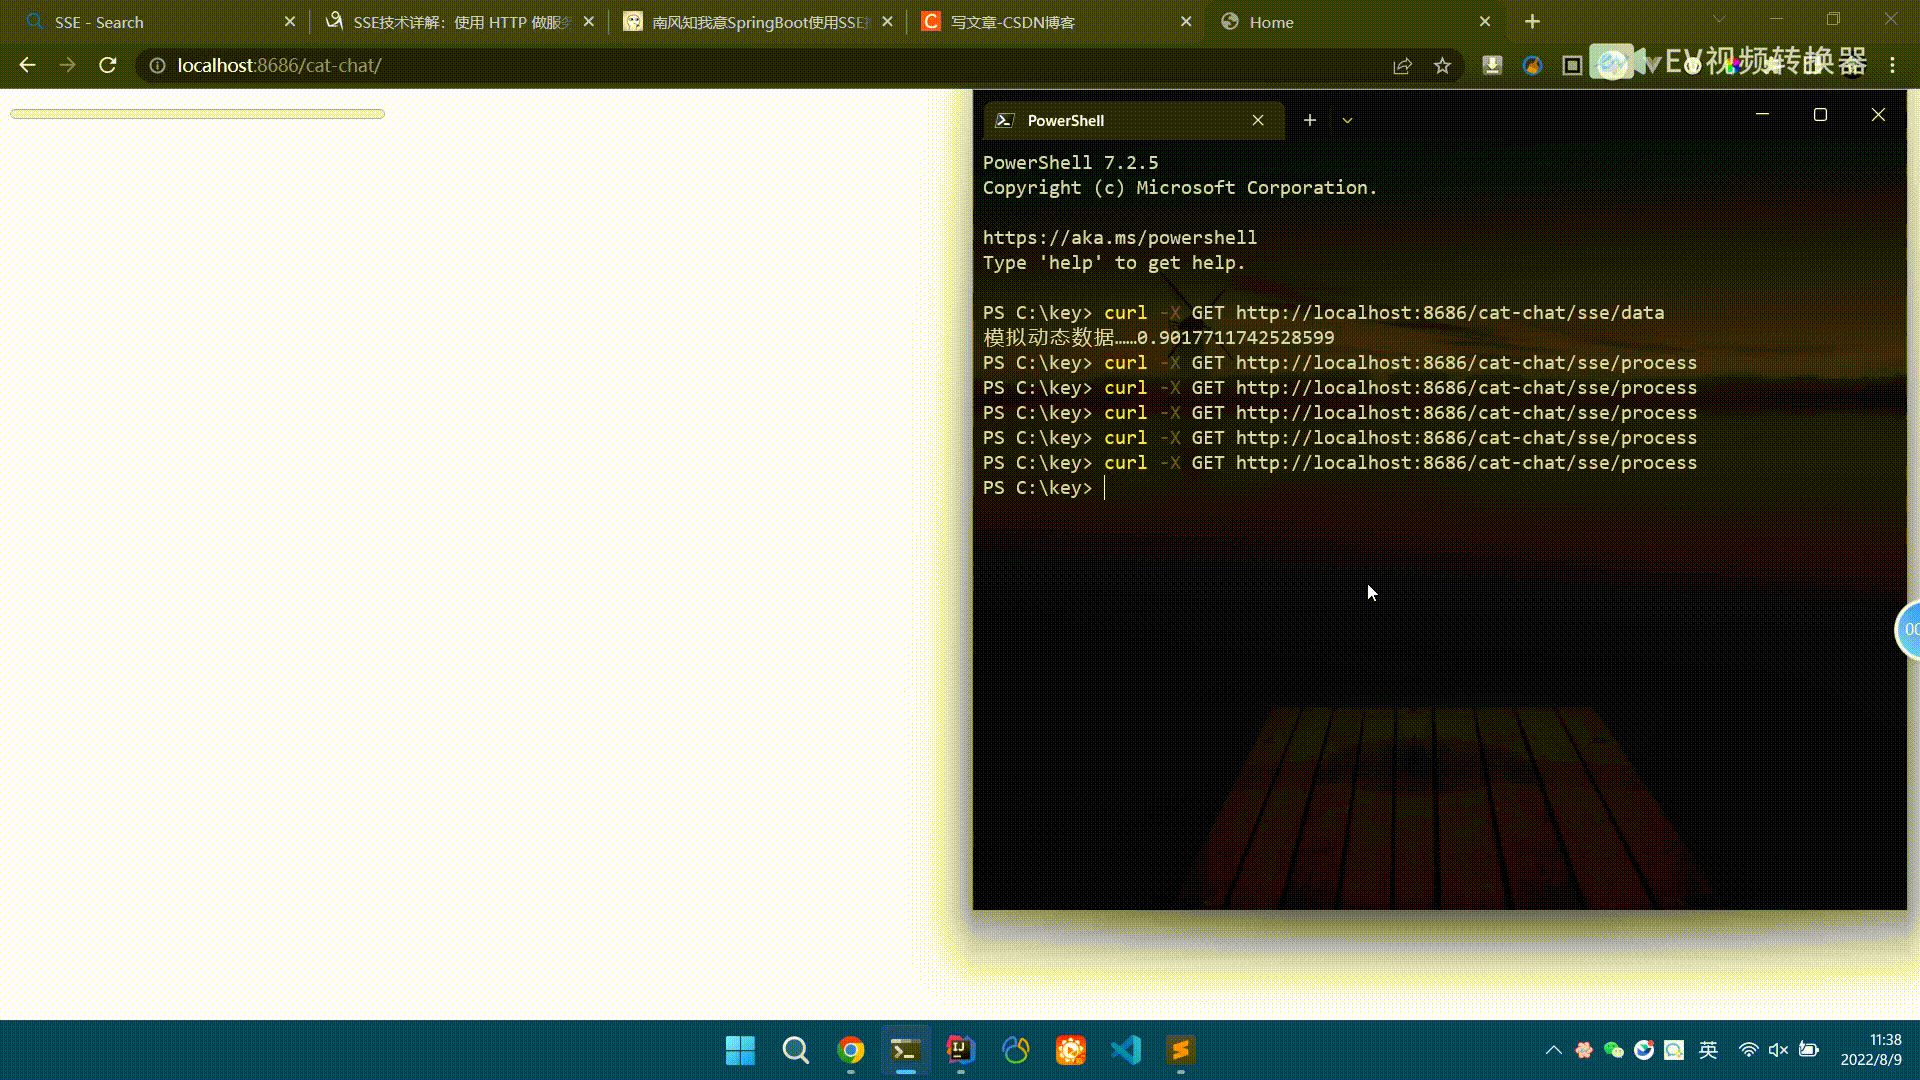 Spring Boot怎么使用SSE方式向前端推送数据May 10, 2023 pm 05:31 PM
前言SSE简单的来说就是服务器主动向前端推送数据的一种技术,它是单向的,也就是说前端是不能向服务器发送数据的。SSE适用于消息推送,监控等只需要服务器推送数据的场景中,下面是使用SpringBoot来实现一个简单的模拟向前端推动进度数据,前端页面接受后展示进度条。服务端在SpringBoot中使用时需要注意,最好使用SpringWeb提供的SseEmitter这个类来进行操作,我在刚开始时使用网上说的将Content-Type设置为text-stream这种方式发现每次前端每次都会重新创建接。最
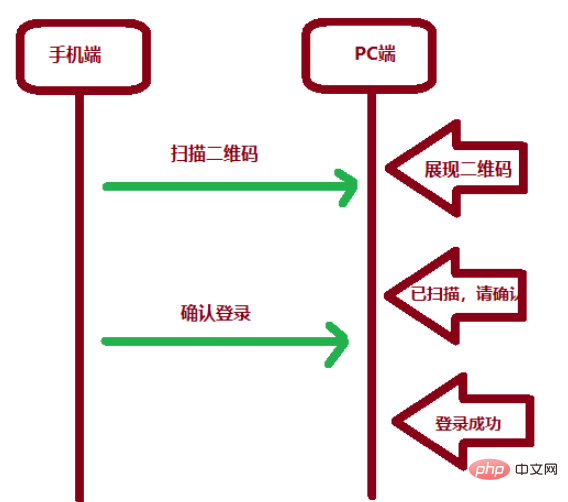 SpringBoot怎么实现二维码扫码登录May 10, 2023 pm 08:25 PM
一、手机扫二维码登录的原理二维码扫码登录是一种基于OAuth3.0协议的授权登录方式。在这种方式下,应用程序不需要获取用户的用户名和密码,只需要获取用户的授权即可。二维码扫码登录主要有以下几个步骤:应用程序生成一个二维码,并将该二维码展示给用户。用户使用扫码工具扫描该二维码,并在授权页面中授权。用户授权后,应用程序会获取一个授权码。应用程序使用该授权码向授权服务器请求访问令牌。授权服务器返回一个访问令牌给应用程序。应用程序使用该访问令牌访问资源服务器。通过以上步骤,二维码扫码登录可以实现用户的快
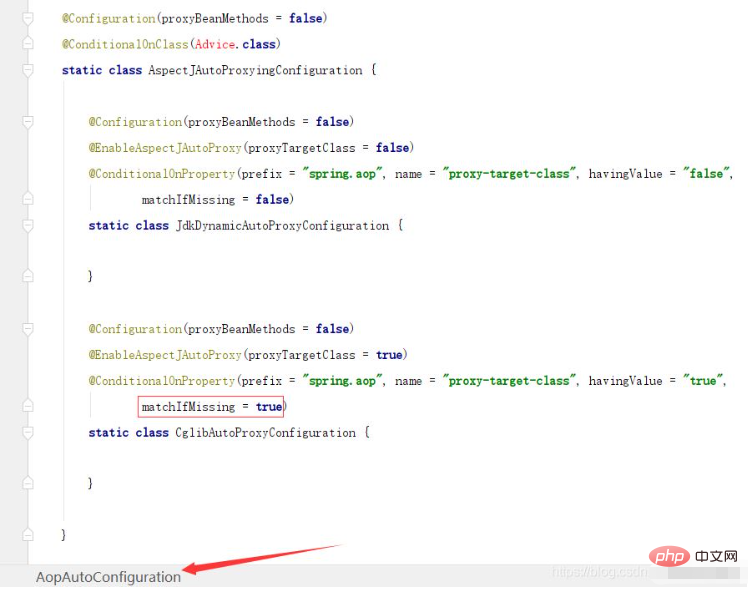 SpringBoot/Spring AOP默认动态代理方式是什么May 10, 2023 pm 03:52 PM
1.springboot2.x及以上版本在SpringBoot2.xAOP中会默认使用Cglib来实现,但是Spring5中默认还是使用jdk动态代理。SpringAOP默认使用JDK动态代理,如果对象没有实现接口,则使用CGLIB代理。当然,也可以强制使用CGLIB代理。在SpringBoot中,通过AopAutoConfiguration来自动装配AOP.2.Springboot1.xSpringboot1.xAOP默认还是使用JDK动态代理的3.SpringBoot2.x为何默认使用Cgl
 spring boot怎么对敏感信息进行加解密May 10, 2023 pm 02:46 PM
我们使用jasypt最新版本对敏感信息进行加解密。1.在项目pom文件中加入如下依赖:com.github.ulisesbocchiojasypt-spring-boot-starter3.0.32.创建加解密公用类:packagecom.myproject.common.utils;importorg.jasypt.encryption.pbe.PooledPBEStringEncryptor;importorg.jasypt.encryption.pbe.config.SimpleStrin
 使用Java SpringBoot集成POI实现Word文档导出Apr 21, 2023 pm 12:19 PM
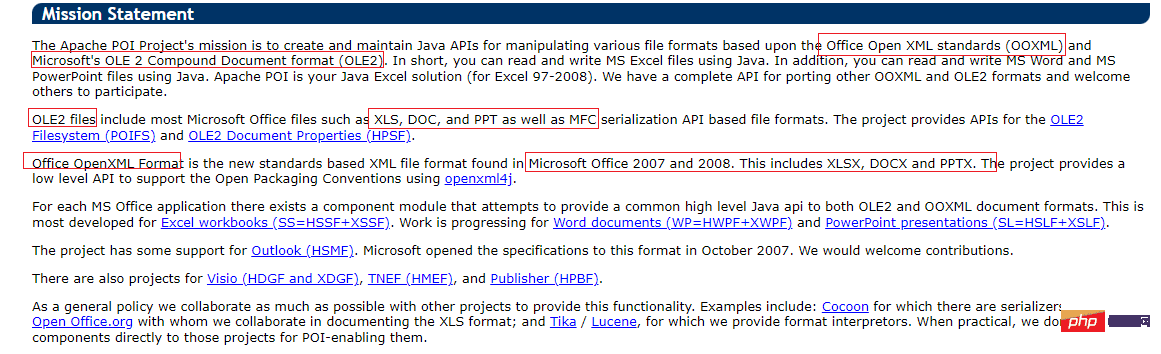
知识准备需要理解ApachePOI遵循的标准(OfficeOpenXML(OOXML)标准和微软的OLE2复合文档格式(OLE2)),这将对应着API的依赖包。什么是POIApachePOI是用Java编写的免费开源的跨平台的JavaAPI,ApachePOI提供API给Java程序对MicrosoftOffice格式档案读和写的功能。POI为“PoorObfuscationImplementation”的首字母缩写,意为“简洁版的模糊实现”。ApachePOI是创建和维护操作各种符合Offic
 springboot怎么整合shiro实现多验证登录功能May 10, 2023 pm 04:19 PM
1.首先新建一个shiroConfigshiro的配置类,代码如下:@ConfigurationpublicclassSpringShiroConfig{/***@paramrealms这儿使用接口集合是为了实现多验证登录时使用的*@return*/@BeanpublicSecurityManagersecurityManager(Collectionrealms){DefaultWebSecurityManagersManager=newDefaultWebSecurityManager();
 Springboot如何实现视频上传及压缩功能May 10, 2023 pm 05:16 PM
一、定义视频上传请求接口publicAjaxResultvideoUploadFile(MultipartFilefile){try{if(null==file||file.isEmpty()){returnAjaxResult.error("文件为空");}StringossFilePrefix=StringUtils.genUUID();StringfileName=ossFilePrefix+"-"+file.getOriginalFilename(


Hot AI Tools

Undresser.AI Undress
AI-powered app for creating realistic nude photos

AI Clothes Remover
Online AI tool for removing clothes from photos.

Undress AI Tool
Undress images for free

Clothoff.io
AI clothes remover

AI Hentai Generator
Generate AI Hentai for free.

Hot Article
Hot Tools

SublimeText3 Chinese version
Chinese version, very easy to use

mPDF
mPDF is a PHP library that can generate PDF files from UTF-8 encoded HTML. The original author, Ian Back, wrote mPDF to output PDF files "on the fly" from his website and handle different languages. It is slower than original scripts like HTML2FPDF and produces larger files when using Unicode fonts, but supports CSS styles etc. and has a lot of enhancements. Supports almost all languages, including RTL (Arabic and Hebrew) and CJK (Chinese, Japanese and Korean). Supports nested block-level elements (such as P, DIV),

SublimeText3 Linux new version
SublimeText3 Linux latest version

MantisBT
Mantis is an easy-to-deploy web-based defect tracking tool designed to aid in product defect tracking. It requires PHP, MySQL and a web server. Check out our demo and hosting services.

SAP NetWeaver Server Adapter for Eclipse
Integrate Eclipse with SAP NetWeaver application server.

