
Home >Backend Development >PHP Tutorial >Summary of problems encountered by thinkphp5 during server deployment
Summary of problems encountered by thinkphp5 during server deployment

- 不言Original
- 2018-08-15 09:48:416418browse
This article brings you a summary of the problems encountered by thinkphp5 in the process of deploying the server. It has certain reference value. Friends in need can refer to it. I hope it will be helpful to you.
I have encountered many pitfalls in the recent deployment of TP5, and some problems will occur in various environments. The following is the way I recorded the pitfalls
Let’s talk about the simplest lnmp one-click installation package first. Using the 1.5 stable version
Installation command:wget http://soft.vpser.net/lnmp/lnmp1.5.tar.gz -cO lnmp1.5. tar.gz && tar zxf lnmp1.5.tar.gz && cd lnmp1.5 && ./install.sh lnmp (one-click installation and compilation)
If you need to install LNMPA or LAMP, install . Just replace the parameter lnmp after /install.sh with lnmpa or lamp. If you need to change the website and database directories, customize Nginx parameters, PHP parameter modules, open lua, etc., you need to modify the lnmp.conf file in the installation package directory before running the ./install.sh command. For details, you can view the lnmp.conf file parameter description. .
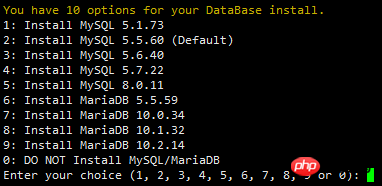
The first tip: Provide a database (I use 3), just enter the number and press Enter
Second prompt: Enter database password

Third prompt: Whether to enable it Innodb, just press Enter or press y

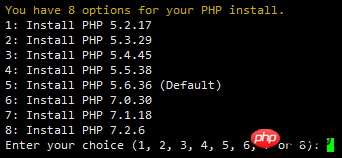
##Fourth tip: Select the PHP version (default 5.6) Mine It is the default version
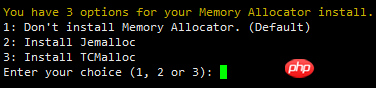
The fifth tip: I chose not to install it by default (mine is the default)
Sixth tip: Select the apache version (the default I chose)

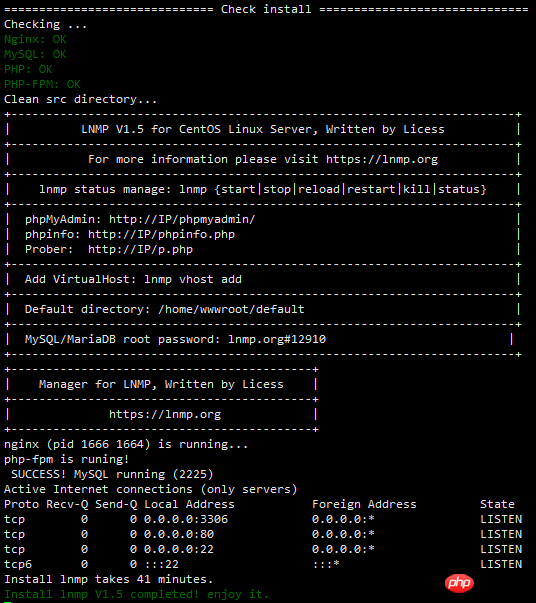 and Nginx, MySQL, PHP is all running, and ports 80 and 3306 exist. If it prompts the installation time and Install lnmp V1.5 completed! enjoy it., it means the installation has been successful.
After the installation is complete, you can start using it. Press
Add virtual host tutorial
. After adding the virtual host, you can use sftp or ftp server to upload the website code and resolve the domain name to the VPS or server. On the IP, it can be used after the resolution takes effect.
 If a prompt similar to the picture above appears, there is a Or several failed installations indicate that the installation failed! ! You need to use winscp or other similar tools to download lnmp-install.log under the /root directory, post on the LNMP support forum and indicate your system distribution name and version number, 32-bit or 64-bit, etc., and copy lnmp -The install.log is compressed and uploaded to the forum as an attachment. We will find errors through the logs and provide corresponding solutions
By default, LNMP does not install an FTP server. If an FTP server is required: https://lnmp .org/faq/ftpserver.html
##lnmp vhost add // Add virtual host
 ##Enter your virtual domain name, mine is www.tp5api.cn

Note that if you want to enter it, it must be a full path, that is, a complete path starting with /!!! ). If you press Enter without typing, the default directory is used: /home/wwwroot/domain name
Enable pseudo-static, which is beneficial to SEO optimization

By default, there are discuz, discuzx, discuzx2 (Discuz X secondary directory), wordpress, wp2 (WordPress secondary directory), typecho, typecho2 (Typecho secondary directory), sablog, emlog, dabr, phpwind,, dedecms Commonly used Nginx pseudo-static configuration files such as , drupal, ecshop, shopex, etc. can be used by directly entering the name. If it is a secondary directory, it needs to correspond to the name of the secondary directory in the configuration file.

Whether to enable the error log

If enabled, you need to enter the name of the log to be set. The default log directory is :/home/wwwlogs/ The default file name is: domain name.log. After pressing Enter to confirm, you will be asked whether to add a database and database user.

If you want to add, you need to verify the MySQL root password first (Note: Entering the password will not be displayed)
Prompt Enter database name: and then enter the name of the database to be created , the database user name to be created will have the same name as the database, press Enter to confirm.
Prompt Please enter password for mysql user database name: Enter the password to be set and press Enter to confirm.
If an FTP server is installedIt will ask whether to add an FTP account

If you need to add it, enter y, if not, enter n and press Enter .

prompts Enter ftp account name: and then enter the name of the FTP account to be created and press Enter to confirm.
Prompt Enter password for ftp account FTP account: Enter the password to be set and press Enter to confirm.
Next is the new SSL function added in 1.4
If you need to add input y, do not add input n and press Enter.
If you choose to add SSL, you will be prompted with 
There are two options. Option 1 is to use the SSL certificate and key you have prepared. 
> > When prompted, Please enter full path to SSL Certificate file, enter the full path and file name of the SSL certificate you want, and press Enter to confirm.
> > Prompt Please enter full path to SSL Certificate Key file: Then enter the full path and file name of the key file, and press Enter to confirm.
2 Option is to use the certificate of free SSL certificate provider Letsencrypt to automatically generate SSL certificate and other information. 
You need to enter an email address and press Enter to confirm.
Prompt Press any key to start create virtul host... After pressing Enter to confirm, the creation of the virtual host will begin.
If the addition is successful, you will be prompted with the added domain name, directory, pseudo-static, log, database, FTP and other related information, as shown below: 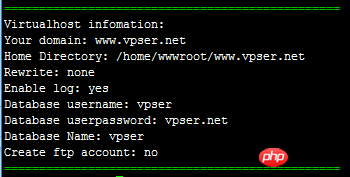
##Pseudo-static Management
##LNMPA or LAMP can directly use the website root directory to download .htaccess to set pseudo-static rules (for specific rules, you can go to the official website of the program to find Google Baidu), but under LNMP, you need to use Nginx Pseudo-static rules.
Pseudo-static can be added or deleted at any time. If you forget or do not add pseudo-static after adding the virtual host, you can add pseudo-static by modifying the configuration file.
The virtual host configuration file is at:/usr/local/nginx/conf/vhost/domain name.conf
The pseudo-static rule file needs to be placed under /usr/local/nginx/conf/.
To edit the virtual host configuration file, you can use vi, nano or winscp. The latter two tools are easier for novices.
For example, after opening the virtual host we added earlier, the first half of the configuration will be displayed as follows: 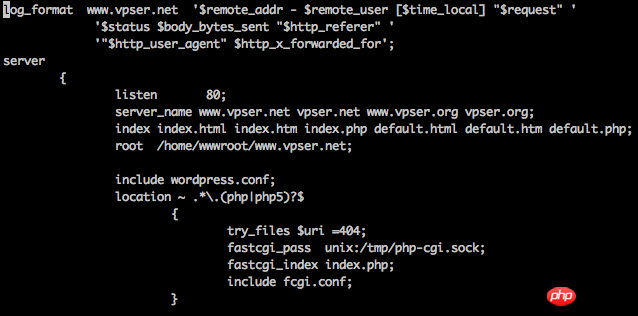
Add below the line root /home/wwwroot/www.vpser.net;:
include wordpress.conf;
The above wordpress.conf is a pseudo-static file. If you need other pseudo-static files, create one yourself and upload it to /usr/local/nginx/conf/ and include pseudo-static.conf; After adding and saving, execute: /etc/init.d/nginx restart The restart will take effect. If an error is reported, it may be that the addition is incorrect or the pseudo-static rule is incorrect.
The pseudo-static files of 1.4 and earlier versions are all in the /usr/local/nginx/conf/ directory
The pseudo-static files of 1.5 and later versions are all in the /usr/local/nginx/conf/rewrite directory
The name of the pseudo-static file with 2 behind it is the pseudo-static of the secondary directory. You can modify the name of the secondary directory according to your own needs or copy it to another name and include it in the virtual host configuration file.
##Upload website program
##If you have installed the FTP server, you can directly use the ftp client to log in with your FTP information and upload the website or sftp and other software to upload the website, set Once you have obtained the relevant permissions, you can start the installation.
After uploading the website, it is recommended to execute: chown www:www -R /path/to/dir to set permissions on the website directory, and replace /path/to/dir with your website directory.
For security reasons, you can remove execution permissions from directories such as uploaded files that do not require PHP to run. Reference: http://www.vpser.net/security/lnmp-remove-nginx-php-execute.html
##Add a ssl certificate to an existing virtual host and enable https
##To add an https site to an existing virtual host, you can execute: lnmp ssl The add command adds an ssl certificate. There are currently two ways: one is to use your own ssl certificate, and the other is to use Let's Encrypt's free certificate. The adding process is the same as the previous process of adding a virtual host, except that there is an additional step to fill in the SSL certificate and key or directly select Let'sEncrypt to automatically generate the certificate.
If you upgrade from version 1.* to 1.4 or change the version, you need to refer to the instructions in: https://lnmp.org/faq/upgrade1-4.html. If there is a prompt that it is unsafe or the little green lock is not displayed, There are also instructions in the link.
##List website (virtual host)
##Execute: lnmp vhost list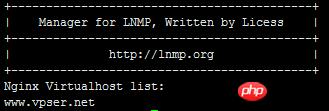
##Delete website (virtual host)
##Execute: lnmp vhost del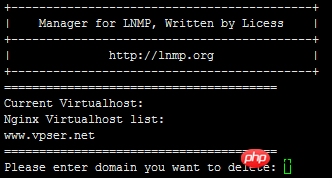
Deleting a website will first list the existing virtual hosts. Follow the prompts to enter the domain name of the virtual host to be deleted and press Enter to confirm.
This is just to delete the virtual host configuration file. The website files will not be deleted and you need to delete them yourself.
Under LNMP 1.2, you need to execute: chattr -i /website directory/.user.ini before you can delete the website directory.
When executing chown or chmod to operate the owner group or permissions of the website directory, you may be prompted chown: changing ownership of `/home/wwwroot/default/.user.ini': Operation not permitted, no You need to pay attention. If you have obsessive-compulsive disorder, you can refer to the previous chattr -i operation.
##Default website (virtual host)
##LNMP default website configuration file:/usr/local/nginx/conf/nginx.conf
LNMPA Default website configuration file: /usr/local/nginx/conf/nginx.conf and /usr/local/apache/conf/extra/httpd-vhosts.conf
LAMP default website configuration file: /usr/local/apache/ conf/extra/httpd-vhosts.conf
##Anti-cross-directory settings
##LNMP 1.1 and previous versions use php.ini, open_basedir setting
LNMP 1.2 and higher versions use .user.ini to prevent cross-directory functions. This file is in the root directory of the website. You can modify the open_basedir value in .user.ini to set the directory to restrict access or Delete to remove the anti-cross-directory settings.
.user.ini file cannot be modified directly. If you want to repair or delete it, you need to execute: chattr -i /website directory/.user.ini
You can use winscp file management, vim editor or nano editing The device is modified.
To delete it, just rm -f /website directory/.user.ini.
After the modification is completed, execute: chattr i/website directory/.user.ini
.user.ini does not need to be restarted and will take effect in about 5 minutes. You can also restart php-fpm and it will take effect immediately.
If you want to change the website directory, you must modify the anti-cross-directory settings according to the above method, otherwise an error will definitely be reported! !
On LNMP 1.4, if you do not want to use anti-cross-directory or modify the anti-cross-directory directory of .user.ini, you also need to change the directory in /usr/local/nginx/conf/fastcgi.conf fastcgi_param PHP_ADMIN_VALUE "open_basedir=$document_root/:/tmp/:/proc/"; Add # before the line or delete and change the line. You need to restart nginx.
On LNMP 1.4, you can also directly use ./remove_open_basedir_restriction.sh in the lnmp1.4/tools/ directory to remove it.
In frameworks such as Thinkphp, codeigniter, Laravel, etc., the website directory is generally under public, but programs under public need to cross directories to call files under the public parent directory, because LNMP does not allow cross-directory access by default. , so it is necessary to remove the settings to prevent cross-directory access. Sometimes these framework programs prompt 500 errors, which may also be caused by this problem.
LNMPA or LAMP mode version 1.2 or above uses the corresponding apache virtual host configuration file for anti-cross-directory settings (if added by the lnmp management tool, the file is /usr/local/apache/conf/ Set the php_admin_value open_basedir parameter in vhost/domain name.conf). If you do not need to set it, you can add # in front to comment, or modify the directory restrictions yourself.
Restart apache to take effect.
##pathinfo settings
##The settings for each version of pathinfo on LNMP are basically the same:
On lnmp v1.1, modify the configuration file of the corresponding virtual host (/usr/local/nginx/conf/vhost/domain name.conf)
Remove the # in front of #include pathinfo.conf and set try_files $uri = 404; is commented out by adding # in front of it.
1.2, 1.3, 1.4, 1.5 and above, modify the configuration file of the corresponding virtual host (/usr/local/nginx/conf/vhost/domain name.conf)
Will include enable-php.conf ;Replace with include enable-php-pathinfo.conf;
If you enable pathinfo in multiple PHP versions of version 1.4, enter the /usr/local/nginx/conf directory and copy a copy of enable-php-pathinfo.conf and name it enable-php7.2-pathinfo.conf, copy the entire fastcgi_pass line in the enable-php7.2.conf file and replace the fastcgi_pass line in the enable-php7.2-pathinfo.conf file, save it, and then press the previous button Just modify the virtual host include enable-php7.2-pathinfo.conf; and so on for other versions.
If you enable pathinfo for multiple PHP versions in version 1.5, you can choose to enable pathinfo in lnmp vhost add. If there are multiple PHP versions, you will be prompted to choose. You can also directly modify the virtual host configuration file to include enable-php. conf; Replace with include enable-php7.2-pathinfo.conf; Save
Modifying pathinfo requires restarting nginx to take effect.
##Database management
##1.3 or above, you can choose to create a database when adding a virtual host, or you can create it separately Use lnmp database add to add the database as prompted. The added user name and database name have the same name.
Add database command: lnmp database add
Edit database user password command: lnmp database edit
Delete database command: lnmp database del
List all database commands: lnmp database list
These information are all found at https://lnmp.org/faq/lnmp-vhost-add-howto.html (found on lnmp official website)
Many things are copied directly and written to my level It will not be better than the official website manual
If someone uses Pagoda tp5 and reports an error open_base_dir, there is a security protection in the website settings, just turn it off (it took me a long time)
Related recommendations:
CentOS 6 Deployment Nginx PHP5 Server
thinkphp is deployed to Wanwang Cloud Server and reports that it cannot connect to mysql
The above is the detailed content of Summary of problems encountered by thinkphp5 during server deployment. For more information, please follow other related articles on the PHP Chinese website!