Home >Backend Development >PHP Tutorial >Summary of usage of GridView in Yii2
Summary of usage of GridView in Yii2
- 不言Original
- 2018-07-10 14:49:186804browse
This article mainly introduces a summary of the usage of GridView in Yii2. It has a certain reference value. Now I share it with you. Friends in need can refer to it.
We use the yii2.0.14 version , for the convenience of learning, it is written in question and answer format.
Start GridView
GridView is mainly to achieve table reuse. Especially when we are working in the background, you will find that forms and tables occupy most of the page, and the styles of the tables are highly unified. , then it would be great if there was such a widget that could automatically render tables when incoming data sets.
So GridView appeared, a detailed and stable table rendering widget.
Usually GridView is used in conjunction with various dataProviders. I have written an article before about the dataProvider in the yii2 framework. You can read it. This will help you learn GridView. A small talk about the three data providers in yii2 and their use with GridView
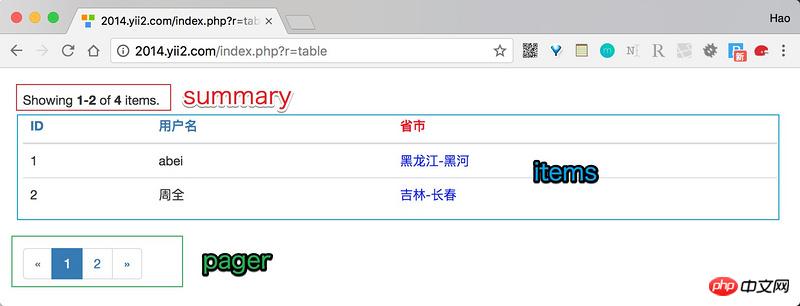
Before learning the GridView widget, we need to understand the structure of GridView first, see the figure below.
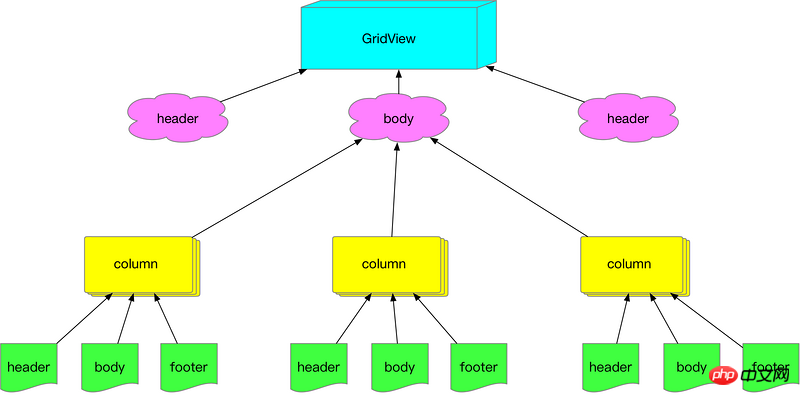
Simply put, a GridView consists of N columns, and each column has its own header, content and footer operations. This is in the GridView code. It is reflected in
try {
    echo GridView::widget([
        'dataProvider' => $dataProvider,

        'columns'=>[
            'id',
            'created_at:datetime:生成时间',
            [
                'label'=>'会员名',
                'attribute'=>'username',
                'format'=>'text'
            ],
        ]
    ]);
}catch(\Exception $e){
    // todo
}
Of course yii2 has done quite a bit of detail. You don’t need to write columns. GridView will automatically render each column according to the dataProvider. Next, we will start the question and answer area and gain a deeper understanding through question and answer. GridView.
Preparation phase
In order for the Q&A to proceed smoothly, we simulated a data table as the source of the result set.
| username | province | city | created_at | updated_at | Sex | |
|---|---|---|---|---|---|---|
| abei | 黑龙江 | 黑河 | 1514201852 | 1528707743 | 1 | ##2 |
| Jilin | Changchun | 1528115243 | 1528115243 | 1 | ##3 | |
| 吉林 | 松元 | 1528180018 | 1528255890 | 1 | 4 | |
| Liaoning | Shenyang | 1528265883 | 1528265883 | 0 | ||
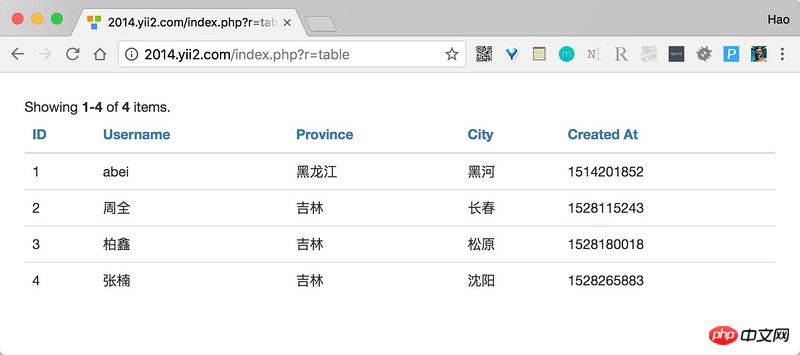
#Column在A系列中我们先说说GridView中column的使用方法。 A1. 请渲染出id、username、province、city和sex。当我们只需要$dataProvider每个对象的某些属性的时,则必须要指定columns属性,代码如下 try {
echo GridView::widget([
'dataProvider' => $dataProvider,
'columns'=>[
'id',
'username',
'province',
'city',
'created_at'
]
]);
}catch(\Exception $e){
// todo
}
结果如下
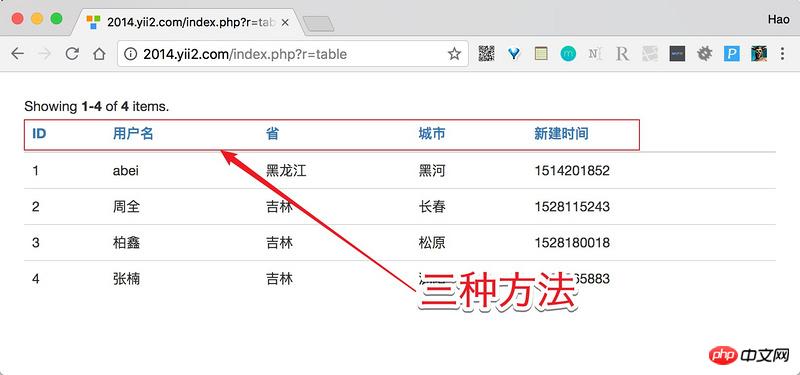
A2.我想更改列的头部内容在A1中我们发现每一列的头部是英文,现在想改成中文,有三个方法 方法1 更改对应模型中的attributeLabels方法 // app\models\User
class User extends \yii\db\ActiveRecord {
public function attributeLabels(){
return [
'id' => 'ID',
'username' => '用户名',
'province' => '省',
'city' => '城市',
'created_at' => '新建时间',
'updated_at' => '最近更新',
'sex' => '性别',
];
}
}
当我们重新设置了attributeLabels方法后,对应的GridView会自动去拿取。 方法2 设置一个column的label属性,如下代码 try {
echo GridView::widget([
'dataProvider' => $dataProvider,
'columns'=>[
'username:text:用户名'
]
]);
}catch(\Exception $e){
// todo
}
可以通过设置列的label属性实现,就像 username:text:用户名,用英文冒号:分隔,分别是属性名、格式以及label。 方法3 使用GridView的自定义属性,如下代码 try {
echo GridView::widget([
'dataProvider' => $dataProvider,
'columns'=>[
[
'label'=>'用户名',
'attribute'=>'username'
]
]
]);
}catch(\Exception $e){
// todo
}
上面3种方法都可以,从1-3越来越灵活,当然代码量也越来越大,第1种最简单,第3种最灵活。
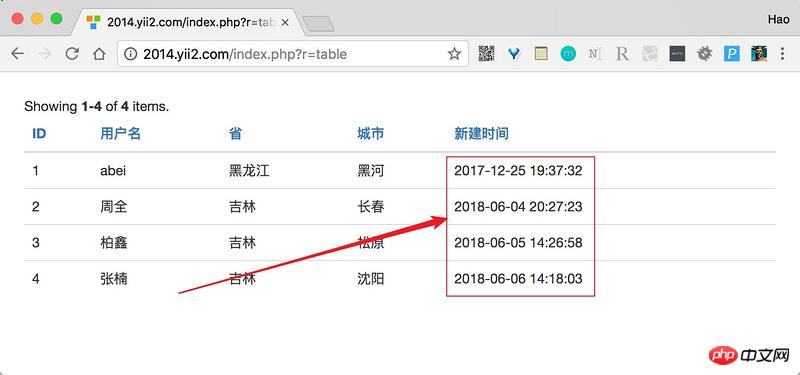
A3.我不要时间戳在A2中,我们看到新建时间这一列的内容竟然直接出现了时间戳,怎么变成对应的时间那?关于这个问题其实也有两种方法。 方法1 设置column的format属性 try {
echo GridView::widget([
'dataProvider' => $dataProvider,
'columns'=>[
'created_at:datetime'
]
]);
}catch(\Exception $e){
// todo
}
方法2 通过传递一个数组类型的column并设置其value来实现,如下代码 try {
echo GridView::widget([
'dataProvider' => $dataProvider,
'columns'=>[
[
'attribute'=>'created_at',
'value'=>function($model){// 形参为此行记录对象
return date("Y-m-d H:i:s",$model->created_at);
}
]
]
]);
}catch(\Exception $e){
// todo
}
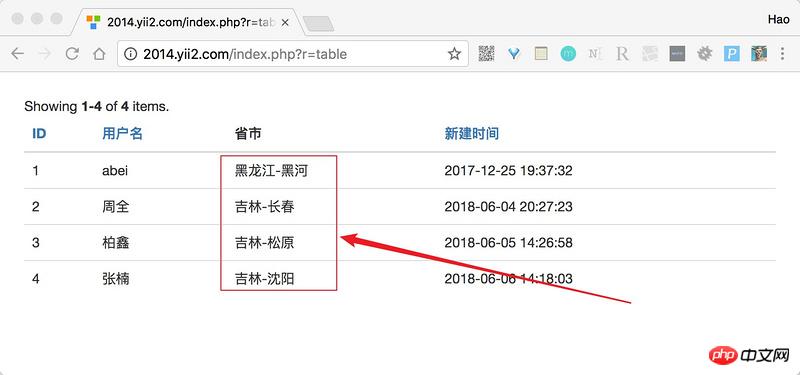
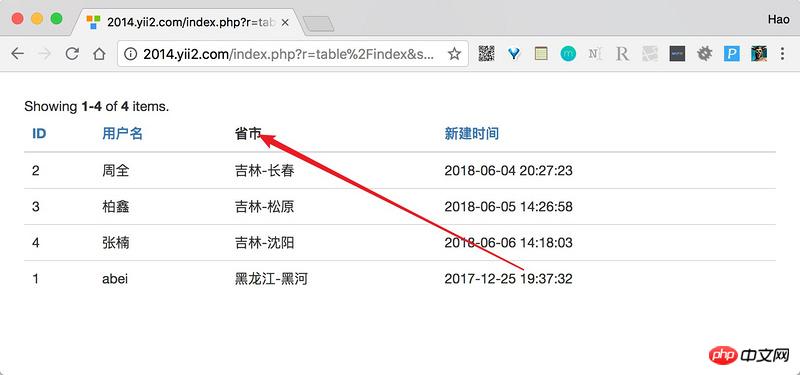
从A3的方法1和方法2来看,其实方法1更多是方法2的快捷方式,因此我们通过设置数组类型column的format属性等于datetime也能实现此题的需求。 A4.我想定义一个属性叫省市,将省和市字段内容合并通过对A2和A3的学习,我想你已经知道可以通过数组类型的column来解决这个,没错,如下代码 try {
echo GridView::widget([
'dataProvider' => $dataProvider,
'columns'=>[
[
'label'=>'省市',
'value'=>function($model){
return "{$model->province}-{$model->city}";
}
]
]
]);
}catch(\Exception $e){
// todo
}
value 属性代表此单元格的数据内容,将结果返回即可,就像结果图一样。
但是问题出现了,我希望省市一列按照省属性来排序,怎么办?只需要指定attribute即可,这也是我们控制列排序的一种方法。 try {
echo GridView::widget([
'dataProvider' => $dataProvider,
'columns'=>[
[
'label'=>'省市',
'attribute'=>'province',
'value'=>function($model){
return "{$model->province}-{$model->city}";
}
]
]
]);
}catch(\Exception $e){
// todo
}
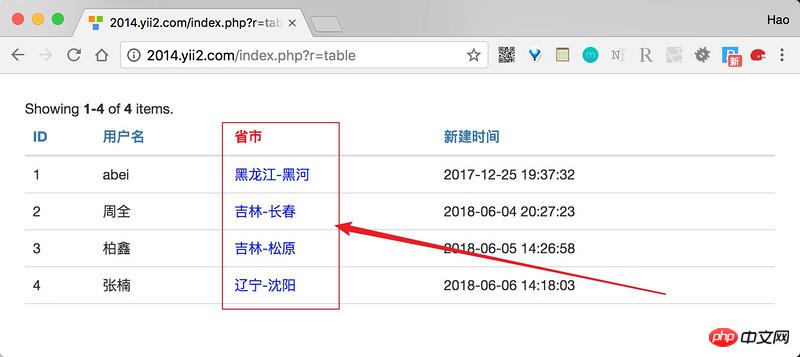
A5.如何控制列排序?从A4我们知道通过设置column的attribute属性控制是否排序,但是attribute的本意并不在此,因此我们标准的去掉排序或设置排序的方法是通过其enableSorting属性实现的。 try {
echo GridView::widget([
'dataProvider' => $dataProvider,
'columns'=>[
[
'label'=>'省市',
'attribute'=>'province',
'enableSorting'=>false,
'value'=>function($model){
return "{$model->province}-{$model->city}";
}
]
]
]);
}catch(\Exception $e){
// todo
}
默认enableSorting为true,可以通过设置为false来取消此列排序功能,如下图。
A6.列的样式如何控制?到现在你已经知道了5个使用GridView的技巧,我们继续,在A6中我们尝试改变表格某一列的样式。针对于列样式,GridView提供了3个属性,分别为headerOptions、contentOptions和footerOptions。 现在我们来做一个需求,将省市这一列个性化,列的头部编程红色,列的内容编程蓝色,如下 try {
echo GridView::widget([
'dataProvider' => $dataProvider,
'columns'=>[
[
'label'=>'省市',
'attribute'=>'province',
'enableSorting' => false,
'value'=>function($model){
return "{$model->province}-{$model->city}";
},
'headerOptions' => ['style'=>'color:red'],
'contentOptions' => ['style'=>'color:blue'],
]
]
]);
}catch(\Exception $e){
// todo
}
是的,使用这一列的headerOptions和contentOptions即可
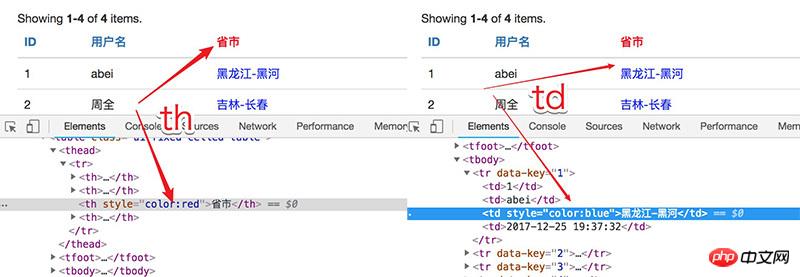
有个要注意的地方,我们使用浏览器的f12看看标注颜色的列。
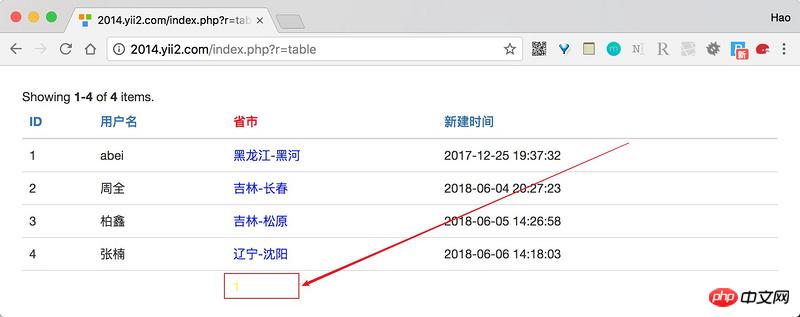
你看到了,headerOptions和contentOptions直接作用到了th和td标签,为其增加类似于style等属性,因此如果你的th或td标签中还有其他的html标签,直接定义style就无法生效了,此时可以通过css类解决这个问题。 A7.关于GridView中footerOptions的使用。在A6中我们说GridView的列有一个footerOptions属性,那么这个属性是干嘛用的那?从单词上分析是控制列footer的属性(比如样式等等),但是footer在哪里???在哪里在哪里? 需要先设置GridView的showFooter等于true才可以。才可以才可以。 try {
echo GridView::widget([
'dataProvider' => $dataProvider,
'columns'=>[
[
'label'=>'省市',
'attribute'=>'province',
'enableSorting' => false,
'value'=>function($model){
return "{$model->province}-{$model->city}";
},
'headerOptions' => ['style'=>'color:red'],
'contentOptions' => ['style'=>'color:blue'],
'footerOptions'=>['style'=>'color:yellow']
]
],
'showFooter'=>true
]);
}catch(\Exception $e){
// todo
}
在showFooter=true的天空下,列的footerOptions才能自由飞翔。
从原理上说,'showFooter'=>true的结果是让table出现了下面代码 <tfoot> <tr> <td></td> <td></td> <td></td> </tr> <tr> </tr> </tfoot> 因此每列的footerOptions就控制着在tfoot中这一列对应的td。 A8.footerRowOptions你是干毛用的?在我们大摇大摆的用着A8中的showFooter的时候,突然PhpStorm自动关联出一个footerRowOptions,这是个什么东西那? footerRowOptions是GridView的属性,它控制着tfoot的tr标签属性,简单点说,你最后在tfoot上每个单元格看到的效果是footerRowOptions + footerOptions 的结合体(就style而言)。 比如针对上面的例子我们在配置下footerRowOptions 'footerRowOptions'=>['style'=>'font-size:20px;'] 则你会发现黄色字体变成了20px。 要注意:A6、A7和A8中的这些xxxOptions所能控制的是标签的属性,不单单是style。 A9.showFooter的大家族从A7中我们知道了GridView的showFooter,它决定这table是否显示tfoot信息,除此之外show家族还有一些其他成员。
A10.魔术师visible的戏法这个片段我们说下GridView列的visible属性,此属性默认为true代表此列显示,通过设置visible属性可以隐藏一列,这种隐藏非css的display:none,而是在渲染表格的时候就去掉了此列。 你可能会问,如果我要使用visible来隐藏一列,我不写这一列不就好了么? 是的,你的思路没错,但是visible是可以传递一个表达式,实现逻辑判断,比如下面的需求当1号管理员登录的时候可以看到省市一列。 try {
echo GridView::widget([
'dataProvider' => $dataProvider,
'columns'=>[
[
'label'=>'省市',
'attribute'=>'province',
'enableSorting' => false,
'value'=>function($model){
return "{$model->province}-{$model->city}";
},
'visible'=>(Yii::$app->admin->id === 1)
]
],
'showFooter'=>true
]);
}catch(\Exception $e){
// todo
}
A1-A10 我们重点说的是GridView每列的公共属性,这并不是全部,针对于不同类型的列还有会其他的属性,比如DataColumn、ActionColumn、CheckboxColumn等等,针对于不同类型列的讲解,要后续放出。 GridView接下来我们进入B系列,B系列的重点在讲解GridView。 B1 关于布局layout默认情况下GridView的布局如下图
这个布局来自于GridView的layout属性,我们可以改变这个模板,比如要去掉summary。 try {
echo GridView::widget([
'dataProvider' => $dataProvider,
'columns'=>[
],
'layout'=>"{items}\n{pager}"
]);
}catch(\Exception $e){
// todo
}
layout内有5个可以使用的值,分别为{summary}、{errors}、{items}、{sorter}和{pager}。 B2.指定列默认的类型 dataColumnClass在一个表格中每列都有不同的作用,有的是数据类型的、有的是复选框类型,具体有5种
通过GridView可以设置一列的默认类型,当然你可以针对特殊的类单独指定其class。 try {
echo GridView::widget([
'dataProvider' => $dataProvider,
'columns'=>[
],
'dataColumnClass'=>"yii\grid\DataColumn"
]);
}catch(\Exception $e){
// todo
}
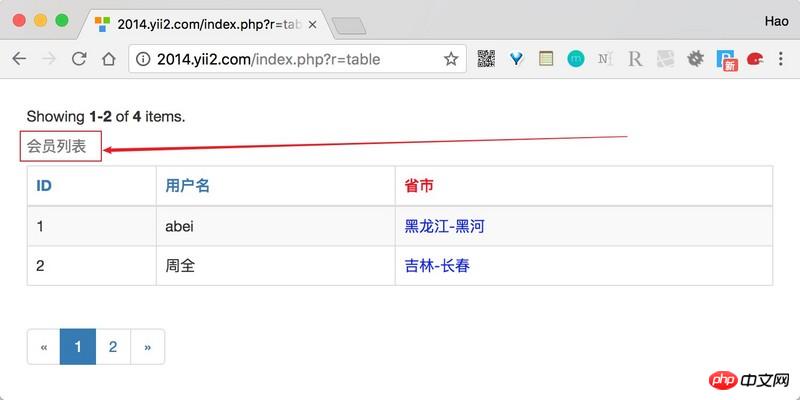
B3.caption属性我们可以通过设置GridView的caption属性来实现table的caption功能,作为table用途非常有用。 try {
echo GridView::widget([
'dataProvider' => $dataProvider,
'columns'=>[
],
'caption'=>"会员列表"
]);
}catch(\Exception $e){
// todo
}
效果图如下
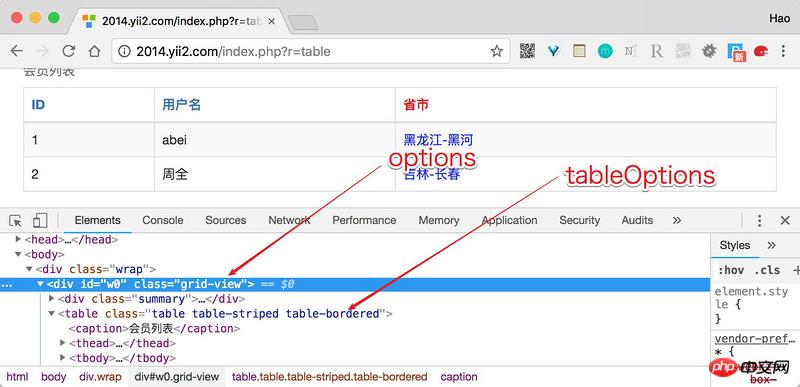
当然不用多说,GridView也提供了captionOptions属性来让你控制caption的属性。 B4.tableOptions和options属性这两个属性有的开发者可能会混淆,接下来我用一张图让你瞬间明白。
就是说GridView渲染的时候首先弄出来一个p容器,这是这个GridView的代表,接下来在此容器内放各种元素,比如{summary}、{items}等等。
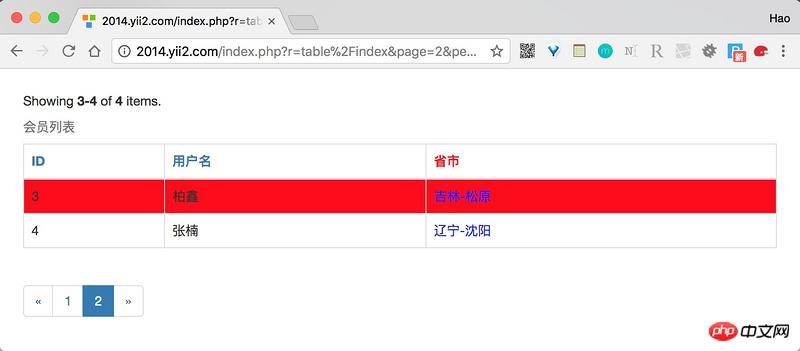
现在你会改table的样式类了么? B5.一堆好基友 headerRowOptions 和 footerRowOptions我们在A8中讲了footerRowOptions的用法,headerRowOptions的用法和它一样,只不过它管理的是thead下tr的属性。 B6.rowOptions学会了B5,你可能看着rowOptions一眼识破,没错它的目的就是管理tbody下的每个tr,但是它更强大,除了直接接收一个数组外还能传入匿名函数。 你可以融入你的逻辑,比如现在我们要用rowOptions实现隔行换色的功能,来吧。 try {
echo GridView::widget([
'dataProvider' => $dataProvider,
'columns'=>[
],
'rowOptions'=>function($model,$key, $index){
if($index%2 === 0){
return ['style'=>'background:red'];
}
}
]);
}catch(\Exception $e){
// todo
}
目的达到,看效果
对于rowOptions接收的匿名行数的4个形参,这里说明一下
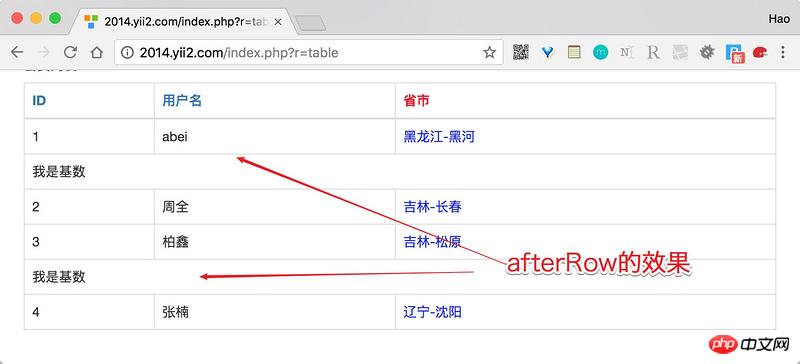
B7. beforeRow和afterRow这是一对非常灵活的属性,它们接收一个匿名函数。分别表示在渲染了一行之前和之后发生点什么?当然具体发生什么由你来决定。 要记住的是,匿名函数返回的结果也会作为一行纳入到渲染过程,比如当我们遇到奇数的时候就在此行下面添加一行,可以如下代码 try {
echo GridView::widget([
'dataProvider' => $dataProvider,
'tableOptions' => ['class'=>'table table-bordered'],
'columns'=>[
'id',
'username:text:用户名',
.....
],
'afterRow'=>function($model,$key, $index,$grid){
if(($index+1)%2 != 0){
return "<tr><td>我是基数</td></tr>";
}
}
]);
}catch(\Exception $e){
// todo
}
非常好,得到了我们想要的结果
B8. 两个小盆友placeFooterAfterBody & emptyCell很细节的两个小属性
小结不知不觉写了3000多字,本想一篇完成GridView的讲解,现在看来比较困难,毕竟还有很多类型的列要去研究分享,还是变成专题吧,接下来我会对每个列做单独的分析,希望对你有用。 以上就是本文的全部内容,希望对大家的学习有所帮助,更多相关内容请关注PHP中文网! 相关推荐: |
The above is the detailed content of Summary of usage of GridView in Yii2. For more information, please follow other related articles on the PHP Chinese website!


