


This article mainly introduces JavaScript to create a simple frame chart in detail, which has certain reference value. Interested friends can refer to it
Story background: I encountered this in the past few days A customer is taking meeting minutes. During each meeting, a specific device will record the speaker's position and display it as an angle value. He gave me the angle values and asked me to make him a diagram showing an approximate position of each person.
The customer thought of using Echarts charts. The first thing I thought of was using Echarts. However, after thinking about his request, I realized that using Echarts to create a simple frame selection chart would be overkill, and There is also so much useless code to import.
So I thought of using canvas to imitate it, but after thinking about it again, canvas was not easy to operate. Can I use ordinary css combined with javascript to make it? This reflection proves that you must use your brain more when doing anything in order to find a simpler way to solve the problem.
Considering that maybe everyone will need it one day, I released it. Note: It has portability and can be moved to any position on the page, and the effect will not change
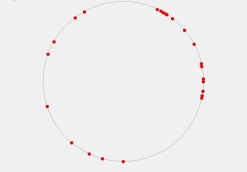
Let’s take a look at the final effect first:
Figure 1:


Picture 2:
<!doctype html>
<html>
<head>
<meta charset="utf-8" />
<title>仿Echarts图表</title>
<style>
* {
padding:0;
margin:0;
}
#getcharts {
position:relative;
width:510px;
height:510px;
}
#wrapcharts {
list-style:none;
height:500px;
width:500px;
border:2px solid #aaa;
border-radius:50%;
position:relative;
margin:20px auto;
}
#wrapcharts li {
height:10px;
width:10px;
diaplay:block;
position:absolute;
cursor:pointer;
left:247px;
top:2px;
height:10px;
width:10px;
transition:0.2s;
background:red;
border-radius:50%;
}
#boxshadow {
position:absolute;
background:blue;
opacity:0.2;
height:0;
width:0;
left:0;
top:0;
}
</style>
</head>
<body>
<ul id="wrapcharts"></ul>
<p id="boxshadow"></p>
<script>
/*
**模拟从后端取值过来的【角度】和相对应的【人名】数组
**/
var degArr = [25,88,252,323,33,28,30,90,290,100,300,50,180,205,220,331,195,97,102,77,62,38,32,79];
var nameArr = ['内衣天使','小恶魔','金正恩','奥巴马','duolaA梦','午夜激情','梁静茹','刘亦菲','琪琪','大熊','小静','小屁孩','张三','李四','王五','麻六','小明','小张','丽丽','多多','瑾瑾','biubiu','Mr.boluo','Hanson'];
/*
**声明 getPos(param)函数: 利用三角函数定理根据传入的角度值获取对边和临边的x,y值
**/
function getPos(deg)
{
var X = Math.sin(deg*Math.PI/180)*250 + 245;
var Y = -Math.cos(deg*Math.PI/180)*250 + 245;
return {x:X,y:Y};
}
/*
**这里不用说吧,获取页面中的ul,和ul中的li对象,以及框选时的那个任意变动大小的小方块对象
**/
var oWrap = document.getElementById('wrapcharts');
var aLi = oWrap.getElementsByTagName('li');
var oBox =document.getElementById('boxshadow');
var allLi = '';
var posArr = [];
/*
**for循环中调用getPos(param)来获取degArr数组中的所有角度对应的x,y值(就是每个角度对应的x,y坐标),并传入到一个数组中保存,方便取用
**/
for(var i=0;i<degArr.length; i++)
{
posArr.push(getPos(degArr[i]));
}
/*
**for循环根据度数数组degArr的长度插入li小圆点到ul中,并将之前获取的每个点对应的x,y左边插入到行内样式
**/
for(var i=0; i<degArr.length; i++)
{
allLi += '<li style="left:'+posArr[i].x+'px;top:'+posArr[i].y+'px;" title="'+degArr[i]+'°;姓名:'+nameArr[i]+'"></li>';
}
oWrap.innerHTML = allLi;
/*
**遍历最终得到的ul中的li
**/
for(var i=0; i<aLi.length; i++)
{
aLi[i].index = i;
/*
**封装鼠标移入每个小圆点时的放大事件,这里用到了matrix矩阵,为的事想兼容ie9以下浏览器,但是好像出了点问题
*/
function focusOn(_this,color, size)
{
_this.style.background = color;
_this.style.WebkitTransform = 'matrix('+size+', 0, 0, '+size+', 0, 0)';
_this.style.MozTransform = 'matrix('+size+', 0, 0, '+size+', 0, 0)';
_this.style.transform = 'matrix('+size+', 0, 0, '+size+', 0, 0)';
_this.style.filter="progid:DXImageTransform.Microsoft.Matrix( M11= "+size+", M12= 0, M21= 0 , M22="+size+",SizingMethod='auto expend')";
}
aLi[i].onmouseover = function()
{
//alert(this.offsetLeft);
_this = this;
focusOn(_this,'blue', 2);
}
aLi[i].onmouseout = function()
{
//alert(this.offsetLeft);
_this = this;
focusOn(_this,'red', 1);
}
}
/***框选***/
/*
**拖拽框选代码区域,这个我就不解释了,明白人都一眼知道什么意思,这就像是公式,
*/
var allSelect = {};
document.onmousedown = function(ev)
{
var ev = ev || window.event;
var disX = ev.clientX;
var disY = ev.clientY;
var H = W = clientleft = clienttop = clientright = clientbottom = 0;
oBox.style.cssText = 'left:'+disX+'px;top:'+disY+'px;';
//console.log(disX+';'+disY);
function again(f)
{
for(var i=0; i<posArr.length; i++)
{
if(posArr[i].x > clientleft && posArr[i].y > clienttop && (posArr[i].x + 10) < clientright && (posArr[i].y +10) < clientbottom)
{
//console.log(clientleft+';'+ clienttop +';'+ clientright +';' + clientbottom);
if(f){allSelect[i] = i;}else{
aLi[i].style.background = 'blue';
}
} else
{
aLi[i].style.background = 'red';
}
}
}
document.onmousemove = function(ev)
{
var ev = ev || window.event;
/*
**当鼠标向四个方向拖拉的时候进行方向判断,并相应的改变小方块的left,top以及width,height
**其实我这里有个问题,那就是,代码重复了一些,本想着合并一下,但是作者有点懒,嘿嘿,你们也可以尝试一下
**修改后你们拿去当做你们的发布,作者不会介意的
*/
if(ev.clientX > disX && ev.clientY > disY)
{
W = ev.clientX - disX;
H = ev.clientY - disY;
oBox.style.width = W + 'px';
oBox.style.height = H + 'px';
clienttop = disY-oWrap.offsetTop;
clientleft = disX-oWrap.offsetLeft;
}else if(ev.clientX < disX && ev.clientY < disY)
{
W = disX - ev.clientX;
H = disY - ev.clientY;
oBox.style.top = ev.clientY + 'px';
oBox.style.left = ev.clientX + 'px';
oBox.style.width = W + 'px';
oBox.style.height = H + 'px';
clienttop = ev.clientY - oWrap.offsetTop;
clientleft = ev.clientX - oWrap.offsetLeft;
}else if(ev.clientX > disX && ev.clientY < disY)
{
W = ev.clientX - disX;
H = disY - ev.clientY;
oBox.style.top = ev.clientY + 'px';
oBox.style.width = W + 'px';
oBox.style.height = H + 'px';
clienttop = ev.clientY - oWrap.offsetTop;
clientleft = disX - oWrap.offsetLeft;
}else if(ev.clientX < disX && ev.clientY > disY)
{
W = disX - ev.clientX;
H = ev.clientY - disY;
oBox.style.left = ev.clientX + 'px';
oBox.style.width = W + 'px';
oBox.style.height = H + 'px';
clienttop = disY-oWrap.offsetTop;
clientleft = ev.clientX - oWrap.offsetLeft;
}
clientright = clientleft+ W;
clientbottom = clienttop + H;
W = '';
H = '';
again();
}
document.onmouseup = function()
{
again(1);
document.onmouseup = document.onmousemove = null;
oBox.style.cssText = 'height:0;width:0;';
if(JSON.stringify(allSelect) == '{}'){return;}
console.log(allSelect);
var lastSelect = [];
for(var attr in allSelect){
lastSelect.push(nameArr[attr]);
}
allSelect = {};
console.log(lastSelect);
alert('你选中的人是:\n\n'+lastSelect+'\n\n');
for(var i=0; i<aLi.length; i++)
{
aLi[i].style.background = 'red';
}
}
return false;
}
</script>
</body>
</html>
Some knowledge points that will be used to expandb = Math.sin(deg/180*Math.PI);c = -Math.sin(deg/180*Math.PI);d = Math. cos(deg/180*Math.PI);7. As for trigonometric functions, I won’t introduce them, Baidu has a lot of them. The above is the entire content of this article. I hope it will be helpful to everyone's study. For more related content, please pay attention to the PHP Chinese website! Related recommendations:
How to use JS and CSS3 to create cool pop-up window effects
javascript to achieve waterfall flow dynamics Loading images
jQuery implements the function of fixing the top display of the sliding page
##
The above is the detailed content of About making a simple frame chart using JavaScript. For more information, please follow other related articles on the PHP Chinese website!

 JavaScript and the Web: Core Functionality and Use CasesApr 18, 2025 am 12:19 AM
The main uses of JavaScript in web development include client interaction, form verification and asynchronous communication. 1) Dynamic content update and user interaction through DOM operations; 2) Client verification is carried out before the user submits data to improve the user experience; 3) Refreshless communication with the server is achieved through AJAX technology.
 Understanding the JavaScript Engine: Implementation DetailsApr 17, 2025 am 12:05 AM
Understanding how JavaScript engine works internally is important to developers because it helps write more efficient code and understand performance bottlenecks and optimization strategies. 1) The engine's workflow includes three stages: parsing, compiling and execution; 2) During the execution process, the engine will perform dynamic optimization, such as inline cache and hidden classes; 3) Best practices include avoiding global variables, optimizing loops, using const and lets, and avoiding excessive use of closures.
 Python vs. JavaScript: The Learning Curve and Ease of UseApr 16, 2025 am 12:12 AM
Python is more suitable for beginners, with a smooth learning curve and concise syntax; JavaScript is suitable for front-end development, with a steep learning curve and flexible syntax. 1. Python syntax is intuitive and suitable for data science and back-end development. 2. JavaScript is flexible and widely used in front-end and server-side programming.
 Python vs. JavaScript: Community, Libraries, and ResourcesApr 15, 2025 am 12:16 AM
Python and JavaScript have their own advantages and disadvantages in terms of community, libraries and resources. 1) The Python community is friendly and suitable for beginners, but the front-end development resources are not as rich as JavaScript. 2) Python is powerful in data science and machine learning libraries, while JavaScript is better in front-end development libraries and frameworks. 3) Both have rich learning resources, but Python is suitable for starting with official documents, while JavaScript is better with MDNWebDocs. The choice should be based on project needs and personal interests.
 From C/C to JavaScript: How It All WorksApr 14, 2025 am 12:05 AM
The shift from C/C to JavaScript requires adapting to dynamic typing, garbage collection and asynchronous programming. 1) C/C is a statically typed language that requires manual memory management, while JavaScript is dynamically typed and garbage collection is automatically processed. 2) C/C needs to be compiled into machine code, while JavaScript is an interpreted language. 3) JavaScript introduces concepts such as closures, prototype chains and Promise, which enhances flexibility and asynchronous programming capabilities.
 JavaScript Engines: Comparing ImplementationsApr 13, 2025 am 12:05 AM
Different JavaScript engines have different effects when parsing and executing JavaScript code, because the implementation principles and optimization strategies of each engine differ. 1. Lexical analysis: convert source code into lexical unit. 2. Grammar analysis: Generate an abstract syntax tree. 3. Optimization and compilation: Generate machine code through the JIT compiler. 4. Execute: Run the machine code. V8 engine optimizes through instant compilation and hidden class, SpiderMonkey uses a type inference system, resulting in different performance performance on the same code.
 Beyond the Browser: JavaScript in the Real WorldApr 12, 2025 am 12:06 AM
JavaScript's applications in the real world include server-side programming, mobile application development and Internet of Things control: 1. Server-side programming is realized through Node.js, suitable for high concurrent request processing. 2. Mobile application development is carried out through ReactNative and supports cross-platform deployment. 3. Used for IoT device control through Johnny-Five library, suitable for hardware interaction.
 Building a Multi-Tenant SaaS Application with Next.js (Backend Integration)Apr 11, 2025 am 08:23 AM
I built a functional multi-tenant SaaS application (an EdTech app) with your everyday tech tool and you can do the same. First, what’s a multi-tenant SaaS application? Multi-tenant SaaS applications let you serve multiple customers from a sing


Hot AI Tools

Undresser.AI Undress
AI-powered app for creating realistic nude photos

AI Clothes Remover
Online AI tool for removing clothes from photos.

Undress AI Tool
Undress images for free

Clothoff.io
AI clothes remover

AI Hentai Generator
Generate AI Hentai for free.

Hot Article
Hot Tools

Safe Exam Browser
Safe Exam Browser is a secure browser environment for taking online exams securely. This software turns any computer into a secure workstation. It controls access to any utility and prevents students from using unauthorized resources.

WebStorm Mac version
Useful JavaScript development tools

SAP NetWeaver Server Adapter for Eclipse
Integrate Eclipse with SAP NetWeaver application server.

MinGW - Minimalist GNU for Windows
This project is in the process of being migrated to osdn.net/projects/mingw, you can continue to follow us there. MinGW: A native Windows port of the GNU Compiler Collection (GCC), freely distributable import libraries and header files for building native Windows applications; includes extensions to the MSVC runtime to support C99 functionality. All MinGW software can run on 64-bit Windows platforms.

Atom editor mac version download
The most popular open source editor

