Video live broadcast has become very popular recently. I found that the current mainstream video live broadcast solutions on the WEB are HLS and RTMP. The mobile WEB side is currently mainly HLS, and the PC side is mainly RTMP. The real-time performance is better. Next, we will focus on these two This video streaming protocol is used to share the H5 live broadcast theme. Let’s share with you the detailed explanation of HTML5 video live broadcast ideas through this article. Let’s take a look together
Preface
Not long ago, I took the time to do some research and exploration on the currently popular video live broadcast, understand its overall implementation process, and explore the feasibility of HTML5 live broadcast on the mobile terminal.
It is found that the current mainstream video live broadcast solutions on the WEB are HLS and RTMP. The mobile WEB end is currently based on HLS (HLS has latency issues, and you can also use RTMP with the help of video.js). The PC end uses RTMP. In order to achieve better real-time performance, H5 live broadcast theme sharing will be carried out around these two video streaming protocols.
1. Video streaming protocol HLS and RTMP
1. HTTP Live Streaming
HTTP Live Streaming (HLS for short) is a video streaming protocol based on HTTP, implemented by Apple. QuickTime, Safari on Mac OS and Safari on iOS all support HLS well. Higher versions of Android also add support for HLS. . Some common clients such as MPlayerX and VLC also support the HLS protocol.
HLS protocol is based on HTTP, and a server that provides HLS needs to do two things:
Encoding: encode images in H.263 format, and encode sounds in MP3 or HE-AAC Encoding, and finally packaged into an MPEG-2 TS (Transport Stream) container; segmentation: split the encoded TS file into small files with the suffix ts of equal length, and generate a .m3u8 plain text index file; the browser uses are m3u8 files. m3u8 is very similar to the audio list format m3u. You can simply think of m3u8 as a playlist containing multiple ts files. The player plays them one by one in order, and then requests the m3u8 file after playing them all, and obtains the playlist containing the latest ts file to continue playing, and the cycle starts again. The entire live broadcast process relies on a constantly updated m3u8 and a bunch of small ts files. m3u8 must be dynamically updated, and ts can be processed through a CDN. A typical m3u8 file format is as follows:
#EXTM3U
#EXT-X-STREAM-INF:PROGRAM-ID=1, BANDWIDTH=200000
gear1/prog_index.m3u8
#EXT-X-STREAM-INF:PROGRAM-ID=1, BANDWIDTH=311111
gear2/prog_index.m3u8
#EXT-X-STREAM-INF:PROGRAM-ID=1, BANDWIDTH=484444
gear3/prog_index.m3u8
#EXT-X-STREAM-INF:PROGRAM-ID=1, BANDWIDTH=737777
gear4/prog_index.m3u8
You can see that the essence of the HLS protocol is still one HTTP request/response, so it has good adaptability and will not Affected by firewall. But it also has a fatal weakness: the delay is very obvious. If each ts is divided into 5 seconds, and an m3u8 puts 6 ts indexes, it will cause at least a 30-second delay. If you reduce the length of each ts and reduce the number of indexes in m3u8, the delay will indeed be reduced, but it will lead to more frequent buffering and the request pressure on the server will also increase exponentially. So we can only find a compromise point based on the actual situation.
For browsers that support HLS, just write this to play:
<video></video>
Note: HLS is only supported on PC Safari browser, similar to Chrome browser, cannot play m3u8 format using HTML5 video
tag. You can directly use some more mature solutions on the Internet, such as: sewise-player, MediaElement, videojs-contrib-hls, jwplayer.
2. Real Time Messaging Protocol
Real Time Messaging Protocol (RTMP for short) is a set of video live broadcast protocols developed by Macromedia and now belongs to Adobe. This solution requires building a specialized RTMP streaming service such as Adobe Media Server, and only Flash can be used to implement the player in the browser. Its real-time performance is very good and the delay is very small, but its shortcoming is that it cannot support mobile WEB playback.
Although it cannot be played on the H5 page of iOS, you can write your own decoding and parsing for native iOS applications. RTMP has low latency and good real-time performance. On the browser side, the HTML5 video
tag cannot play RTMP protocol videos, which can be achieved through video.js.
<link>
<video>
<source>
</source></video>
<script></script>
<script>
videojs.options.flash.swf = ‘video.swf’;
videojs(‘example_video_1′).ready(function() {
this.play();
});
</script>
3. Comparison of video streaming protocol HLS and RTMP

2. Live broadcast format

The current H5 is similar to a live broadcast page, and the implementation technical difficulty is not big. It can be divided into implementation methods:
① The video background at the bottom uses the video video tag to achieve playback
② Follow and comment The module uses WebScoket to send and receive new messages in real time through DOM and CSS3.
③ Like and use CSS3 animation
After understanding the live broadcast format, let’s understand the live broadcast process as a whole.
3. The overall process of live broadcast
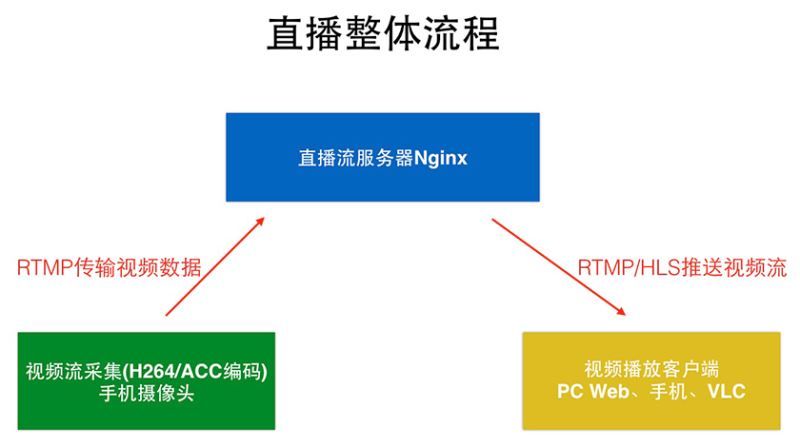
The overall process of live broadcast can be roughly divided into:
Video collection terminal: it can be a computer The audio and video input device on the mobile phone, or the camera or microphone on the mobile phone, is currently dominated by mobile phone video.

Live streaming video server: an Nginx server, which collects the video stream (H264/ACC encoding) transmitted by the video recording end, parses and encodes it on the server side, and pushes RTMP /HLS format video is streamed to the video player.
Video player: It can be the player on the computer (QuickTime Player, VLC), the native player on the mobile phone, and the video tag of H5, etc. Currently, the native player on the mobile phone is the main one.
(Web front-end learning and exchange group: 328058344. Chatting is prohibited, no entry unless you are interested!)
4. H5 recording video
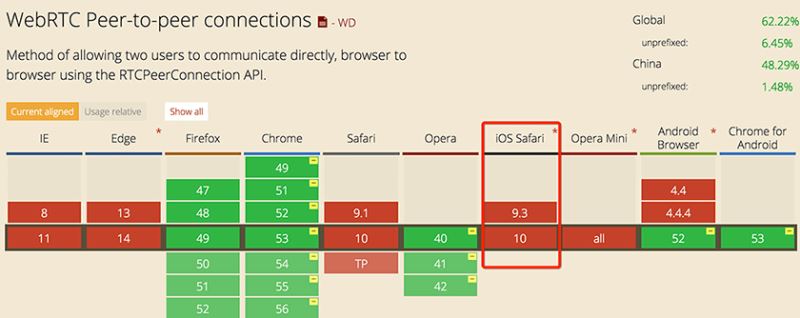
For H5 video recording, you can use the powerful webRTC (Web Real-Time Communication), which is a technology that supports web browsers for real-time voice conversations or video conversations. The disadvantage is that it is only supported on Chrome on PC and is supported on mobile terminals. Not ideal.
Basic process of using webRTC to record video
① Call window.navigator.webkitGetUserMedia()
Get the user’s PC camera video data.
② Convert the obtained video stream data into window.webkitRTCPeerConnection
(a video stream data format).
③ Use WebScoket
to transmit video stream data to the server.
Note:
Although Google has been promoting WebRTC, and many mature products have appeared, most mobile browsers do not yet support webRTC (the latest iOS 10.0 does not support it either) , so the real video recording still needs to be achieved by the client (iOS, Android), and the effect will be better.

WebRTC support
WebRTC support
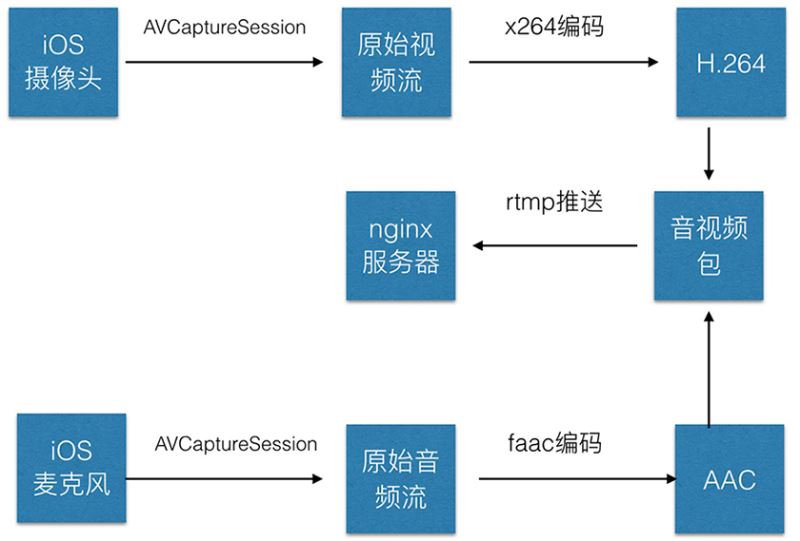
iOS native application calls the camera to record video process
① Audio and video Collection, the original audio and video data stream can be collected using AVCaptureSession and AVCaptureDevice.
② Encode H264 for video and AAC for audio. There are encapsulated encoding libraries (x264 encoding, faac encoding, ffmpeg encoding) in iOS to encode audio and video.
③ Assemble the encoded audio and video data into packets.
④ Establish RTMP connection and push it to the server.
 5. Build Ng
5. Build Nginx Rtmp live streaming service
Install nginx, nginx-rtmp-module
① First clone the nginx project to the local:
brew tap homebrew/nginx
② Execute the installation nginx-rtmp-module
brew install nginx-full –with-rtmp-module
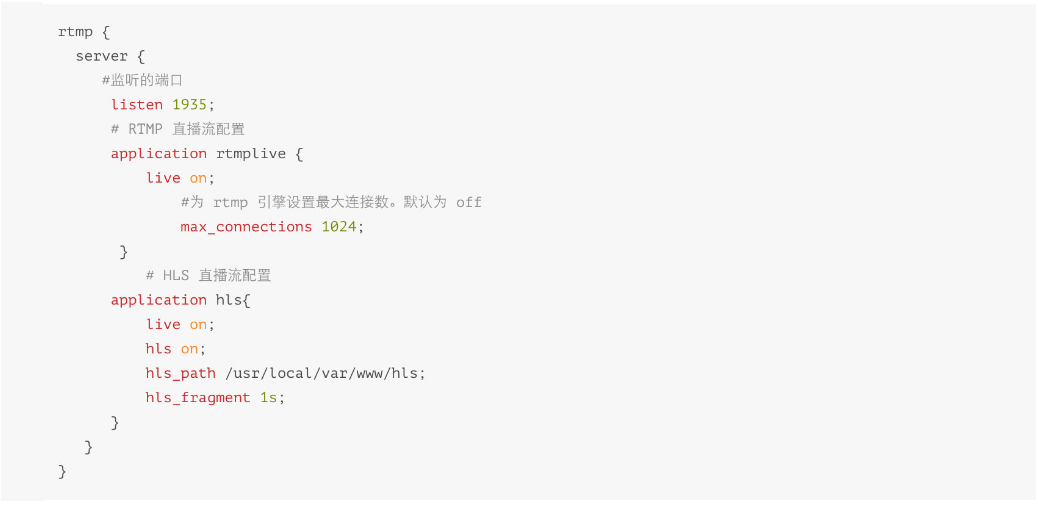
2. nginx.conf configuration file, configure RTMP, HLS
Find the nginx.conf configuration file (path/usr /local/etc/nginx/nginx.conf), configure RTMP and HLS.
① Add the rtmp configuration content before the http node:

② Add the hls configuration in http

3. 重启nginx服务
重启nginx服务,浏览器中输入 http://localhost:8080,是否出现欢迎界面确定nginx重启成功。
nginx -s reload
六、直播流转换格式、编码推流
当服务器端接收到采集视频录制端传输过来的视频流时,需要对其进行解析编码,推送RTMP/HLS格式视频流至视频播放端。通常使用的常见编码库方案,如x264编码、faac编码、ffmpeg编码等。鉴于 FFmpeg 工具集合了多种音频、视频格式编码,我们可以优先选用FFmpeg进行转换格式、编码推流。
1.安装 FFmpeg 工具
brew install ffmpeg
2.推流MP4文件
视频文件地址:/Users/gao/Desktop/video/test.mp4
推流拉流地址:rtmp://localhost:1935/rtmplive/home,rtmp://localhost:1935/rtmplive/home
//RTMP 协议流
ffmpeg -re -i /Users/gao/Desktop/video/test.mp4 -vcodec libx264 -acodec aac -f flv rtmp://10.14.221.17:1935/rtmplive/home
//HLS 协议流
ffmpeg -re -i /Users/gao/Desktop/video/test.mp4 -vcodec libx264 -vprofile baseline -acodec aac -ar 44100 -strict -2 -ac 1 -f flv -q 10 rtmp://10.14.221.17:1935/hls/test
注意:
当我们进行推流之后,可以安装VLC、ffplay(支持rtmp协议的视频播放器)本地拉流进行演示
3.FFmpeg推流命令
① 视频文件进行直播
ffmpeg -re -i /Users/gao/Desktop/video/test.mp4 -vcodec libx264 -vprofile baseline -acodec aac -ar 44100 -strict -2 -ac 1 -f flv -q 10 rtmp://192.168.1.101:1935/hls/test
ffmpeg -re -i /Users/gao/Desktop/video/test.mp4 -vcodec libx264 -vprofile baseline -acodec aac -ar 44100 -strict -2 -ac 1 -f flv -q 10 rtmp://10.14.221.17:1935/hls/test
② 推流摄像头+桌面+麦克风录制进行直播
ffmpeg -f avfoundation -framerate 30 -i “1:0″ \-f avfoundation -framerate 30 -video_size 640x480 -i “0” \-c:v libx264 -preset ultrafast \-filter_complex ‘overlay=main_w-overlay_w-10:main_h-overlay_h-10′ -acodec libmp3lame -ar 44100 -ac 1 -f flv rtmp://192.168.1.101:1935/hls/test
更多命令,请参考:
FFmpeg处理RTMP流媒体的命令大全
FFmpeg常用推流命令
七、H5 直播视频播放
移动端iOS和 Android 都天然支持HLS协议,做好视频采集端、视频流推流服务之后,便可以直接在H5页面配置 video 标签播放直播视频。
<video controls preload=“auto” autoplay=“autoplay” loop=“loop” webkit-playsinline>
<source src=“http://10.14.221.8/hls/test.m3u8″ type=“application/vnd.apple.mpegurl” />
<p class=“warning”>Your browser does not support HTML5 video.</p>
</video>
八、总结
本文从视频采集上传,服务器处理视频推流,以及H5页面播放直播视频一整套流程,具体阐述了直播实现原理,实现过程中会遇到很多性能优化问题。
① H5 HLS 限制必须是H264+AAC编码。
② H5 HLS 播放卡顿问题,server 端可以做好分片策略,将 ts 文件放在 CDN 上,前端可尽量做到 DNS 缓存等。
③ H5 直播为了达到更好的实时互动,也可以采用RTMP协议,通过video.js 实现播放。
以上就是本文的全部内容,希望对大家的学习有所帮助,更多相关内容请关注PHP中文网!
相关推荐:
HTML5
video播放器全屏(fullScreen)实现的方法
The above is the detailed content of How to implement live video function in HTML5. For more information, please follow other related articles on the PHP Chinese website!
 H5 vs. Older HTML Versions: A ComparisonMay 06, 2025 am 12:09 AM
The main differences between HTML5 (H5) and older versions of HTML include: 1) H5 introduces semantic tags, 2) supports multimedia content, and 3) provides offline storage functions. H5 enhances the functionality and expressiveness of web pages through new tags and APIs, such as and tags, improving user experience and SEO effects, but need to pay attention to compatibility issues.
 H5 vs. HTML5: Clarifying the Terminology and RelationshipMay 05, 2025 am 12:02 AM
The difference between H5 and HTML5 is: 1) HTML5 is a web page standard that defines structure and content; 2) H5 is a mobile web application based on HTML5, suitable for rapid development and marketing.
 HTML5 Features: The Core of H5May 04, 2025 am 12:05 AM
The core features of HTML5 include semantic tags, multimedia support, form enhancement, offline storage and local storage. 1. Semantic tags such as, improve code readability and SEO effect. 2. Multimedia support simplifies the process of embedding media content through and tags. 3. Form Enhancement introduces new input types and verification properties, simplifying form development. 4. Offline storage and local storage improve web page performance and user experience through ApplicationCache and localStorage.
 H5: Exploring the Latest Version of HTMLMay 03, 2025 am 12:14 AM
HTML5isamajorrevisionoftheHTMLstandardthatrevolutionizeswebdevelopmentbyintroducingnewsemanticelementsandcapabilities.1)ItenhancescodereadabilityandSEOwithelementslike,,,and.2)HTML5enablesricher,interactiveexperienceswithoutplugins,allowingdirectembe
 Beyond Basics: Advanced Techniques in H5 CodeMay 02, 2025 am 12:03 AM
Advanced tips for H5 include: 1. Use complex graphics to draw, 2. Use WebWorkers to improve performance, 3. Enhance user experience through WebStorage, 4. Implement responsive design, 5. Use WebRTC to achieve real-time communication, 6. Perform performance optimization and best practices. These tips help developers build more dynamic, interactive and efficient web applications.
 H5: The Future of Web Content and DesignMay 01, 2025 am 12:12 AM
H5 (HTML5) will improve web content and design through new elements and APIs. 1) H5 enhances semantic tagging and multimedia support. 2) It introduces Canvas and SVG, enriching web design. 3) H5 works by extending HTML functionality through new tags and APIs. 4) Basic usage includes creating graphics using it, and advanced usage involves WebStorageAPI. 5) Developers need to pay attention to browser compatibility and performance optimization.
 H5: New Features and Capabilities for Web DevelopmentApr 29, 2025 am 12:07 AM
H5 brings a number of new functions and capabilities, greatly improving the interactivity and development efficiency of web pages. 1. Semantic tags such as enhance SEO. 2. Multimedia support simplifies audio and video playback through and tags. 3. Canvas drawing provides dynamic graphics drawing tools. 4. Local storage simplifies data storage through localStorage and sessionStorage. 5. The geolocation API facilitates the development of location-based services.
 H5: Key Improvements in HTML5Apr 28, 2025 am 12:26 AM
HTML5 brings five key improvements: 1. Semantic tags improve code clarity and SEO effects; 2. Multimedia support simplifies video and audio embedding; 3. Form enhancement simplifies verification; 4. Offline and local storage improves user experience; 5. Canvas and graphics functions enhance the visualization of web pages.


Hot AI Tools

Undresser.AI Undress
AI-powered app for creating realistic nude photos

AI Clothes Remover
Online AI tool for removing clothes from photos.

Undress AI Tool
Undress images for free

Clothoff.io
AI clothes remover

Video Face Swap
Swap faces in any video effortlessly with our completely free AI face swap tool!

Hot Article

Hot Tools

Dreamweaver Mac version
Visual web development tools

DVWA
Damn Vulnerable Web App (DVWA) is a PHP/MySQL web application that is very vulnerable. Its main goals are to be an aid for security professionals to test their skills and tools in a legal environment, to help web developers better understand the process of securing web applications, and to help teachers/students teach/learn in a classroom environment Web application security. The goal of DVWA is to practice some of the most common web vulnerabilities through a simple and straightforward interface, with varying degrees of difficulty. Please note that this software

Dreamweaver CS6
Visual web development tools

SublimeText3 Linux new version
SublimeText3 Linux latest version

Safe Exam Browser
Safe Exam Browser is a secure browser environment for taking online exams securely. This software turns any computer into a secure workstation. It controls access to any utility and prevents students from using unauthorized resources.


