
 Web Front-endJS TutorialHow to implement data interaction between sub-sibling components in Vue2.0
Below I will share with you an article on data interaction methods between Vue2.0 sub-sibling components. It has a good reference value and I hope it will be helpful to everyone.
I am familiar with the communication between Vue.js components at the same level, so I write this article for recording.
Vue is a lightweight progressive framework. For some of its features and advantages, please check it on the official website without going into details.
The Vue project initialized using NPM and related command line tools, the directory structure is as follows

Then we enter the Demo, first we can delete the src in the template project /components/Hello.vue, and then delete the registration and use of the Hello subcomponent and some other irrelevant things in App.vue. At this time, App.vue should look like this

1. Let’s first create the central event bus and create an eventBus.js under src/assets/.
The content is as follows (in eventBus We only created a new Vue instance, which will then serve as the bridge for communication between components, that is, the central event bus.)

2. Create a firstChild component, introduce the eventBus event bus, then add a button and bind a click event

1. We are here In the sendMsg function that responds to the click event, $emit is used to trigger a custom userDefinedEvent event, and a string parameter
2 is passed. The $emit instance method triggers the current instance (the current instance here is the bus). For events, additional parameters will be passed to the listener callback.
3. Let’s create a secondChild component, introduce the eventBus event bus, and use a p tag to display the passed value

1. In mounted, we listened to the userDefinedEvent and passed the passed string parameter to the callback function of the $on listener.
2. mounted: is a Vue life The hook function in the cycle is simply similar to jQuery's ready. Vue will call the mounted function after the document is loaded.
3. $on: Listen to custom events on the current instance (the current instance here is bus). Events can be triggered by $emit, and the callback function will receive all additional parameters passed in to the event triggering function ($emit).
4. In the parent component, register these two components and add the tags of these two components

Save all modified files, and then open the browser window, the content is as follows (please handle the css yourself)
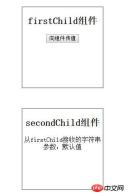
Click the Pass Value to Component button, we can see Value passed successfully

Summary:
1. Create an event bus, such as eventBus in the demo , use it as a communication bridge
2. Use bus.$emit to trigger a custom event in the component that needs to pass the value, and pass the parameters
3. In the component that needs to receive data Use bus.$on to listen to custom events and process the passed parameters in the callback function
In addition:
1. Brother components Compared with the data interaction between parent and child components, the communication between sibling components is actually somewhat similar to the child component passing values to the parent component. In fact, their communication principles are the same. For example, the child passes the value to the parent. The forms of $emit and $on just don't have eventBus, but if we think about it carefully, the parent component actually plays the role of the event bus at this time.
2. This method of using a Vue instance as a central event bus to manage component communication is only suitable for projects with simpler communication requirements. For more complex situations, Vue also provides more complex state management modes. Vuex does the processing.
The above is what I compiled for everyone. I hope it will be helpful to everyone in the future.
Related articles:
web3.js adds eth.getRawTransactionByHash(txhash) method steps
Nodejs simple method of accessing and operating mysql database example
Project created by vue-cli, how to configure multiple pages
The above is the detailed content of How to implement data interaction between sub-sibling components in Vue2.0. For more information, please follow other related articles on the PHP Chinese website!

 VUE3开发基础:使用extends继承组件Jun 16, 2023 am 08:58 AM
Vue是目前最流行的前端框架之一,而VUE3则是Vue框架的最新版本,相较于VUE2,VUE3具备了更高的性能和更出色的开发体验,成为了众多开发者的首选。在VUE3中,使用extends继承组件是一个非常实用的开发方式,本文将为大家介绍如何使用extends继承组件。extends是什么?在Vue中,extends是一个非常实用的属性,它可以用于子组件继承父
 如何使用 Vue 实现日历组件?Jun 25, 2023 pm 01:28 PM
Vue是一款非常流行的前端框架,它提供了很多工具和功能,如组件化、数据绑定、事件处理等,能够帮助开发者构建出高效、灵活和易维护的Web应用程序。在这篇文章中,我来介绍如何使用Vue实现一个日历组件。1、需求分析首先,我们需要分析一下这个日历组件的需求。一个基本的日历应该具备以下功能:展示当前月份的日历页面;支持切换到前一月或下一月;支持点击某一天,
 聊聊Vue怎么通过JSX动态渲染组件Dec 05, 2022 pm 06:52 PM
Vue怎么通过JSX动态渲染组件?下面本篇文章给大家介绍一下Vue高效通过JSX动态渲染组件的方法,希望对大家有所帮助!
 VSCode插件分享:一个实时预览Vue/React组件的插件Mar 17, 2022 pm 08:07 PM
在VSCode中开发Vue/React组件时,怎么实时预览组件?本篇文章就给大家分享一个VSCode 中实时预览Vue/React组件的插件,希望对大家有所帮助!
 如何使用 Vue 实现仿照片墙组件?Jun 25, 2023 am 08:19 AM
在现代Web开发中,组件化是一个极受欢迎的开发模式。而Vue.js则是一个非常适合组件化的前端框架。在这篇文章中,我们将介绍如何使用Vue.js创建一个仿照片墙组件。在开始之前,我们需要明确一些准备工作。首先,我们需要安装Vue.js。安装的方法非常简单,只需在终端中输入以下命令:npminstallvue安装完成后,我们可以创建一个名为
 VUE3开发入门教程:使用组件实现分页Jun 16, 2023 am 08:48 AM
VUE3开发入门教程:使用组件实现分页分页是一个常见的需求,因为在实际开发中,我们往往需要将大量的数据分成若干页以展示给用户。在VUE3开发中,可以通过使用组件实现分页功能,本文将介绍如何使用组件实现简单的分页功能。1.创建组件首先,我们需要创建一个分页组件,使用“vuecreate”命令创建VUE项目,并在src/components目录下创建Pagin
 VUE3初学者入门:使用Vue.js组件组合实现可复用组合Jun 15, 2023 pm 08:53 PM
Vue.js是一款流行的前端JavaScript框架,它提供了一种简单易用的方式来构建动态网页应用程序。Vue.js的主要特点是其模块化的设计和可插拔的组件系统。这使得开发者可以轻松地创建可复用的组件,从而提高了应用程序的重用性和可维护性。在本文中,我们将重点介绍VUE3初学者如何使用Vue.js组件组合实现可复用组合。Vue.js组件是一个完整的封装元素,
 Vue 中如何实现分页组件?Jun 25, 2023 am 08:23 AM
Vue是一款优秀的前端框架,在处理大量数据时,分页组件是必不可少的。分页组件可以使页面更加整洁,同时也可以提高用户体验。在Vue中,实现一个分页组件并不复杂,本文将介绍Vue如何实现分页组件。一、需求分析在实现分页组件前,我们需要对需求进行分析。一个基本的分页组件需要具有以下功能:展示当前页数、总页数以及每页展示条数点击分页按钮可以切换至不同页数展示当前页


Hot AI Tools

Undresser.AI Undress
AI-powered app for creating realistic nude photos

AI Clothes Remover
Online AI tool for removing clothes from photos.

Undress AI Tool
Undress images for free

Clothoff.io
AI clothes remover

AI Hentai Generator
Generate AI Hentai for free.

Hot Article
Hot Tools

SublimeText3 Chinese version
Chinese version, very easy to use

SublimeText3 English version
Recommended: Win version, supports code prompts!

MantisBT
Mantis is an easy-to-deploy web-based defect tracking tool designed to aid in product defect tracking. It requires PHP, MySQL and a web server. Check out our demo and hosting services.

Dreamweaver CS6
Visual web development tools

WebStorm Mac version
Useful JavaScript development tools

