 Web Front-end
 JS Tutorial
 Implement login and registration page permission interception by using vue+vuex+axios technologies (detailed tutorial)
Now I will share with you an article about vue vuex axios to implement login and registration page permission interception. It has a good reference value and I hope it will be helpful to everyone.
There are many templates written on GitHub, and this project is also based on templates.
Now record the process I did
#1. Modify the BASE_API in dev.env.js in the config folder and change the address Change to the public part of the request backend
BASE_API: '"http://192.168.xx.xx"',
2. The next step is to operate the src file. First, write the vew component (login.vue,regist. vue), write it and configure the path in index.js in the router
login.vue
<template>
<p class="login-container">
<el-form autoComplete="on" :model="loginForm" :rules="loginRules" ref="loginForm" label-position="left"
label-width="0px"
class="card-box login-form">
<h3 id="登录">登录</h3>
<el-form-item prop="name">
<span class="svg-container svg-container_login">
<svg-icon icon-class="user"/>
</span>
<el-input name="name" disabled type="text" v-model="loginForm.name" autoComplete="on"
placeholder="用户名"/>
</el-form-item>
<el-form-item prop="password">
<span class="svg-container">
<svg-icon icon-class="password"></svg-icon>
</span>
<el-input name="password" :type="pwdType" @keyup.enter.native="handleLogin" v-model="loginForm.password"
autoComplete="on"
placeholder="密码"></el-input>
<span class="show-pwd" @click="showPwd"><svg-icon icon-class="eye"/></span>
</el-form-item>
<el-form-item>
<el-button type="primary" style="width:100%;" :loading="loading" @click.native.prevent="handleLogin">
登录
</el-button>
</el-form-item>
</el-form>
</p>
</template>
<script>
export default {
name: 'login',
data() {
const validateUsername = (rule, value, callback) => {
if (value.trim().length<1) {
callback(new Error('用户名不能为空'))
} else {
callback()
}
};
const validatePass = (rule, value, callback) => {
if (value.trim().length < 1) {
callback(new Error('密码不能为空'))
} else {
callback()
}
};
return {
loginForm: {
name: '',
password: ''
},
loginRules: {
name: [{required: true, trigger: 'blur', validator: validateUsername}],
password: [{required: true, trigger: 'blur', validator: validatePass}]
},
loading: false,
pwdType: 'password'
}
},
methods: {
showPwd() {
if (this.pwdType === 'password') {
this.pwdType = ''
} else {
this.pwdType = 'password'
}
},
handleLogin() {
this.$refs.loginForm.validate(valid => {
if (valid) {
this.loading = true;
this.$store.dispatch('Login', this.loginForm).then(() => {
this.loading = false;
this.$router.push({path: '/'});
}).catch((e) => {
this.loading = false
})
} else {
console.log('error submit!!')
return false
}
})
}
}
}
</script>
router/index.js
{ path: '/login', component: _import('Login/login'), hidden: true }
3. Write the interface address to connect with the backend in login.js in the api. Define user in user.js in modules in stores, including state, mutations, and action. The specific request operation is written in action. login.vue or register.vue calls the request written in user.js, getter.js Define store getters in
api/login.js
import request from '@/utils/request'
export function login(name,password) {
 return request({
 url: '/XX/XX',
 method: 'post',
 data: {
  name,
  password
 }
 })
}
##stores/modules/user. js
  import { login,regist,logout } from '@/api/login'
  import { getToken,setToken } from '@/utils/auth'
  const user = {
  state: {
   name:'',
   token:''
  },
  mutations: {
   SET_NAME: (state, name) => {
   state.name = name;
   },
   SET_TOKEN: (state, token) => {
   state.token = token;
   setToken(token);
   }
  },
  actions: {
   // 登录
   Login({ commit }, userInfo) {
   const name = userInfo.name.trim();
   const password = userInfo.password.trim();
   return new Promise((resolve, reject) => {
    login(name, password).then(response => {
    const data = response.data;
    commit('SET_NAME', data.name);
    commit('SET_TOKEN', data.token);
    setName(data.name);
    setToken(data.token);
    resolve(response); }).catch(error => { reject(error) }) }) },
   // 注册
   Regist({ commit }, userInfo) {
   const name= userInfo.name.trim();
   const password = userInfo.password.trim();
   return new Promise((resolve, reject) => {
    regist(name, password).then(response => {
    const data = response.data;
    commit('SET_NAME', data.name);
    commit('SET_TOKEN', data.token);
    setName(data.name);setToken(data.token);
    resolve(response);
    }).catch(error => {
    reject(error) }) }) },
   // 登出
   LogOut({ commit, state }) {
   return new Promise((resolve, reject) => {
   logout().then(response => {
    commit('SET_NAME', '');
    commit('SET_TOKEN', '');
    setName('');
    setToken(false);
    //removeName();
    //removeToken();
    resolve(response);
   }).catch(error => {
    reject(error)
   })
   })
  },
   // 前端 登出
   FedLogOut({ commit }) {
   return new Promise(resolve => {
  setToken(false);
 commit('SET_TOKEN', false);
 resolve()
   })
   }
  }
  }
  export default user
getter.js:
const getters={
 name:state=>state.user.name,
 token:state=>state.user.token
}
export default getter
4. Operate cookies in auth.js in utils, write, read, delete user permissions, sign whether to log in, etc.
import Cookies from 'js-cookies'
export function setName(name) {
 return Cookies.set("name", name);
}
export function getName() {
 return Cookies.get("name");
}
export function setToken(token) {
 return Cookies.set("token", token);
}
export function getToken() {
 return Cookies.get("token");
}
5. Write a whitelist in permission.js, intercept jumps outside the whitelist and jump to login. At the same time, determine user permissions, whether to log in, etc.
import router from './router'
import store from './store'
import NProgress from 'nprogress' // Progress 进度条
import 'nprogress/nprogress.css'// Progress 进度条样式
import {Message} from 'element-ui'
import {getName, getToken} from "@/utils/auth"; // 验权
const whiteList = ['/login', '/regist']; // 不重定向白名单
router.beforeEach((to, from, next) => {
 NProgress.start();
 if (whiteList.indexOf(to.path) !== -1) {
 next();
 } else {
 if (getToken()==="true") {
  next();
  NProgress.done()
 } else {
  next({path: '/login'});
  NProgress.done()
 }
 }
})
router.afterEach(() => {
 NProgress.done() // 结束Progress
})
6. Write the interception code in request.js in utils, intercept the specific code returned by the backend and perform corresponding operations
import axios from 'axios'
import { Message, MessageBox } from 'element-ui'
import store from '../store'
// 创建axios实例
const service = axios.create({
 baseURL: process.env.BASE_API, // api的base_url
 timeout: 15000     // 请求超时时间
});
// respone拦截器
service.interceptors.response.use(
 response => {
 /**
 * code为非200是抛错 可结合自己业务进行修改
 */
 const res = response.data;
 //const res = response;
 if (res.code !== '200' && res.code !== 200) {
  if (res.code === '4001' || res.code === 4001) {
  MessageBox.confirm('用户名或密码错误,请重新登录', '重新登录', {
   confirmButtonText: '重新登录',
   cancelButtonText: '取消',
   type: 'warning'
  }).then(() => {
   store.dispatch('FedLogOut').then(() => {
    location.reload()// 为了重新实例化vue-router对象 避免bug
   })
  })
  }
  if (res.code === '4009' || res.code === 4009) {
  MessageBox.confirm('该用户名已存在,请重新注册!', '重新注册', {
   confirmButtonText: '重新注册',
   cancelButtonText: '取消',
   type: 'warning'
  }).then(() => {
   store.dispatch('FedLogOut').then(() => {
   location.reload()// 为了重新实例化vue-router对象 避免bug
   })
  })
  }
  return Promise.reject('error')
 } else {
  return response.data
 }
 },
 error => {
 Message({
  message: error.message,
  type: 'error',
  duration: 5 * 1000
 });
 return Promise.reject(error)
 }
)
export default service
above I compiled it for everyone. I hope it will be helpful to everyone in the future. Related articles:
Detailed explanation of red-black tree insertion and examples of Javascript implementation methods
js canvas implements sliding puzzle verification Code function
Summary of the method of converting JS from non-array object to array
The above is the detailed content of Implement login and registration page permission interception by using vue+vuex+axios technologies (detailed tutorial). For more information, please follow other related articles on the PHP Chinese website!
 SOA中的软件架构设计及软硬件解耦方法论Apr 08, 2023 pm 11:21 PM
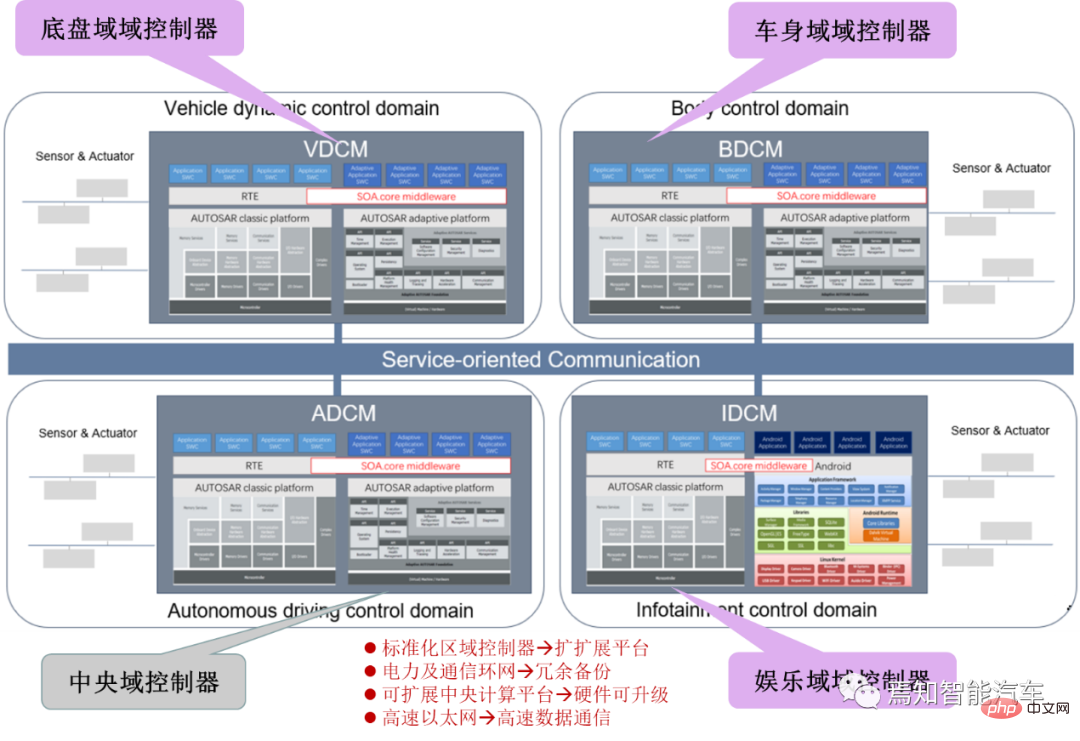
对于下一代集中式电子电器架构而言,采用central+zonal 中央计算单元与区域控制器布局已经成为各主机厂或者tier1玩家的必争选项,关于中央计算单元的架构方式,有三种方式:分离SOC、硬件隔离、软件虚拟化。集中式中央计算单元将整合自动驾驶,智能座舱和车辆控制三大域的核心业务功能,标准化的区域控制器主要有三个职责:电力分配、数据服务、区域网关。因此,中央计算单元将会集成一个高吞吐量的以太网交换机。随着整车集成化的程度越来越高,越来越多ECU的功能将会慢慢的被吸收到区域控制器当中。而平台化
 新视角图像生成:讨论基于NeRF的泛化方法Apr 09, 2023 pm 05:31 PM
新视角图像生成(NVS)是计算机视觉的一个应用领域,在1998年SuperBowl的比赛,CMU的RI曾展示过给定多摄像头立体视觉(MVS)的NVS,当时这个技术曾转让给美国一家体育电视台,但最终没有商业化;英国BBC广播公司为此做过研发投入,但是没有真正产品化。在基于图像渲染(IBR)领域,NVS应用有一个分支,即基于深度图像的渲染(DBIR)。另外,在2010年曾很火的3D TV,也是需要从单目视频中得到双目立体,但是由于技术的不成熟,最终没有流行起来。当时基于机器学习的方法已经开始研究,比
 多无人机协同3D打印盖房子,研究登上Nature封面Apr 09, 2023 am 11:51 AM
我们经常可以看到蜜蜂、蚂蚁等各种动物忙碌地筑巢。经过自然选择,它们的工作效率高到叹为观止这些动物的分工合作能力已经「传给」了无人机,来自英国帝国理工学院的一项研究向我们展示了未来的方向,就像这样:无人机 3D 打灰:本周三,这一研究成果登上了《自然》封面。论文地址:https://www.nature.com/articles/s41586-022-04988-4为了展示无人机的能力,研究人员使用泡沫和一种特殊的轻质水泥材料,建造了高度从 0.18 米到 2.05 米不等的结构。与预想的原始蓝图
 如何让自动驾驶汽车“认得路”Apr 09, 2023 pm 01:41 PM
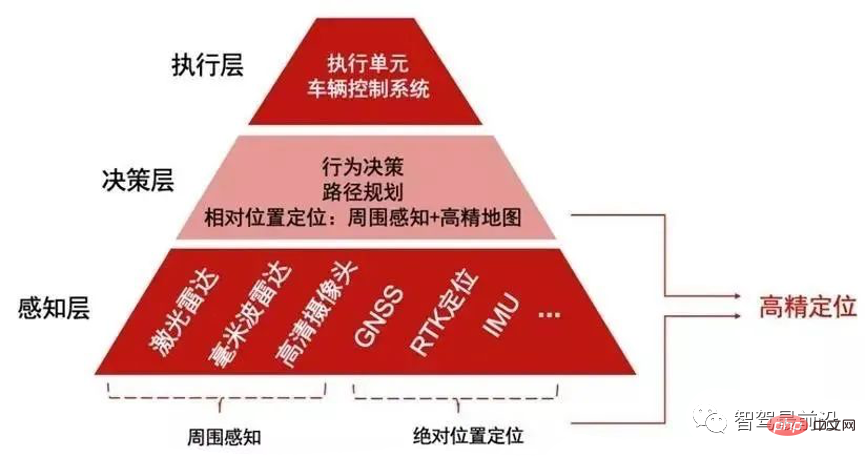
与人类行走一样,自动驾驶汽车想要完成出行过程也需要有独立思考,可以对交通环境进行判断、决策的能力。随着高级辅助驾驶系统技术的提升,驾驶员驾驶汽车的安全性不断提高,驾驶员参与驾驶决策的程度也逐渐降低,自动驾驶离我们越来越近。自动驾驶汽车又称为无人驾驶车,其本质就是高智能机器人,可以仅需要驾驶员辅助或完全不需要驾驶员操作即可完成出行行为的高智能机器人。自动驾驶主要通过感知层、决策层及执行层来实现,作为自动化载具,自动驾驶汽车可以通过加装的雷达(毫米波雷达、激光雷达)、车载摄像头、全球导航卫星系统(G
 超逼真渲染!虚幻引擎技术大牛解读全局光照系统LumenApr 08, 2023 pm 10:21 PM
实时全局光照(Real-time GI)一直是计算机图形学的圣杯。多年来,业界也提出多种方法来解决这个问题。常用的方法包通过利用某些假设来约束问题域,比如静态几何,粗糙的场景表示或者追踪粗糙探针,以及在两者之间插值照明。在虚幻引擎中,全局光照和反射系统Lumen这一技术便是由Krzysztof Narkowicz和Daniel Wright一起创立的。目标是构建一个与前人不同的方案,能够实现统一照明,以及类似烘烤一样的照明质量。近期,在SIGGRAPH 2022上,Krzysztof Narko
 一文聊聊智能驾驶系统与软件升级的关联设计方案Apr 11, 2023 pm 07:49 PM
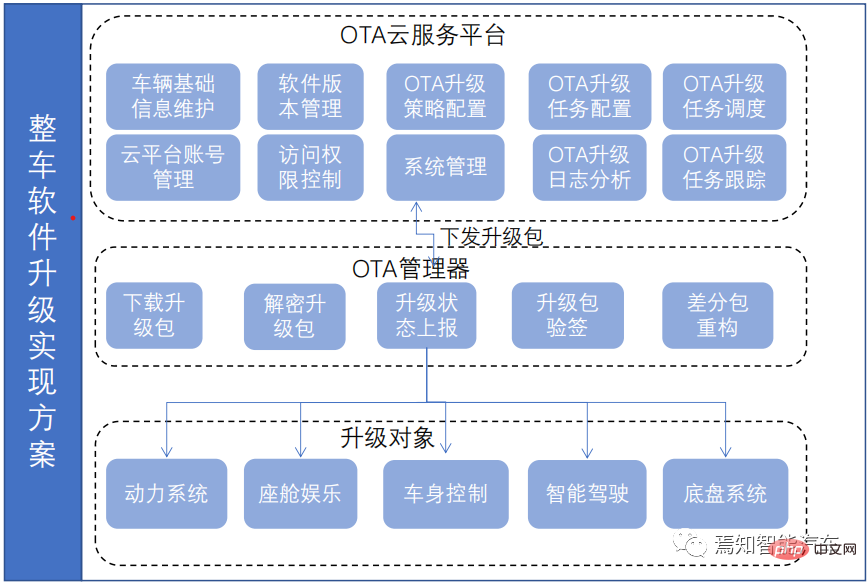
由于智能汽车集中化趋势,导致在网络连接上已经由传统的低带宽Can网络升级转换到高带宽以太网网络为主的升级过程。为了提升车辆升级能力,基于为车主提供持续且优质的体验和服务,需要在现有系统基础(由原始只对车机上传统的 ECU 进行升级,转换到实现以太网增量升级的过程)之上开发一套可兼容现有 OTA 系统的全新 OTA 服务系统,实现对整车软件、固件、服务的 OTA 升级能力,从而最终提升用户的使用体验和服务体验。软件升级触及的两大领域-FOTA/SOTA整车软件升级是通过OTA技术,是对车载娱乐、导
 internet的基本结构与技术起源于什么Dec 15, 2020 pm 04:48 PM
internet的基本结构与技术起源于ARPANET。ARPANET是计算机网络技术发展中的一个里程碑,它的研究成果对促进网络技术的发展起到了重要的作用,并未internet的形成奠定了基础。arpanet(阿帕网)为美国国防部高级研究计划署开发的世界上第一个运营的封包交换网络,它是全球互联网的始祖。
 综述:自动驾驶的协同感知技术Apr 08, 2023 pm 03:01 PM
arXiv综述论文“Collaborative Perception for Autonomous Driving: Current Status and Future Trend“,2022年8月23日,上海交大。感知是自主驾驶系统的关键模块之一,然而单车的有限能力造成感知性能提高的瓶颈。为了突破单个感知的限制,提出协同感知,使车辆能够共享信息,感知视线之外和视野以外的环境。本文回顾了很有前途的协同感知技术相关工作,包括基本概念、协同模式以及关键要素和应用。最后,讨论该研究领域的开放挑战和问题


Hot AI Tools

Undresser.AI Undress
AI-powered app for creating realistic nude photos

AI Clothes Remover
Online AI tool for removing clothes from photos.

Undress AI Tool
Undress images for free

Clothoff.io
AI clothes remover

AI Hentai Generator
Generate AI Hentai for free.

Hot Article

Hot Tools

mPDF
mPDF is a PHP library that can generate PDF files from UTF-8 encoded HTML. The original author, Ian Back, wrote mPDF to output PDF files "on the fly" from his website and handle different languages. It is slower than original scripts like HTML2FPDF and produces larger files when using Unicode fonts, but supports CSS styles etc. and has a lot of enhancements. Supports almost all languages, including RTL (Arabic and Hebrew) and CJK (Chinese, Japanese and Korean). Supports nested block-level elements (such as P, DIV),

Notepad++7.3.1
Easy-to-use and free code editor

SAP NetWeaver Server Adapter for Eclipse
Integrate Eclipse with SAP NetWeaver application server.

VSCode Windows 64-bit Download
A free and powerful IDE editor launched by Microsoft

DVWA
Damn Vulnerable Web App (DVWA) is a PHP/MySQL web application that is very vulnerable. Its main goals are to be an aid for security professionals to test their skills and tools in a legal environment, to help web developers better understand the process of securing web applications, and to help teachers/students teach/learn in a classroom environment Web application security. The goal of DVWA is to practice some of the most common web vulnerabilities through a simple and straightforward interface, with varying degrees of difficulty. Please note that this software


