

This article mainly introduces the detailed explanation of Angular routing route guard. The editor thinks it is quite good. Now I will share it with you and give it as a reference. Let’s follow the editor to take a look.
1. Route guard
Users are only allowed to enter or leave a route when they meet certain conditions.
Route guard scenario:
Only when the user logs in and has certain permissions, certain routes can be entered.
A wizard composed of multiple forms, such as a registration process. Users can navigate to the next route only if they fill in the required information in the components of the current route.
Remind the user when the user attempts to leave the current navigation without performing a save operation.
Angular provides some hooks to help control entering or leaving routes. These hooks are routing guards, and the above scenarios can be realized through these hooks.
CanActivate: Handles navigation to a route.
CanDeactivate: Handles departure from the current route.
Resolve: Get routing data before routing activation.
Some attributes are used when configuring routing, path, component, outlet, children, routing guards are also routing attributes.
2. CanActivate
Example: Only allow logged-in users to enter product information routing.
Create a new guard directory. Create a new login.guard.ts in the directory.
The LoginGuard class implements the CanActivate interface and returns true or false. Angular determines whether the request passed or failed based on the return value.
import { CanActivate } from "@angular/router";
export class LoginGuard implements CanActivate{
  canActivate(){
    let loggedIn :boolean= Math.random()<p style="text-align: left;">Configure product routing. First add LoginGuard to providers and then specify the routing guard. </p><p style="text-align: left;">canActivate can specify multiple guards, and the value is an <a href="http://www.php.cn/wiki/58.html" target="_blank">array</a>. </p><pre class="brush:php;toolbar:false">const routes: Routes = [
 { path: '', redirectTo : 'home',pathMatch:'full' },
 { path: 'chat', component: ChatComponent, outlet: "aux"},//辅助路由
 { path: 'home', component: HomeComponent },
 { path: 'product/:id', component: ProductComponent, children:[
  { path: '', component : ProductDescComponent },
  { path: 'seller/:id', component : SellerInfoComponent }
 ] ,canActivate: [LoginGuard]},
 { path: '**', component: Code404Component }
];
Effect: Click the Product details link console to remind the user that they are not logged in and cannot enter the product details route.

3. CanDeactivate
Route guard when leaving. Remind users to save before leaving.
Create a new unsave.guard.ts file in the guard directory.
The CanDeactivate interface has a generic type that specifies the type of the current component.
The first parameter of the CanDeactivate method is the component of the generic type specified by the interface. Based on the status of the component to be protected, or calling a method to determine whether the user can leave.
import { CanDeactivate } from "@angular/router";
import { ProductComponent } from "../product/product.component";
export class UnsaveGuard implements CanDeactivate<productcomponent>{
  //第一个参数 范型类型的组件
  //根据当前要保护组件 的状态 判断当前用户是否能够离开
  canDeactivate(component: ProductComponent){
    return window.confirm('你还没有保存,确定要离开吗?');
  }
}</productcomponent>
To configure routing, add it to the provider first, and then configure the routing.
import { NgModule } from '@angular/core';
import { Routes, RouterModule } from '@angular/router';
import { HomeComponent } from './home/home.component';
import { ProductComponent } from './product/product.component';
import { Code404Component } from './code404/code404.component';
import { ProductDescComponent } from './product-desc/product-desc.component';
import { SellerInfoComponent } from './seller-info/seller-info.component';
import { ChatComponent } from './chat/chat.component';
import { LoginGuard } from './guard/login.guard';
import { UnsaveGuard } from './guard/unsave.guard';
const routes: Routes = [
 { path: '', redirectTo : 'home',pathMatch:'full' },
 { path: 'chat', component: ChatComponent, outlet: "aux"},//辅助路由
 { path: 'home', component: HomeComponent },
 { path: 'product/:id', component: ProductComponent, children:[
  { path: '', component : ProductDescComponent },
  { path: 'seller/:id', component : SellerInfoComponent }
 ] ,canActivate: [LoginGuard],
   canDeactivate: [UnsaveGuard]},
 { path: '**', component: Code404Component }
];
@NgModule({
 imports: [RouterModule.forRoot(routes)],
 exports: [RouterModule],
 providers: [LoginGuard,UnsaveGuard]
})
export class AppRoutingModule { }
Effect:
Click ok to leave the current page, cancel to stay on the current page.

4. Resolve guard
There is a delay in returning http request data, resulting in the template not being displayed immediately.
Before the data is returned, all places on the template that need to use interpolation Expression to display the value of a controller are empty. The user experience is not good.
resolve Solution: Go to the server to read the data before entering the routing. After reading all the required data, enter the routing with the data and display the data immediately.
Example:
Before entering the product information routing, prepare the product information and then enter the routing. If you cannot get the information, or there is a problem getting the information, you will jump directly to the Error message page, or a prompt will pop up, and you will no longer enter the target route.
First declare the product information type in product.component.ts.
import { NgModule } from '@angular/core';
import { Routes, RouterModule } from '@angular/router';
import { HomeComponent } from './home/home.component';
import { ProductComponent } from './product/product.component';
import { Code404Component } from './code404/code404.component';
import { ProductDescComponent } from './product-desc/product-desc.component';
import { SellerInfoComponent } from './seller-info/seller-info.component';
import { ChatComponent } from './chat/chat.component';
import { LoginGuard } from './guard/login.guard';
import { UnsaveGuard } from './guard/unsave.guard';
const routes: Routes = [
 { path: '', redirectTo : 'home',pathMatch:'full' },
 { path: 'chat', component: ChatComponent, outlet: "aux"},//辅助路由
 { path: 'home', component: HomeComponent },
 { path: 'product/:id', component: ProductComponent, children:[
  { path: '', component : ProductDescComponent },
  { path: 'seller/:id', component : SellerInfoComponent }
 ] ,canActivate: [LoginGuard],
   canDeactivate: [UnsaveGuard]},
 { path: '**', component: Code404Component }
];
@NgModule({
 imports: [RouterModule.forRoot(routes)],
 exports: [RouterModule],
 providers: [LoginGuard,UnsaveGuard]
})
export class AppRoutingModule { }
Create new product.resolve.ts in the guard directory. The ProductResolve class implements the Resolve interface.
Resolve must also declare a paradigm, which is the type of data to be parsed by resolve.
import { Resolve, ActivatedRouteSnapshot, RouterStateSnapshot, Router } from "@angular/router";
import { Injectable } from "@angular/core";
import { Observable } from "rxjs/Observable";
import { Product } from "../product/product.component";
@Injectable()
export class ProductResolve implements Resolve<product>{
  constructor(private router: Router) {
  }
  resolve(route: ActivatedRouteSnapshot, state: RouterStateSnapshot): Observable<any> | Promise<any> | any {
    let productId: number = route.params["id"];
    if (productId == 2) { //正确id
      return new Product(1, "iPhone7");
    } else { //id不是1导航回首页
      this.router.navigate(["/home"]);
      return undefined;
    }
  }
}</any></any></product>
路由配置:Provider里声明,product路由里配置。
resolve是一个对象,对象里参数的名字就是想传入的参数的名字product,用ProductResolve来解析生成。
import { NgModule } from '@angular/core';
import { Routes, RouterModule } from '@angular/router';
import { HomeComponent } from './home/home.component';
import { ProductComponent } from './product/product.component';
import { Code404Component } from './code404/code404.component';
import { ProductDescComponent } from './product-desc/product-desc.component';
import { SellerInfoComponent } from './seller-info/seller-info.component';
import { ChatComponent } from './chat/chat.component';
import { LoginGuard } from './guard/login.guard';
import { UnsaveGuard } from './guard/unsave.guard';
import { ProductResolve } from './guard/product.resolve';
const routes: Routes = [
 { path: '', redirectTo : 'home',pathMatch:'full' },
 { path: 'chat', component: ChatComponent, outlet: "aux"},//辅助路由
 { path: 'home', component: HomeComponent },
 { path: 'product/:id', component: ProductComponent, children:[
  { path: '', component : ProductDescComponent },
  { path: 'seller/:id', component : SellerInfoComponent }
 ] ,
  // canActivate: [LoginGuard],
  // canDeactivate: [UnsaveGuard],
  resolve:{ //resolve是一个对象
   product : ProductResolve  //想传入product,product由ProductResolve生成
  }},
 { path: '**', component: Code404Component }
];
@NgModule({
 imports: [RouterModule.forRoot(routes)],
 exports: [RouterModule],
 providers: [LoginGuard,UnsaveGuard,ProductResolve]
})
export class AppRoutingModule { }
修改一下product.component.ts 和模版,显示商品id和name。
import { Component, OnInit } from '@angular/core';
import { ActivatedRoute, Params } from '@angular/router';
@Component({
 selector: 'app-product',
 templateUrl: './product.component.html',
 styleUrls: ['./product.component.css']
})
export class ProductComponent implements OnInit {
 private productId: number;
 private productName: string;
 constructor(private routeInfo: ActivatedRoute) { }
 ngOnInit() {
  // this.routeInfo.params.subscribe((params: Params)=> this.productId=params["id"]);
  this.routeInfo.data.subscribe(
   (data:{product:Product})=>{
    this.productId=data.product.id;
    this.productName=data.product.name;
   }
  );
 }
}
export class Product{
 constructor(public id:number, public name:string){
 }
}
<p>
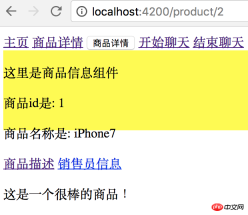
</p><p>
这里是商品信息组件
</p>
<p>
商品id是: {{productId}}
</p>
<p>
商品名称是: {{productName}}
</p>
<a>商品描述</a>
<a>销售员信息</a>
<router-outlet></router-outlet>
效果:
点商品详情链接,传入商品ID为2,在resolve守卫中是正确id,会返回一条商品数据。
点商品详情按钮,传入商品ID是3,是错误id,会直接跳转到主页。

相信看了本文案例你已经掌握了方法,更多精彩请关注php中文网其它相关文章!
推荐阅读:
React怎样在react-router路由实现登陆验证控制
The above is the detailed content of How to use routing guards in Angular routing. For more information, please follow other related articles on the PHP Chinese website!

 Python vs. JavaScript: A Comparative Analysis for DevelopersMay 09, 2025 am 12:22 AM
The main difference between Python and JavaScript is the type system and application scenarios. 1. Python uses dynamic types, suitable for scientific computing and data analysis. 2. JavaScript adopts weak types and is widely used in front-end and full-stack development. The two have their own advantages in asynchronous programming and performance optimization, and should be decided according to project requirements when choosing.
 Python vs. JavaScript: Choosing the Right Tool for the JobMay 08, 2025 am 12:10 AM
Whether to choose Python or JavaScript depends on the project type: 1) Choose Python for data science and automation tasks; 2) Choose JavaScript for front-end and full-stack development. Python is favored for its powerful library in data processing and automation, while JavaScript is indispensable for its advantages in web interaction and full-stack development.
 Python and JavaScript: Understanding the Strengths of EachMay 06, 2025 am 12:15 AM
Python and JavaScript each have their own advantages, and the choice depends on project needs and personal preferences. 1. Python is easy to learn, with concise syntax, suitable for data science and back-end development, but has a slow execution speed. 2. JavaScript is everywhere in front-end development and has strong asynchronous programming capabilities. Node.js makes it suitable for full-stack development, but the syntax may be complex and error-prone.
 JavaScript's Core: Is It Built on C or C ?May 05, 2025 am 12:07 AM
JavaScriptisnotbuiltonCorC ;it'saninterpretedlanguagethatrunsonenginesoftenwritteninC .1)JavaScriptwasdesignedasalightweight,interpretedlanguageforwebbrowsers.2)EnginesevolvedfromsimpleinterpreterstoJITcompilers,typicallyinC ,improvingperformance.
 JavaScript Applications: From Front-End to Back-EndMay 04, 2025 am 12:12 AM
JavaScript can be used for front-end and back-end development. The front-end enhances the user experience through DOM operations, and the back-end handles server tasks through Node.js. 1. Front-end example: Change the content of the web page text. 2. Backend example: Create a Node.js server.
 Python vs. JavaScript: Which Language Should You Learn?May 03, 2025 am 12:10 AM
Choosing Python or JavaScript should be based on career development, learning curve and ecosystem: 1) Career development: Python is suitable for data science and back-end development, while JavaScript is suitable for front-end and full-stack development. 2) Learning curve: Python syntax is concise and suitable for beginners; JavaScript syntax is flexible. 3) Ecosystem: Python has rich scientific computing libraries, and JavaScript has a powerful front-end framework.
 JavaScript Frameworks: Powering Modern Web DevelopmentMay 02, 2025 am 12:04 AM
The power of the JavaScript framework lies in simplifying development, improving user experience and application performance. When choosing a framework, consider: 1. Project size and complexity, 2. Team experience, 3. Ecosystem and community support.
 The Relationship Between JavaScript, C , and BrowsersMay 01, 2025 am 12:06 AM
Introduction I know you may find it strange, what exactly does JavaScript, C and browser have to do? They seem to be unrelated, but in fact, they play a very important role in modern web development. Today we will discuss the close connection between these three. Through this article, you will learn how JavaScript runs in the browser, the role of C in the browser engine, and how they work together to drive rendering and interaction of web pages. We all know the relationship between JavaScript and browser. JavaScript is the core language of front-end development. It runs directly in the browser, making web pages vivid and interesting. Have you ever wondered why JavaScr


Hot AI Tools

Undresser.AI Undress
AI-powered app for creating realistic nude photos

AI Clothes Remover
Online AI tool for removing clothes from photos.

Undress AI Tool
Undress images for free

Clothoff.io
AI clothes remover

Video Face Swap
Swap faces in any video effortlessly with our completely free AI face swap tool!

Hot Article
Hot Tools

SublimeText3 English version
Recommended: Win version, supports code prompts!

Safe Exam Browser
Safe Exam Browser is a secure browser environment for taking online exams securely. This software turns any computer into a secure workstation. It controls access to any utility and prevents students from using unauthorized resources.

SecLists
SecLists is the ultimate security tester's companion. It is a collection of various types of lists that are frequently used during security assessments, all in one place. SecLists helps make security testing more efficient and productive by conveniently providing all the lists a security tester might need. List types include usernames, passwords, URLs, fuzzing payloads, sensitive data patterns, web shells, and more. The tester can simply pull this repository onto a new test machine and he will have access to every type of list he needs.

Notepad++7.3.1
Easy-to-use and free code editor

PhpStorm Mac version
The latest (2018.2.1) professional PHP integrated development tool

