Home >Backend Development >PHP Tutorial >Detailed explanation of file upload in php
Detailed explanation of file upload in php
- 墨辰丷Original
- 2018-05-30 11:29:366617browse
Have you really mastered php file upload technology? This article has compiled relevant information on PHP file uploading for everyone. It has certain reference value. Interested friends can refer to it.
First of all, let me state that this chapter has a lot of content and is relatively difficult. , you have to have an attitude of fighting with yourself. Don’t miss the subtleties, practice more and more is the way to go.
Learning is like climbing a mountain. You have to do it step by step. First, set a small goal for yourself, and then continue to climb higher and higher, and finally reach the top.
Please consider the above two pieces of advice carefully
1. Description of my preparations.
Editor: sublime text3 (Which editor you use depends on your preference)
Server build: Use phpstudy2014 to build the server. The server file is stored in the www file on the D drive of my computer. (Installing phpstudy will automatically generate the www file, you decide which disk to install it on). Run phpstudy and enter localhost in the browser address bar to access files on the server.
The process of uploading files: The browser uploads the file on the client, click submit, the file is sent to a php file in the server for processing, and the php uploads the file Save the file to the server.
2. Create the form
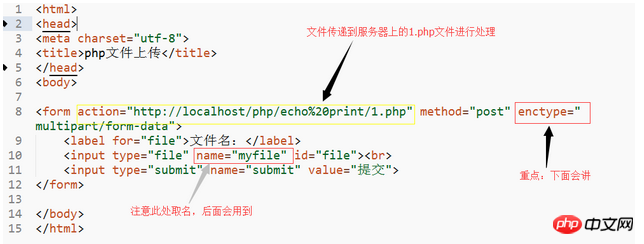
Please see my html code

1. application/x-www-form-urlencoded: Form data is encoded as name/value pairs. This is a standard encoding format.
2. multipart/form-data: Form data is encoded as a message, and each control on the page corresponds to a part of the message.
3. text/plain: The form data is encoded in plain text, without any controls or formatting characters.
Supplement (just take a look): The enctype attribute of ORM is the encoding method. There are two commonly used ones: application/x-www-form-urlencoded and multipart/form-data. The default is application/x-www-form. -urlencoded. When the action is get, the browser uses the x-www-form-urlencoded encoding method to convert the form data into a string (name1=value1&name2=value2...), and then appends the string to the end of the url, splits it with ?, and loads it. this new url. When the action is post, the browser encapsulates the form data into the http body and then sends it to the server. If there is no type=file control, just use the default application/x-www-form-urlencoded. But if there is type=file, multipart/form-data will be used. The browser will divide the entire form into control units, and add Content-Disposition (form-data or file), Content-Type (default is text/plain), name (control name) and other information to each part, and Add delimiter (boundary).
In short, remember two sentences: if there is type=file in the input tag, then enctype=multipart/form-data. If there is no type=file, application/x-www-form-urlencoded is generally used.
When uploading files, the data must undergo certain transformations before they can be uploaded to the server. The difference between application/x-www-form-urlencoded and multipart/form-data is the conversion encoding method.
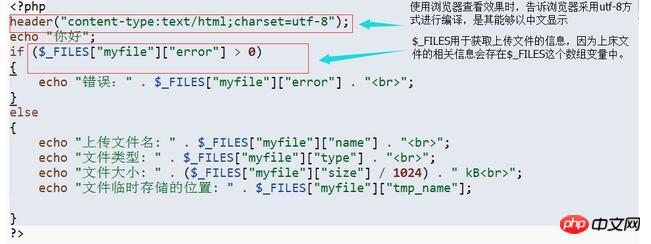
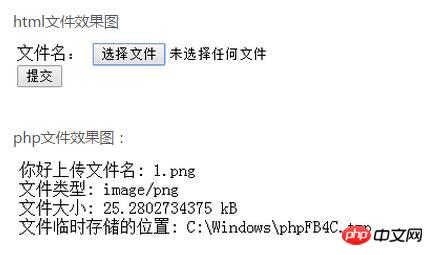
3. Create a php file to process the uploaded files.


FILES["myfile"]["error"]=1 The uploaded file exceeds the server limit, such as exceeding the server space size. _FILES["myfile"]["error"]=2 exceeds the browser limit for uploading $_FILES["myfile"]["error"]=3 Only part of the file is uploaded
Upload limit
Normally, the server usually limits the size or type of files uploaded by the server. We add restrictions on the uploaded file code based on the above php code.
First familiarize yourself with the usage of several functions:
explode()The function is used to split strings. For example: explode(“.”,”aaa.HTML”) is to divide this at the position of the dot. The string is divided into two strings, "aaa" and "HTML", and these two strings are stored in the same array in order.
end()Get the value of the last element in the array.
in_array() Search for an element in the array to see if it exists. It returns true if it exists and false if it does not exist.
<?php
//第一步:明确服务器规定上传至服务器的文件类型。这里我们只允许上传以下类型的图片。
$allowedExts = array("gif", "jpeg", "jpg", "png");// 允许上传的图片后缀
//第二部:获取上传的文件名称,通过explorde()函数将其分割成字符串形式的数组。
$temp = explode(".", $_FILES["myfile"]["name"]);
echo $_FILES["file"]["size"];

$extension = end($temp);   // end函数用于获取数组中最后一个元素的值。
//第三步:列出上传文件需要满足的条件
if ((($_FILES["myfile"]["type"] == "image/gif")
|| ($_FILES["myfile"]["type"] == "image/jpeg")
|| ($_FILES[myfile"]["type"] == "image/jpg")
|| ($_FILES["myfile"]["type"] == "image/pjpeg")
|| ($_FILES["myfile"]["type"] == "image/x-png")
|| ($_FILES["myfile"]["type"] == "image/png"))
&& ($_FILES["myfile"]["size"] < 204800)  // 小于 200 kb
&& in_array($extension, $allowedExts))
  //in_array表示在$allowedExts数组中查找$extension这个字符串
{
  if ($_FILES["myfile"]["error"] > 0)
  {
    echo "错误:: " . $_FILES["myfile"]["error"] . "<br>";
    //举个例子服务器空间不足,文件只能上传部分就会出现错误。
  }
  else
  {
    echo "上传文件名: " . $_FILES["myfile"]["name"] . "<br>";
    echo "文件类型: " . $_FILES["myfile"]["type"] . "<br>";
    echo "文件大小: " . ($_FILES["myfile"]["size"] / 1024) . " kB<br>";
    echo "文件临时存储的位置: " . $_FILES["myfile"]["tmp_name"] . "<br>";
  }
}
else
{
  echo "非法的文件格式";
}
?>
4. Save the uploaded file
After the file is uploaded, it is saved in a temporary location. It will disappear when the script ends. If we want to save it permanently on the server, we need to save it in another location.
. file_exists("upload/" . FILES["file"]["name"]) checks whether the file or directory exists. .moveuploadedfile(_FILES["file"]["tmp_name"], "upload/" . $_FILES["myfile"]["name"]);Move the uploaded file from the temporary location to the server space.
<?php
//第一步:明确服务器规定上传至服务器的文件类型。这里我们只允许上传以下类型的图片。
$allowedExts = array("gif", "jpeg", "jpg", "png");// 允许上传的图片后缀
//第二部:获取上传的文件名称,通过explorde()函数将其分割成字符串形式的数组。
$temp = explode(".", $_FILES["myfile"]["name"]);
echo $_FILES["myfilefile"]["size"];
$extension = end($temp);   // end函数用于获取数组中最后一个元素的值。
//第三步:列出上传文件需要满足的
if ((($_FILES["myfile"]["type"] == "image/gif")
|| ($_FILES["myfile"]["type"] == "image/jpeg")
|| ($_FILES["myfile"]["type"] == "image/jpg")
|| ($_FILES["myfile"]["type"] == "image/pjpeg")
|| ($_FILES["myfile"]["type"] == "image/x-png")
|| ($_FILES["myfile"]["type"] == "image/png"))
&& ($_FILES["myfile"]["size"] < 204800)  // 小于 200 kb
&& in_array($extension, $allowedExts))//in_array表示在$allowedExts数组中查找$extension这个字符串
{
  if ($_FILES["myfilefile"]["error"] > 0)
  {
    echo "错误:: " . $_FILES["myfile"]["error"] . "<br>";
  }
  else
  {
    echo "上传文件名: " . $_FILES["myfile"]["name"] . "<br>";
    echo "文件类型: " . $_FILES["myfile"]["type"] . "<br>";
    echo "文件大小: " . ($_FILES["myfile"]["size"] / 1024) . " kB<br>";
    echo "文件临时存储的位置: " . $_FILES["myfile"]["tmp_name"] . "<br>";

    // 判断当期目录(即www文件夹中)下的 upload 目录(自己创建,名字自取)是否存在该文件
    // 如果没有 upload 目录,你需要创建它,upload 目录权限为 777
    if (file_exists("upload/" . $_FILES["myfile"]["name"]))
    {
      echo $_FILES["myfile"]["name"] . " 文件已经存在。 ";
    }
    else
    {
      // 如果 upload 目录不存在该文件则将文件上传到 upload 目录下
      move_uploaded_file($_FILES["myfile"]["tmp_name"], "upload/" . $_FILES["file"]["name"]);//
      echo "文件存储在: " . "upload/" . $_FILES["myfile"]["name"];
    }
  }
}
else
{
  echo "非法的文件格式";
}
?>
The above is the entire content of this article, I hope it will be helpful to everyone's study.
Related recommendations:
How to combine two photos of the front and back of an ID card into one picture using PHP
PHP uses SWOOLE extension to implement scheduled synchronization of MySQL data
##PHP summary of object knowledge
The above is the detailed content of Detailed explanation of file upload in php. For more information, please follow other related articles on the PHP Chinese website!

