Home >Backend Development >PHP Tutorial >Detailed explanation of how PHP uses the imagick extension to merge images
Detailed explanation of how PHP uses the imagick extension to merge images
- 墨辰丷Original
- 2018-05-23 14:58:322591browse
This article mainly introduces the method of merging images using imagick extension in PHP. It analyzes the specific steps and related operation skills of PHP based on imagick extension in the form of examples. Friends who need it can refer to it
Step one:
// step1: 调整尺寸到 590 x 590
$a = ROOT . '/' . 'a';
// 扫描目录
$dirA = scandir($a);
$im = new Imagick;
foreach ($dirA as $item) {
// 跳过目录和缩略图
if ($item === '.' || $item === '..' || strstr($item, '.db')) {
continue;
}
// 读取图片
$im->readImage($a . '/' . $item);
// 获取图片宽x高
$geo = $im->getImageGeometry();
if ($geo['width'] === 590 && $geo['height'] === 590) {
// 宽高符合,跳过
} else {
// 调整尺寸到590 x 590
im->resizeImage(590, 590, Gmagick::FILTER_UNDEFINED, 1, TRUE);
}
// 将图片保存到另一目录
$im->writeImage(ROOT . '/_a/' . $item);
// 释放资源
$im->destroy();
}
Step two:
// step2: 合并图片和名字
// 扫描目录
$files = scandir(ROOT . '/_a');
$k = 0;
foreach ($files as $item) {
// 跳过目录和缩略图
if ($item === '.' || $item === '..' || strstr($item, '.db')) {
continue;
}
// 文本图片的宽
$twidth = 570;
// 文本图片的高
$theight = 141;
// 获取图片名
$pathinfo = pathinfo($item);
$filename = $pathinfo['filename'];
// 初始化图片对象
$text = new Imagick;
// 初始化绘制对象
$draw = new ImagickDraw;
// 设置字体,这里是放到网站的font下的微软雅黑
$draw->setFont('font/msyh.ttf');
// 文字大小
$draw->setFontSize(40);
// 文字颜色
$draw->setFillColor(new ImagickPixel('#000000'));
// 文字对齐方式
$draw->setTextAlignment(Imagick::ALIGN_LEFT);
// 获取文字信息,主要是长宽,因为要实现在图片居中
$a = $text->queryFontMetrics($draw, $filename);
// 添加文字
$draw->annotation(($twidth - $a['textWidth']) / 2, 80, $filename);
// 建立图像
$text->newImage($twidth, $theight, new ImagickPixel('#ffffff'));
// 图片格式
$text->setImageFormat('png');
// 绘制图片
$text->drawImage($draw);
// 新建一个空白图片用来做画布
$canvas = new Imagick;
$canvas->newimage(570, 661, 'white');
$canvas->setImageFormat('png');
// 读取图片
$pic = new Imagick;
$pic->readImage(ROOT . '/_a/' . $item);
$pic->scaleimage(470, 470, TRUE);
// 将图片合并到画布
$canvas->compositeImage($pic, Imagick::COMPOSITE_OVER, 50, 50);
// 将文字合并到画布
$canvas->compositeimage($text, Imagick::COMPOSITE_OVER, 0, 520);
// 保存图片到另一目录
$canvas->writeimage(ROOT . '/com_a/' . $item);
$k++;
echo "{$k} files proceeded.\n";
}
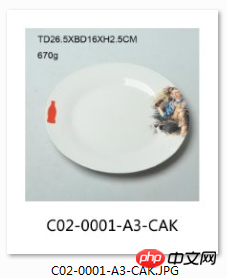
Rendering

##Step Three:
// step3: 合并每20张到一页
// 扫描目录
$files = scandir(ROOT . '/com_a');
// 给图片分组
$i = $j = 0;
$group = array();
foreach ($files as $item) {
  if ($item === '.' || $item === '..' || strstr($item, '.db')) {
    continue;
  }
  $i++;
  $group[$j][] = $item;
  if ($i % 20 === 0) {
    $j++;
  }
}
$total = count($group);
// 按组拼接图片,A4纸尺寸,4x5的组合方式
foreach ($group as $k => $v) {
  $canvas = new Imagick;
  $canvas->newimage(2480, 3508, 'white');
  $canvas->setimageformat('png');
  $i = $j = 0;
  foreach ($v as $item) {
    $im = new Imagick(ROOT . '/com_a/' . $item);
    // 预留了150的左边距
    $x = 150 + $i * 570;
    // 130的顶边距
    $y = 130 + $j * 661;
    $canvas->compositeimage($im, Imagick::COMPOSITE_OVER, $x, $y);
    // 每4张一行
    if (($i + 1) % 4 === 0) {
      $i = 0;
      $j++;
    } else {
      $i++;
    }
  }
  $canvas->writeimage(ROOT . '/merge_a/' . $k . '.png');
  $c = $k + 1;
  echo "Group {$c}/{$total} done.\n";
}
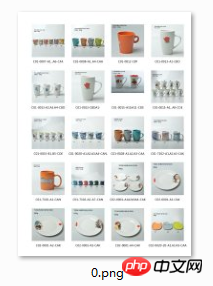
Rendering

PHP Detailed explanation of the progress bar effect achieved_php skills
PHPA simple way to implement a text counter_php tips
A simple way to implement array paging_php tips
The above is the detailed content of Detailed explanation of how PHP uses the imagick extension to merge images. For more information, please follow other related articles on the PHP Chinese website!

