


This time I will bring you the steps to build and serve with Angular CLI. What are the precautions for building and serving with Angular CLI? The following is a practical case, let’s take a look.
Build.
Build will mainly do the following actions:- Compile the project file and output it Go to a certain directory
- Build targets determine the output result
- bundling packaging
- Production The build of the environment will also perform uglify and tree-shaking (removing useless code)
ng build.
You can read the help first :ng build --helpFor the development environment, use the command ng build.By default, its output directory is configured in the ourDir attribute in the .angular-cli.json file, and the default is /dist Directory.After building, you will see these files in dist:
- inline.bundle.js This is the runtime of webpack.
- main.bundle.js is the program code.
- pollyfills.bundle.js is the browser’s Pollyfills.
- styles. bundle.js style
- vendor.bundle.js is angular and third-party library


references the 5 generated js files.
Open main.bundle.js and you can see the code I wrote:


install it:
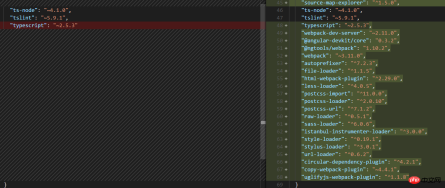
npm install --save-dev source-map-explorerThen execute ng build, then execute:
.\node_modules\.bin\source-map-explorer dist\main.bundle.jsThe result will generate this graph:

.\node_modules\.bin\source-map-explorer dist\vendor.bundle.js

Build Targets and Environment.
Environment refers to which environment file to use:
ng build |
ng build --prod |
|
Environment |
environment.ts |
environment..prod.ts |
Cache |
Only cache images referenced in css |
All builds File |
source maps |
generated |
not generated |
How to process css |
Global css output to js file |
The generated css file |
uglify |
is not |
Yes |
Tree-Shaking |
Do not remove useless code |
Remove Useless code |
AOT |
is not |
is |
Bundling Packaging |
is |
is |
--build-optimizer |
No |
Yes (with AOT and Angular5) |
--named-chunks |
Yes |
No |
--output-hashing |
media |
all |
下面命令都是针对开发时的build, 它们的作用是一样的:
ng build
ng build --dev
ng build --dev -e=dev
ng build --target=development --environment=dev
下面则是生产build:
ng build --prod
ng build --prod -e=prod
ng build --target=production --environment=prod
其它常用的参数还有:
--sourcemap -sm 生成source map
--aot Ahead of Time编译
--watch -w Watch并rebuild
--environment -e Build环境
--target -t Build target
--dev 表示dev env和target
--prod 表示prod env和target
Production Build.
先使用--aot:
ng build --aot

使用aot之后可以看到 vendor.bundle的大小降了很多, 只有1.5m左右了.
执行aot会去掉一些程序执行不需要的代码, 例如angular的compiler这时就不在build输出的文件里了(可以使用source-map-explorer查看).
试试生产环境:
ng build --prod

可以看到所有的文件都非常小了, 并且没有vendor了(因为prod下--build-optimizer起作用所以vendor没有了, 但可以使用--vendor-chunk true给弄出来).
Serve.
ng serve. 已经一直在用了, 下面看看它常用的参数:
--open -o 打开默认浏览器
--port -p 端口
--live-reload -lr 发生变化时重新加载网页(默认开启的)
--ssl 使用https
--proxy-config -pc 代理配置
--prod 在内存中serve 生产模式build的文件
试试 --prod:
ng serve --prod

通过文件大小可以看出确实是prod build的.
ng eject.
为项目生成webpack配置和脚本.
执行该命令试试:

看看有哪些变化:
.angular-cli.json:

package.json:

命令脚本都变了
还多出来一个webpack.config.js文件:

为什么要这么做呢?
可以对项目更深入的配置....
这时运行程序就是 npm start了.
我还是把reject恢复回去吧, 使用git来恢复吧.
如果需要Serve 其他js/css/assets文件:

放在.angular-cli.json就行, 例如jquery就应该放在scripts里面.
相信看了本文案例你已经掌握了方法,更多精彩请关注php中文网其它相关文章!
推荐阅读:
The above is the detailed content of Angular CLI Build and Serve steps instructions. For more information, please follow other related articles on the PHP Chinese website!

 聊聊Angular中的元数据(Metadata)和装饰器(Decorator)Feb 28, 2022 am 11:10 AM
本篇文章继续Angular的学习,带大家了解一下Angular中的元数据和装饰器,简单了解一下他们的用法,希望对大家有所帮助!
 angular学习之详解状态管理器NgRxMay 25, 2022 am 11:01 AM
本篇文章带大家深入了解一下angular的状态管理器NgRx,介绍一下NgRx的使用方法,希望对大家有所帮助!
 浅析angular中怎么使用monaco-editorOct 17, 2022 pm 08:04 PM
angular中怎么使用monaco-editor?下面本篇文章记录下最近的一次业务中用到的 monaco-editor 在 angular 中的使用,希望对大家有所帮助!
 Angular + NG-ZORRO快速开发一个后台系统Apr 21, 2022 am 10:45 AM
本篇文章给大家分享一个Angular实战,了解一下angualr 结合 ng-zorro 如何快速开发一个后台系统,希望对大家有所帮助!
 项目过大怎么办?如何合理拆分Angular项目?Jul 26, 2022 pm 07:18 PM
Angular项目过大,怎么合理拆分它?下面本篇文章给大家介绍一下合理拆分Angular项目的方法,希望对大家有所帮助!
 聊聊自定义angular-datetime-picker格式的方法Sep 08, 2022 pm 08:29 PM
怎么自定义angular-datetime-picker格式?下面本篇文章聊聊自定义格式的方法,希望对大家有所帮助!
 浅析Angular中的独立组件,看看怎么使用Jun 23, 2022 pm 03:49 PM
本篇文章带大家了解一下Angular中的独立组件,看看怎么在Angular中创建一个独立组件,怎么在独立组件中导入已有的模块,希望对大家有所帮助!
 聊聊Angular Route中怎么提前获取数据Jul 13, 2022 pm 08:00 PM
Angular Route中怎么提前获取数据?下面本篇文章给大家介绍一下从 Angular Route 中提前获取数据的方法,希望对大家有所帮助!


Hot AI Tools

Undresser.AI Undress
AI-powered app for creating realistic nude photos

AI Clothes Remover
Online AI tool for removing clothes from photos.

Undress AI Tool
Undress images for free

Clothoff.io
AI clothes remover

AI Hentai Generator
Generate AI Hentai for free.

Hot Article
Hot Tools

SublimeText3 Mac version
God-level code editing software (SublimeText3)

SAP NetWeaver Server Adapter for Eclipse
Integrate Eclipse with SAP NetWeaver application server.

Atom editor mac version download
The most popular open source editor

mPDF
mPDF is a PHP library that can generate PDF files from UTF-8 encoded HTML. The original author, Ian Back, wrote mPDF to output PDF files "on the fly" from his website and handle different languages. It is slower than original scripts like HTML2FPDF and produces larger files when using Unicode fonts, but supports CSS styles etc. and has a lot of enhancements. Supports almost all languages, including RTL (Arabic and Hebrew) and CJK (Chinese, Japanese and Korean). Supports nested block-level elements (such as P, DIV),

SecLists
SecLists is the ultimate security tester's companion. It is a collection of various types of lists that are frequently used during security assessments, all in one place. SecLists helps make security testing more efficient and productive by conveniently providing all the lists a security tester might need. List types include usernames, passwords, URLs, fuzzing payloads, sensitive data patterns, web shells, and more. The tester can simply pull this repository onto a new test machine and he will have access to every type of list he needs.

