

这次给大家带来Uploadify实现显示进度条上传图片,Uploadify实现显示进度条上传图片的注意事项有哪些,下面就是实战案例,一起来看一下。
Uploadify是一个简单易用的多文件上传方案。作为一个Jquery插件,Uploadify使用简单,并具有高度的定制性。
Uploadify特性:

Uploadify简单说来,是基于Jquery的一款文件上传插件。它的功能特色总结如下:
1)、支持单文件或多文件上传,可控制并发上传的文件数
2)、在服务器端支持各种语言与之配合使用,诸如PHP,.NET,Java……
3)、通过参数可配置上传文件类型及大小限制
4)、通过参数可配置是否选择文件后自动上传
5)、易于扩展,可控制每一步骤的回调函数(onSelect, onCancel……)
6)、通过接口参数和CSS控制外观
7)、提供上传进度的事件回调,实时显示上传进度
8)、开始之前要先下载插件安装包到本地并引用,详细实现请看代码注释,下面开始代码。
1、html代码
<p>
   </p>
- LOGO图标:
- " />
- 请上传LOGO图标!
-
尺寸72px*72px,png格式,建议使用 图标PSD模板 制作

(64*64)
(48*48)
(32*32)
(16*16)
2、Javascript代码(关键部分)
$("#webApplogo").uploadify({
   'uploader': 'js/uploadify-v2.1.4/uploadify.swf',//进度条,Uploadify里面含有
   'script': 'UploadApplogo.ashx',//一般处理程序
   'cancelImg': 'js/uploadify-v2.1.4/cancel.png',//取消图片路径
   'folder': 'Imagelogo',//上传文件夹名
   'auto': true, //文件添加到上传队列后,自动进行上传。默认为false
   'multi': false,//是否允许多文件上传。默认为false
   'fileExt':'*.gif;*.jpg;*.jpeg;*.png',//允许上传的文件类型,使用分号(”;)”分割 例如:*.jpg;*.gif,默认为null(所有文件类型)
   'fileDesc':'不超过2M的图片 (*.gif;*.jpg;*.png)',
   'sizeLimit': 2048000, //允许上传的文件大小(kb) 此为2M
   'onSelectOnce': function(event,data) { //在单文件或多文件上传时,选择文件时触发
    //event 事件对象(the event object)
    //data 选择的操作信息
    //data.filesSelected 选择文件操作中选中的文件数量
    $('#status-message').text(data.filesSelected + ' 文件正在等待上传…….');
   },
   'onComplete': function(event, queueID, fileObj, response, data) {//当单个文件上传完成后触发
    //event:事件对象(the event object)
    //ID:该文件在文件队列中的唯一表示
    //fileObj:选中文件的对象,他包含的属性列表
    //response:服务器端返回的Response文本,我这里返回的是处理过的文件名称
    //data:文件队列详细信息和文件上传的一般数据
    alert("文件:" + fileObj.name + " 上传成功!");
    //设置图片名称
    $("#applogo").attr("value",response);
    //设置输入框的值
    $("#text_webApplogo").attr("value",fileObj.name);
    //设置图片路径
    $("#img_64").attr("src","Imagelogo/64_"+response);
    $("#img_48").attr("src","Imagelogo/48_"+response);
    $("#img_32").attr("src","Imagelogo/32_"+response);
    $("#img_16").attr("src","Imagelogo/16_"+response);
    //图片路径设置完成后,显示图片
    $("#webApplogo_tab").css("display","block");
   },
   'onError': function(event, queueID, fileObj) {//当单个文件上传出错时触发
    alert("文件:" + fileObj.name + " 上传失败!");
   },
   'buttonImg':'Images/bn_04.gif',//浏览按钮的图片路径
   'width':60,//浏览按钮的宽和高
   'height':24
   ,'queueID':'QID_webApplogo'//页面上作为文件上传队列的元素的ID
  });
3、服务器端处理文件上传
/// <summary>
 /// 上传文件
 /// </summary>
 public class UploadApplogo : IHttpHandler
 {
  System.Drawing.Image image, image64, image48, image32, image16; //定义image类的对象
  protected string imagePath;//图片路径
  protected string imageType;//图片类型
  protected string imageName;//图片名称
  protected string fileName;//图片名称
  //提供一个回调方法,用于确定Image对象在执行生成缩略图操作时何时提前取消执行
  //如果此方法确定 GetThumbnailImage 方法应提前停止执行,则返回 true;否则返回 false
  System.Drawing.Image.GetThumbnailImageAbort callb = null;
  public void ProcessRequest(HttpContext context)
  {
   context.Response.ContentType = "text/plain";
   HttpPostedFile UploadImage = context.Request.Files["FileData"];
   //物理路径
   string uploadpath = HttpContext.Current.Server.MapPath(context.Request["folder"] + "\\");
   if (UploadImage != null)
   {
    //是否有目录,如没有就创建
    if (!Directory.Exists(uploadpath))
    {
     Directory.CreateDirectory(uploadpath);
    }
    //客户端文件完全名称
    string filename = UploadImage.FileName;
    string extname = filename.Substring(filename.LastIndexOf(".") + 1);
    //为不重复,设置文件名
    fileName = Guid.NewGuid().ToString() + "." + extname;
    //context.Response.Write("1");
    context.Response.Write(fileName);
   }
   else
   {
    context.Response.Write("0");
   }
   string mPath;
   imagePath = UploadImage.FileName;
   //取得图片类型
   imageType = imagePath.Substring(imagePath.LastIndexOf(".") + 1);
   //取得图片名称
   imageName = imagePath.Substring(imagePath.LastIndexOf("\\") + 1);
   Stream imgStream = UploadImage.InputStream;//流文件,准备读取上载文件的内容
   int imgLen = UploadImage.ContentLength;//上载文件大小
   //建立虚拟路径
   mPath = HttpContext.Current.Server.MapPath(context.Request["folder"]);
   //保存到虚拟路径
   UploadImage.SaveAs(mPath + "\\" + fileName);
   ////显示原图
   //imageSource.ImageUrl = "upFile/" + imageName;
   //为上传的图片建立引用
   image = System.Drawing.Image.FromFile(mPath + "\\" + fileName);
   //生成缩略图
   image64 = image.GetThumbnailImage(64, 64, callb, new System.IntPtr());
   //把缩略图保存到指定的虚拟路径
   image64.Save(HttpContext.Current.Server.MapPath(context.Request["folder"]) + "\\64_" + fileName);
   //释放image64对象的资源
   image64.Dispose();
   //生成缩略图
   image48 = image.GetThumbnailImage(48, 48, callb, new System.IntPtr());
   image48.Save(HttpContext.Current.Server.MapPath(context.Request["folder"]) + "\\48_" + fileName);
   image48.Dispose();
   //生成缩略图
   image32 = image.GetThumbnailImage(32, 32, callb, new System.IntPtr());
   image32.Save(HttpContext.Current.Server.MapPath(context.Request["folder"]) + "\\32_" + fileName);
   image32.Dispose();
   //生成缩略图
   image16 = image.GetThumbnailImage(16, 16, callb, new System.IntPtr());
   image16.Save(HttpContext.Current.Server.MapPath(context.Request["folder"]) + "\\16_" + fileName);
   image16.Dispose();
   //释放image对象占用的资源
   image.Dispose();
  }
  public bool IsReusable
  {
   get
   {
    return false;
   }
  }
 }
4、效果如下

相信看了本文案例你已经掌握了方法,更多精彩请关注php中文网其它相关文章!
推荐阅读:
The above is the detailed content of Uploadify implements display progress bar to upload pictures. For more information, please follow other related articles on the PHP Chinese website!

 如何在FastAPI中实现文件上传和处理Jul 28, 2023 pm 03:01 PM
如何在FastAPI中实现文件上传和处理FastAPI是一个现代化的高性能Web框架,简单易用且功能强大,它提供了原生支持文件上传和处理的功能。在本文中,我们将学习如何在FastAPI框架中实现文件上传和处理的功能,并提供代码示例来说明具体的实现步骤。首先,我们需要导入需要的库和模块:fromfastapiimportFastAPI,UploadF
 电脑怎么拍照上传Jan 16, 2024 am 10:45 AM
电脑只要安装了摄像头就可以进行拍照,但是有些用户还不知道该怎么拍照上传,现在就给大家具体介绍一下电脑拍照的方法,这样用户得到图片之后想上传到哪里都可以了。电脑怎么拍照上传一、Mac电脑1、打开访达,再点击左边的应用程序。2、打开后点击相机应用。3、点击下方的拍照按钮就可以了。二、Windows电脑1、打开下方搜索框,输入相机。2、接着打开搜索到的应用。3、再点击旁边的拍照按钮就可以了。
 酷狗上传自己的音乐的简单步骤Mar 25, 2024 pm 10:56 PM
1、打开酷狗音乐,点击个人头像。2、点击右上角设置的图标。3、点击【上传音乐作品】。4、点击【上传作品】。5、选择歌曲,然后点击【下一步】。6、最后点击【上传】即可。
 如何在QQ音乐上传歌词Feb 23, 2024 pm 11:45 PM
随着数字化时代的到来,音乐平台成为人们获取音乐的主要途径之一。然而,有时候我们在听歌的时候,发现没有歌词是一件十分困扰的事情。很多人都希望在听歌的时候能够显示歌词,以便更好地理解歌曲的内容和情感。而QQ音乐作为国内最大的音乐平台之一,也为用户提供了上传歌词的功能,使得用户可以更好地享受音乐的同时,感受到歌曲的内涵。下面将介绍一下在QQ音乐上如何上传歌词。首先
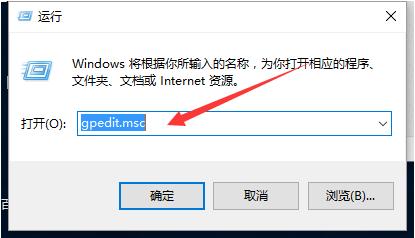
 Win10电脑上传速度慢怎么解决Jul 01, 2023 am 11:25 AM
Win10电脑上传速度慢怎么解决?我们在使用电脑的时候可能会觉得自己电脑上传文件的速度非常的慢,那么这是什么情况呢?其实这是因为电脑默认的上传速度为20%,所以才导致上传速度非常慢,很多小伙伴不知道怎么详细操作,小编下面整理了win11格式化c盘操作步骤,如果你感兴趣的话,跟着小编一起往下看看吧! Win10上传速度慢的解决方法 1、按下win+R调出运行,输入gpedit.msc,回车。 2、选择管理模板,点击网络--Qos数据包计划程序,双击限制可保留带宽。 3、选择已启用,将带
 如何提升电脑上传速度Jan 15, 2024 pm 06:51 PM
上传速度变得非常慢?相信这是很多朋友用电脑上传东西时候都会遇到的一个问题,在使用电脑传送文件的时候如果遇到网络不稳定,上传的速度就会很慢,那么应该怎么提高网络上传速度呢?下面,小编将电脑上传速度慢的处理方法告诉大家。说到网络速度,我们都知道打开网页的速度,下载速度,其实还有一个上传速度也非常关键,特别是一些用户经常需要上传文件到网盘的,那么上传速度快无疑会给你省下不少时间,那么上传速度慢怎么办?下面,小编给大伙带来了电脑上传速度慢的处理图文。电脑上传速度慢怎么解决点击“开始--运行”或者“窗口键
 如何通过PHP快手API接口,实现视频的播放和上传功能Jul 21, 2023 pm 04:37 PM
如何通过PHP快手API接口,实现视频的播放和上传功能导语:随着社交媒体的兴起,大众对于视频内容的需求也逐渐增加。快手作为一款以短视频为主题的社交应用,受到了很多用户的喜爱。本文将介绍如何使用PHP编写代码,通过快手API接口实现视频的播放和上传功能。一、获取访问Token在使用快手API接口之前,首先需要获取访问Token。Token是访问API接口的身份
 如何在Vue中实现头像上传功能Nov 07, 2023 am 08:01 AM
Vue是一款流行的前端框架,可以用于构建交互性强的应用程序。在开发过程中,上传头像是常见的需求之一。因此,在本文中,我们将介绍如何在Vue中实现头像上传功能,并提供具体的代码示例。使用第三方库为了实现头像上传功能,我们可以使用第三方库,比如vue-upload-component。该库提供了一个上传组件,可以方便地集成到Vue应用程序中。下面是一个简单的示例


Hot AI Tools

Undresser.AI Undress
AI-powered app for creating realistic nude photos

AI Clothes Remover
Online AI tool for removing clothes from photos.

Undress AI Tool
Undress images for free

Clothoff.io
AI clothes remover

AI Hentai Generator
Generate AI Hentai for free.

Hot Article
Hot Tools

MantisBT
Mantis is an easy-to-deploy web-based defect tracking tool designed to aid in product defect tracking. It requires PHP, MySQL and a web server. Check out our demo and hosting services.

PhpStorm Mac version
The latest (2018.2.1) professional PHP integrated development tool

VSCode Windows 64-bit Download
A free and powerful IDE editor launched by Microsoft

Notepad++7.3.1
Easy-to-use and free code editor

Atom editor mac version download
The most popular open source editor

