
 Web Front-endJS TutorialEasily learn the jQuery plug-in EasyUI EasyUI to create a tree menu_jquery
Easily learn the jQuery plug-in EasyUI EasyUI to create a tree menu_jquery

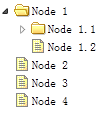
1. EasyUI uses tags to create a tree menu
A tree can be created from markers. The easyui tree menu (Tree) can also be defined in the
- element. The
- element will generate a tree node, and the child
- element will generate a parent tree node.

Create a tree menu (Tree)
 <ul class="easyui-tree">
  <li>
   <span>Folder</span>
   <ul>
    <li>
     <span>Sub Folder 1</span>
     <ul>
      <li><span>File 11</span></li>
      <li><span>File 12</span></li>
      <li><span>File 13</span></li>
     </ul>
    </li>
    <li><span>File 2</span></li>
    <li><span>File 3</span></li>
   </ul>
  </li>
  <li><span>File21</span></li>
 </ul>
2. Create asynchronous tree menu with EasyUI
In order to create an asynchronous tree menu (Tree), each tree node must have an 'id' attribute, which will be submitted back to the server to retrieve child node data.Create a tree menu (Tree)
 <ul id="tt" class="easyui-tree"
 url="tree2_getdata.php">
 </ul>
Server side code
 $id = isset($_POST['id']) ? intval($_POST['id']) : 0;

 include 'conn.php';

 $result = array();
 $rs = mysql_query("select * from nodes where parentId=$id");
 while($row = mysql_fetch_array($rs)){
 $node = array();
 $node['id'] = $row['id'];
 $node['text'] = $row['name'];
 $node['state'] = has_child($row['id']) ? 'closed' : 'open';
 array_push($result,$node);
 }

 echo json_encode($result);

 function has_child($id){
 $rs = mysql_query("select count(*) from nodes where parentId=$id");
 $row = mysql_fetch_array($rs);
 return $row[0] > 0 ? true : false;
 }
3. Add nodes to EasyUI tree menu
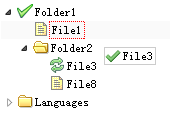
This section shows you how to attach nodes to the tree menu (Tree). We will create a food tree containing fruit and vegetable nodes, and then add some other fruits to the existing fruit nodes.Create a food tree
First, we create the food tree, the code looks like this:
 <div style="width:200px;height:auto;border:1px solid #ccc;">
 <ul id="tt" class="easyui-tree" url="tree_data.json"></ul>
 </div>
Please note that the tree component is defined in the
- tag, and the tree node data is loaded from the URL "tree_data.json".
Get parent nodeThen we select the fruit node by clicking on the node and we will add some other fruit data. Execute the getSelected method to get the processing node:
var node = $('#tt').tree('getSelected');
The return result of the getSelected method is a javascript object, which has an id, text, and target attributes. The target attribute is a DOM object that refers to the selected node, and its append method will be used to append child nodes.
Additional Nodevar node = $('#tt').tree('getSelected'); if (node){ var nodes = [{ "id":13, "text":"Raspberry" },{ "id":14, "text":"Cantaloupe" }]; $('#tt').tree('append', { parent:node.target, data:nodes }); }When adding some fruits, you will see:
As you can see, it is not that difficult to attach nodes using easyui’s Tree plug-in.
4. EasyUI creates a tree menu with check boxes
easyui’s Tree plugin allows you to create a checkbox tree. If you click a node's checkbox, the clicked node information will be inherited up and down. For example: click on the checkbox of the 'tomato' node and you will see that the 'Vegetables' node is now only partially selected.Create checkbox tree
<ul id="tt" class="easyui-tree"
 url="data/tree_data.json"
 checkbox="true">
</ul>
5. EasyUI tree menu drag and drop control
When using the Tree plug-in in an application, the drag and drop functions are required to allow the user to change the position of nodes. To enable drag and drop operations, all you need to do is set the 'dnd' property of the Tree plugin to true.Create a tree menu (Tree)
$('#tt').tree({
 dnd: true,
 url: 'tree_data.json'
});
When a drop operation occurs on a tree node, the 'onDrop' event will be triggered, and you should do some or more operations, such as saving the node state to the remote server, etc.
onDrop: function(targetNode, source, point){
 var targetId = $(target).tree('getNode', targetNode).id;
 $.ajax({
 url: '...',
 type: 'post',
 dataType: 'json',
 data: {
 id: source.id,
 targetId: targetId,
 point: point
 }
 });
}
六、EasyUI树形菜单加载父/子节点
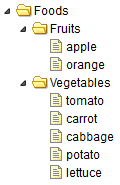
通常表示一个树节点的方式就是在每一个节点存储一个 parentid。 这个也被称为邻接列表模型。 直接加载这些数据到树形菜单(Tree)是不允许的。 但是我们可以在加载树形菜单之前,把它转换为标准标准的树形菜单(Tree)数据格式。 树(Tree)插件提供一个 'loadFilter' 选项函数,它可以实现这个功能。 它提供一个机会来改变任何一个进入数据。 本教程向您展示如何使用 'loadFilter' 函数加载父/子节点到树形菜单(Tree)。父/子节点数据
[
{"id":1,"parendId":0,"name":"Foods"},
{"id":2,"parentId":1,"name":"Fruits"},
{"id":3,"parentId":1,"name":"Vegetables"},
{"id":4,"parentId":2,"name":"apple"},
{"id":5,"parentId":2,"name":"orange"},
{"id":6,"parentId":3,"name":"tomato"},
{"id":7,"parentId":3,"name":"carrot"},
{"id":8,"parentId":3,"name":"cabbage"},
{"id":9,"parentId":3,"name":"potato"},
{"id":10,"parentId":3,"name":"lettuce"}
]
使用 'loadFilter' 创建树形菜单(Tree)
$('#tt').tree({
 url: 'data/tree6_data.json',
 loadFilter: function(rows){
 return convert(rows);
 }
});
转换的实现
function convert(rows){
 function exists(rows, parentId){
 for(var i=0; i<rows.length; i++){
 if (rows[i].id == parentId) return true;
 }
 return false;
 }

 var nodes = [];
 // get the top level nodes
 for(var i=0; i<rows.length; i++){
 var row = rows[i];
 if (!exists(rows, row.parentId)){
 nodes.push({
 id:row.id,
 text:row.name
 });
 }
 }

 var toDo = [];
 for(var i=0; i<nodes.length; i++){
 toDo.push(nodes[i]);
 }
 while(toDo.length){
 var node = toDo.shift(); // the parent node
 // get the children nodes
 for(var i=0; i<rows.length; i++){
 var row = rows[i];
 if (row.parentId == node.id){
 var child = {id:row.id,text:row.name};
 if (node.children){
  node.children.push(child);
 } else {
  node.children = [child];
 }
 toDo.push(child);
 }
 }
 }
 return nodes;
}
以上就是关于EasyUI创建树形菜单的基本操作方法,希望大家可以学以致用,真正的掌握其中的技巧。
- element of an unordered list provides a basic tree structure. Each


 JavaScript in Action: Real-World Examples and ProjectsApr 19, 2025 am 12:13 AM
JavaScript's application in the real world includes front-end and back-end development. 1) Display front-end applications by building a TODO list application, involving DOM operations and event processing. 2) Build RESTfulAPI through Node.js and Express to demonstrate back-end applications.
 JavaScript and the Web: Core Functionality and Use CasesApr 18, 2025 am 12:19 AM
The main uses of JavaScript in web development include client interaction, form verification and asynchronous communication. 1) Dynamic content update and user interaction through DOM operations; 2) Client verification is carried out before the user submits data to improve the user experience; 3) Refreshless communication with the server is achieved through AJAX technology.
 Understanding the JavaScript Engine: Implementation DetailsApr 17, 2025 am 12:05 AM
Understanding how JavaScript engine works internally is important to developers because it helps write more efficient code and understand performance bottlenecks and optimization strategies. 1) The engine's workflow includes three stages: parsing, compiling and execution; 2) During the execution process, the engine will perform dynamic optimization, such as inline cache and hidden classes; 3) Best practices include avoiding global variables, optimizing loops, using const and lets, and avoiding excessive use of closures.
 Python vs. JavaScript: The Learning Curve and Ease of UseApr 16, 2025 am 12:12 AM
Python is more suitable for beginners, with a smooth learning curve and concise syntax; JavaScript is suitable for front-end development, with a steep learning curve and flexible syntax. 1. Python syntax is intuitive and suitable for data science and back-end development. 2. JavaScript is flexible and widely used in front-end and server-side programming.
 Python vs. JavaScript: Community, Libraries, and ResourcesApr 15, 2025 am 12:16 AM
Python and JavaScript have their own advantages and disadvantages in terms of community, libraries and resources. 1) The Python community is friendly and suitable for beginners, but the front-end development resources are not as rich as JavaScript. 2) Python is powerful in data science and machine learning libraries, while JavaScript is better in front-end development libraries and frameworks. 3) Both have rich learning resources, but Python is suitable for starting with official documents, while JavaScript is better with MDNWebDocs. The choice should be based on project needs and personal interests.
 From C/C to JavaScript: How It All WorksApr 14, 2025 am 12:05 AM
The shift from C/C to JavaScript requires adapting to dynamic typing, garbage collection and asynchronous programming. 1) C/C is a statically typed language that requires manual memory management, while JavaScript is dynamically typed and garbage collection is automatically processed. 2) C/C needs to be compiled into machine code, while JavaScript is an interpreted language. 3) JavaScript introduces concepts such as closures, prototype chains and Promise, which enhances flexibility and asynchronous programming capabilities.
 JavaScript Engines: Comparing ImplementationsApr 13, 2025 am 12:05 AM
Different JavaScript engines have different effects when parsing and executing JavaScript code, because the implementation principles and optimization strategies of each engine differ. 1. Lexical analysis: convert source code into lexical unit. 2. Grammar analysis: Generate an abstract syntax tree. 3. Optimization and compilation: Generate machine code through the JIT compiler. 4. Execute: Run the machine code. V8 engine optimizes through instant compilation and hidden class, SpiderMonkey uses a type inference system, resulting in different performance performance on the same code.
 Beyond the Browser: JavaScript in the Real WorldApr 12, 2025 am 12:06 AM
JavaScript's applications in the real world include server-side programming, mobile application development and Internet of Things control: 1. Server-side programming is realized through Node.js, suitable for high concurrent request processing. 2. Mobile application development is carried out through ReactNative and supports cross-platform deployment. 3. Used for IoT device control through Johnny-Five library, suitable for hardware interaction.


Hot AI Tools

Undresser.AI Undress
AI-powered app for creating realistic nude photos

AI Clothes Remover
Online AI tool for removing clothes from photos.

Undress AI Tool
Undress images for free

Clothoff.io
AI clothes remover

AI Hentai Generator
Generate AI Hentai for free.

Hot Article
Hot Tools

ZendStudio 13.5.1 Mac
Powerful PHP integrated development environment

Notepad++7.3.1
Easy-to-use and free code editor

mPDF
mPDF is a PHP library that can generate PDF files from UTF-8 encoded HTML. The original author, Ian Back, wrote mPDF to output PDF files "on the fly" from his website and handle different languages. It is slower than original scripts like HTML2FPDF and produces larger files when using Unicode fonts, but supports CSS styles etc. and has a lot of enhancements. Supports almost all languages, including RTL (Arabic and Hebrew) and CJK (Chinese, Japanese and Korean). Supports nested block-level elements (such as P, DIV),

EditPlus Chinese cracked version
Small size, syntax highlighting, does not support code prompt function

Dreamweaver CS6
Visual web development tools

