

This time I will bring you a detailed explanation of the use of custom instructions in Angular17, and what are the precautions when using custom instructions in Angular17. The following is a practical case, let's take a look.
1 What is HTML
HTML document is a plain text file that contains HTML elements, CSS styles and JavaScriptcode; HTML elements are rendered by tags, and the browser will Each tag creates a DOM object with attributes, and the browser renders the content by rendering these DOM nodes. The content the user sees in the browser is the result of the browser rendering the DOM object.
2 Classification of instructions
˜Components, attribute directives, structural directives
For specific knowledge points, please refer to "Angular2 Revealed"
3 refers to some constants commonly used in defining instructions
3.1 Directive
Used to decorate the controller class to indicate that the controller class is a custom command controller class
3.2 ElementRef
Used as a reference to a DOM object, dependency injection is performed through the constructor. Its instance represents the DOM object of the element marked with a custom instruction; each element marked with a custom instruction will automatically have an ElementRef object. as a reference to the element's DOM object (prerequisite: ElementRef is dependently injected in the controller of the custom directive)
3.3 Render2
Instances of Render2 are used to operate DOM nodes, because Angular does not recommend directly operating DOM nodes; Render2 is only supported from Angular4, and previous versions used Render; each element marked with a custom instruction will have a Render2 instance to operate the DOM attribute of the element (prerequisite: Render2 is dependency injected in the controller of the custom directive)
3.4 HostListener
Annotations used to decorate event triggering methods
4 Custom attribute directive
A custom attribute directive requires a controller class decorated with @Directive decorator
import { Directive } from '@angular/core';
@Directive({
 selector: '[appDirectiveTest02]'
})
export class DirectiveTest02Directive {
 constructor() { }
}
4.1 Implement custom attribute instructions
4.1.1 Create a custom attribute command control class
Tip 01: Create a module to specifically place custom instructions
ng g d directive/test/directive-test02 --spec=false --module=directive# ## 4.1.2 Dependency injection ElementRef in the controller class
constructor(
 private el: ElementRef
 ) {}
4.1.3 Change the background color of the DOM object corresponding to the element marked with a custom instruction through an ElementRef instance
 ngOnInit() {
  this.el.nativeElement.style.backgroundColor = 'skyblue';
 }
4.1.3 Specify exports
import { NgModule } from '@angular/core';
import { CommonModule } from '@angular/common';
import { DirectiveTest01Directive } from './test/directive-test01.directive';
import { SharedModule } from '../shared/shared.module';
import { DirectiveTest02Directive } from './test/directive-test02.directive';
@NgModule({
 imports: [
  CommonModule
 ],
 declarations: [
  DirectiveTest01Directive,
  DirectiveTest02Directive],
 exports: [
  DirectiveTest01Directive,
  DirectiveTest02Directive
 ]
})
export class DirectiveModule { }
in the custom instruction module
4.1.4 Import the custom instruction module into the module where the component that needs to use the specified instruction is located
Tip 01: Custom instructions are generally used multiple times, so the custom instruction module is generally imported into the shared module and exported from the shared module, so that other modules only need to import the shared module
import { NgModule } from '@angular/core';
import { CommonModule } from '@angular/common';
import { RouterModule } from '@angular/router';
import {
 MdToolbarModule,
 MdSidenavModule,
 MdIconModule,
 MdButtonModule,
 MdCardModule,
 MdInputModule,
 MdRadioModule,
 MdRadioButton
 } from '@angular/material';
import { FormsModule, ReactiveFormsModule } from '@angular/forms';
import { HttpModule } from '@angular/http';
import { DirectiveModule } from '../directive/directive.module';
@NgModule({
 imports: [
  CommonModule,
  RouterModule,
  FormsModule,
  ReactiveFormsModule,
  HttpModule,
  MdToolbarModule,
  MdSidenavModule,
  MdIconModule,
  MdButtonModule,
  MdCardModule,
  MdInputModule,
  DirectiveModule,
  MdRadioModule
 ],
 declarations: [],
 exports: [
  CommonModule,
  RouterModule,
  FormsModule,
  ReactiveFormsModule,
  HttpModule,
  MdToolbarModule,
  MdSidenavModule,
  MdIconModule,
  MdButtonModule,
  MdCardModule,
  MdInputModule,
  DirectiveModule,
  MdRadioButton
 ]
})
export class SharedModule { }
4.1.5 Just use the selector corresponding to the custom component in the component
The selector of a custom directive is specified by the selector metadata of the @Directive decorator
Just mark the selector of the custom directive directly in the element.
4.1.6 Code Summary
<p>
  </p><p>实现自定义属性指令</p>
  <p>
    <button>实现自定义指令的按钮</button>
    <br><br>
    <button>未实现自定以指令的按钮</button>
  </p>
  <p>2018-1-20 22:47:06</p>
4.2 Bind input attributes to custom attribute instructions In the custom attribute instructions implemented in 4.1, the background color is hard-coded and cannot be changed. We can bind input attributes to the instructions to achieve data transfer, so as to achieve the purpose of dynamic change 4.2.1 Add an input attribute myColor
import { Directive, ElementRef } from '@angular/core';
import { OnInit } from '../../../../node_modules/_@angular_core@4.4.6@@angular/core/src/metadata/lifecycle_hooks';
@Directive({
 selector: '[appDirectiveTest02]'
})
export class DirectiveTest02Directive implements OnInit {
 constructor(
 private el: ElementRef
 ) {}
 ngOnInit() {
 this.el.nativeElement.style.backgroundColor = 'skyblue';
 }
}
in the controller of the custom attribute directive
4.2.2 Assign a value to the myColor property in the component
技巧01:在给输入属性赋值时,等号右边如果不是一个变量就需要用单引号括起来
View Code
4.2.3 效果展示
4.2.4 改进
可以通过自定义属性指令的选择器来实现数据传输
》利用自定义属性指令的选择器作为输入属性myColor输入属性的别名
》在组件中直接利用自定义指令的选择器作为输入属性
View Code
》 效果展示
4.3 响应用户操作
在自定义属性指令中通过监听DOM对象事件来进行一些操作
4.2.1 引入 HostListener 注解并编写一个方法
技巧01:HostListener注解可以传入两个参数
参数1 -> 需要监听的事件名称
参数2 -> 事件触发时传递的方法
 @HostListener('click', ['$event'])
 onClick(ev: Event) {
		  }
4.2.2 在方法中实现一些操作
@HostListener('click', ['$event'])
 onClick(ev: Event) {
 if (this.el.nativeElement === ev.target) {
  if (this.el.nativeElement.style.backgroundColor === 'green') {
  this.el.nativeElement.style.backgroundColor = 'skyblue';
  } else {
  this.el.nativeElement.style.backgroundColor = 'green';
  }
 }
 // if (this.el.nativeElement.style.backgroundColor === 'yellow') {
 // this.el.nativeElement.style.backgroundColor = 'green';
 // } else {
 // this.el.nativeElement.style.backgroundColor = 'yellow';
 // }
 }
相信看了本文案例你已经掌握了方法,更多精彩请关注php中文网其它相关文章!
推荐阅读:
The above is the detailed content of Detailed explanation of the use of custom instructions in Angular17. For more information, please follow other related articles on the PHP Chinese website!

 如何在Netflix中快速设置自定义头像Feb 19, 2024 pm 06:33 PM
Netflix上的头像是你流媒体身份的可视化代表。用户可以超越默认的头像来展示自己的个性。继续阅读这篇文章,了解如何在Netflix应用程序中设置自定义个人资料图片。如何在Netflix中快速设置自定义头像在Netflix中,没有内置功能来设置个人资料图片。不过,您可以通过在浏览器上安装Netflix扩展来实现此目的。首先,在浏览器上安装Netflix扩展的自定义个人资料图片。你可以在Chrome商店买到它。安装扩展后,在浏览器上打开Netflix并登录您的帐户。导航至右上角的个人资料,然后单击
 Win11如何自定义背景图片Jun 30, 2023 pm 08:45 PM
Win11如何自定义背景图片?在最新发布的win11系统中,里面有许多的自定义功能,但是很多小伙伴不知道应该如何使用这些功能。就有小伙伴觉得背景图片比较单调,想要自定义背景图,但是不知道如何操作自定义背景图,如果你不知道如何定义背景图片,小编下面整理了Win11自定义背景图片步骤,感兴趣的话一起往下看看把!Win11自定义背景图片步骤1、点击桌面win按钮,在弹出的菜单中点击设置,如图所示。2、进入设置菜单,点击个性化,如图所示。3、进入个性化,点击背景,如图所示。4、进入背景设置,点击浏览图片
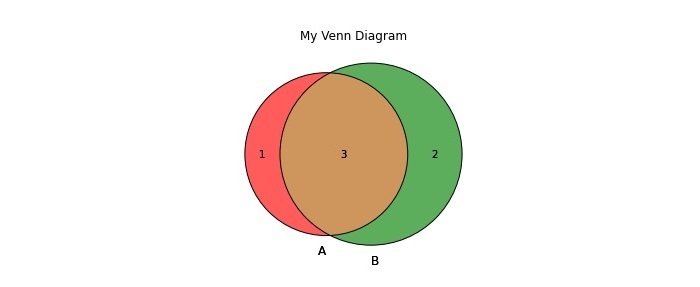 如何在Python中创建和自定义Venn图?Sep 14, 2023 pm 02:37 PM
维恩图是用来表示集合之间关系的图。要创建维恩图,我们将使用matplotlib。Matplotlib是一个在Python中常用的数据可视化库,用于创建交互式的图表和图形。它也用于制作交互式的图像和图表。Matplotlib提供了许多函数来自定义图表和图形。在本教程中,我们将举例说明三个示例来自定义Venn图。Example的中文翻译为:示例这是一个创建两个维恩图交集的简单示例;首先,我们导入了必要的库并导入了venns。然后我们将数据集创建为Python集,之后,我们使用“venn2()”函数创
 如何在CakePHP中创建自定义分页?Jun 04, 2023 am 08:32 AM
CakePHP是一个强大的PHP框架,为开发人员提供了很多有用的工具和功能。其中之一是分页,它可以帮助我们将大量数据分成几页,从而简化浏览和操作。默认情况下,CakePHP提供了一些基本的分页方法,但有时你可能需要创建一些自定义的分页方法。这篇文章将向您展示如何在CakePHP中创建自定义分页。步骤1:创建自定义分页类首先,我们需要创建一个自定义分页类。这个
 Eclipse中自定义快捷键设置的方法Jan 28, 2024 am 10:01 AM
如何在Eclipse中自定义快捷键设置?作为一名开发人员,在使用Eclipse进行编码时,熟练掌握快捷键是提高效率的关键之一。Eclipse作为一款强大的集成开发环境,不仅提供了许多默认的快捷键,还允许用户根据自己的偏好进行个性化的定制。本文将介绍如何在Eclipse中自定义快捷键设置,并给出具体的代码示例。打开Eclipse首先,打开Eclipse,并进入
 Vue3中的render函数:自定义渲染函数Jun 18, 2023 pm 06:43 PM
Vue是一款流行的JavaScript框架,它提供了许多方便的功能和API以帮助开发者构建交互式的前端应用程序。随着Vue3的发布,render函数成为了一个重要的更新。本文将介绍Vue3中render函数的概念、用途和如何使用它自定义渲染函数。什么是render函数在Vue中,template是最常用的渲染方式,但是在Vue3中,可以使用另外一种方式:r
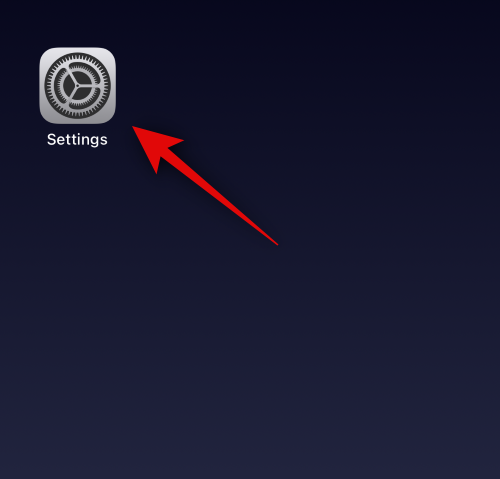 如何在装有 iOS 17 的 iPhone 上的 Apple Music 中启用和自定义交叉淡入淡出Jun 28, 2023 pm 12:14 PM
适用于iPhone的iOS17更新为AppleMusic带来了一些重大变化。这包括在播放列表中与其他用户协作,在使用CarPlay时从不同设备启动音乐播放等。这些新功能之一是能够在AppleMusic中使用交叉淡入淡出。这将允许您在曲目之间无缝过渡,这在收听多个曲目时是一个很棒的功能。交叉淡入淡出有助于改善整体聆听体验,确保您在音轨更改时不会受到惊吓或退出体验。因此,如果您想充分利用这项新功能,以下是在iPhone上使用它的方法。如何為AppleMusic啟用和自定Crossfade您需要最新的
 如何在CodeIgniter中实现自定义中间件Jul 29, 2023 am 10:53 AM
如何在CodeIgniter中实现自定义中间件引言:在现代的Web开发中,中间件在应用程序中起着至关重要的作用。它们可以用来执行在请求到达控制器之前或之后执行一些共享的处理逻辑。CodeIgniter作为一个流行的PHP框架,也支持中间件的使用。本文将介绍如何在CodeIgniter中实现自定义中间件,并提供一个简单的代码示例。中间件概述:中间件是一种在请求


Hot AI Tools

Undresser.AI Undress
AI-powered app for creating realistic nude photos

AI Clothes Remover
Online AI tool for removing clothes from photos.

Undress AI Tool
Undress images for free

Clothoff.io
AI clothes remover

AI Hentai Generator
Generate AI Hentai for free.

Hot Article
Hot Tools

EditPlus Chinese cracked version
Small size, syntax highlighting, does not support code prompt function

VSCode Windows 64-bit Download
A free and powerful IDE editor launched by Microsoft

Dreamweaver Mac version
Visual web development tools

MinGW - Minimalist GNU for Windows
This project is in the process of being migrated to osdn.net/projects/mingw, you can continue to follow us there. MinGW: A native Windows port of the GNU Compiler Collection (GCC), freely distributable import libraries and header files for building native Windows applications; includes extensions to the MSVC runtime to support C99 functionality. All MinGW software can run on 64-bit Windows platforms.

PhpStorm Mac version
The latest (2018.2.1) professional PHP integrated development tool

