
Home >Backend Development >PHP Tutorial >Nginx load balancing server entry case
Nginx load balancing server entry case

- 不言Original
- 2018-04-04 15:00:171447browse
When I was free recently, I studied nginx and made a simple introductory case.
Introduction:
Nginx (engine x) is a lightweight Web server and reverse proxy Server and email (IMAP/POP3) proxy server.
The ordinary client access server mode is direct access. With nginx server, we can deploy the same application to different servers. The access mode is as follows: This greatly improves concurrency capabilities, reduces server pressure, and improves performance.
Normal access mode:
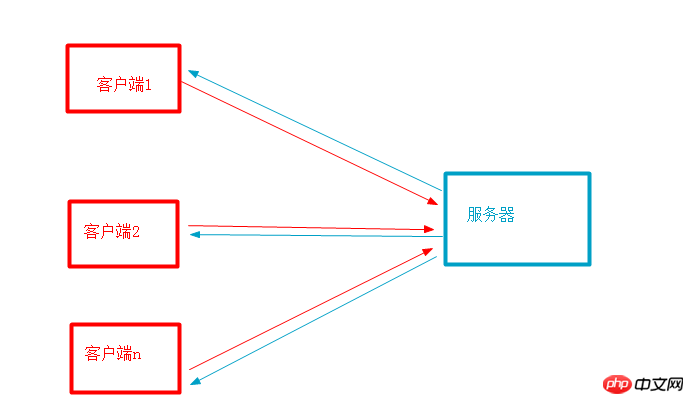
Access mode:

As a Web Server: Compared to Apache,Nginx uses fewer resources, supports more concurrent connections, and reflects higher efficiency, which makes Nginx is especially popular with web hosting providers. Able to support responses of up to 50,000 concurrent connections, thank you Nginx for choosing epoll and kqueue As a development model.
As a load balancing server: Nginx Can be used internally Directly supports Rails and PHP, and can also support external use as a HTTP proxy server Perform services. Nginx Written in C , regardless of system resource overhead or CPU usage efficiency is much better than Perlbal .
As a mail proxy server: Nginx It is also a very excellent mail proxy server (one of the earliest purposes of developing this product was also as a Mail proxy server), Last.fm describes a successful and wonderful experience.
NginxThe installation is very simple, the configuration file is very concise (it can also support perl syntax), BugsVery few servers: Nginx It is particularly easy to start and can almost do7*24 Runs continuously, no need to restart even if it runs for several months. You can also upgrade the software version without interrupting service.
Installation:
There are Linux and windows versions, you basically need to install the corresponding ones. I take windows as an example:
Download the installation packagehttp://nginx.org/en/download.html
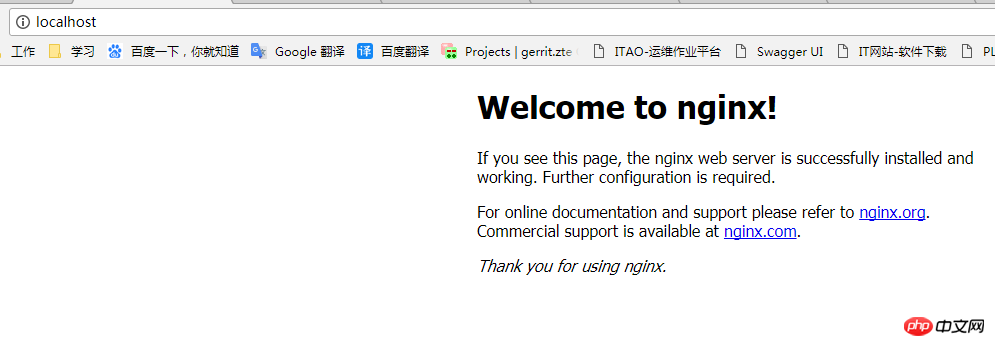
Unzip, click nginx.exe to run to start the service, enter localhost in the browser (default listening 127.0.0.1:80) Entering the following page indicates that the nginx server is started successfully.
Demo:
I built one myself# The simple project of ##springboot is deployed to different ports (can be deployed to different servers). In order to facilitate testing, I have made a simple distinction in the output content:


Note: conf / nginx.conf is the default configuration file of nginx . You can also use nginx -c Specify your configuration file
#运行用户
#user  nobody;
#启动进程,通常设置成和cpu的数量相等
worker_processes  1;

#全局错误日志
#error_log  logs/error.log;
#error_log  logs/error.log  notice;
#error_log  logs/error.log  info;

#PID文件,记录当前启动的nginx的进程ID
#pid        logs/nginx.pid;

#工作模式及连接数上限
events {
    worker_connections  1024;
}

#设定http服务器,利用它的反向代理功能提供负载均衡支持
http {
    #设定mime类型(邮件支持类型),类型由mime.types文件定义
    include       mime.types;
    default_type  application/octet-stream;

    #设定日志
    #log_format  main  '$remote_addr - $remote_user [$time_local] "$request" '
    #                  '$status $body_bytes_sent "$http_referer" '
    #                  '"$http_user_agent" "$http_x_forwarded_for"';

    #access_log  logs/access.log  main;

    #sendfile 指令指定 nginx 是否调用 sendfile 函数(zero copy 方式)来输出文件,对于普通应用,
    #必须设为 on,如果用来进行下载等应用磁盘IO重负载应用,可设置为 off,以平衡磁盘与网络I/O处理速度,降低系统的uptime.
    sendfile        on;
    #tcp_nopush     on;

    #连接超时时间
    keepalive_timeout  65;

    #gzip压缩开关
    #gzip  on;

    #设定负载均衡的服务器列表(或者一个反向代理服务器,一个的话不需要分配权重)
    upstream hello_server {
        #weigth参数表示权值,权值越高被分配到的几率越大
        server 127.0.0.1:8888   weight=1;
        server 127.0.0.1:8899   weight=3;
    }

    server {
        #监听80端口,80端口是知名端口号,用于HTTP协议
	listen       80;
	#定义使用localhost访问
        server_name  localhost;

        #编码格式
	charset utf-8;

        #access_log  logs/host.access.log  main;

	#反向代理的路径,location 后面设置映射的路径
	#对所有请求进行负载均衡请求(和upstream绑定)
        location / {
            root        /root;                 #定义服务器的默认网站根目录位置
            index       index.html index.htm;  #定义首页索引文件的名称
            proxy_pass  http://hello_server;   #请求转向hello_server 定义的服务器列表

            #以下是一些反向代理的配置(可选择性配置)
            #proxy_redirect off;
            proxy_set_header Host $host;
            proxy_set_header X-Real-IP $remote_addr;
            #后端的Web服务器可以通过X-Forwarded-For获取用户真实IP
            proxy_set_header X-Forwarded-For $remote_addr;
            proxy_connect_timeout 90;          #nginx跟后端服务器连接超时时间(代理连接超时)
            proxy_send_timeout 90;             #后端服务器数据回传时间(代理发送超时)
            proxy_read_timeout 90;             #连接成功后,后端服务器响应时间(代理接收超时)
            proxy_buffer_size 4k;              #设置代理服务器(nginx)保存用户头信息的缓冲区大小
            proxy_buffers 4 32k;               #proxy_buffers缓冲区,网页平均在32k以下的话,这样设置
            proxy_busy_buffers_size 64k;       #高负荷下缓冲大小(proxy_buffers*2)
            proxy_temp_file_write_size 64k;    #设定缓存文件夹大小,大于这个值,将从upstream服务器传

            client_max_body_size 10m;          #允许客户端请求的最大单文件字节数
            client_body_buffer_size 128k;      #缓冲区代理缓冲用户端请求的最大字节数
        }

}
After configuring, restart the nginx server, Visit localhost:
Restart command: nginx -s reload

still accesses the nginx(localhost) server, but actually accesses the deployed springbootproject(localhost:8899). Refresh a few more times and you will see the picture below, indicating that the services deployed on both ports have been accessed.

Note: The weight values assigned by the two services are different, so hello world b appears !!!(Actual accesslocalhost:8899) is more likely to appearhello world a!!!(Actual accesslocalhost:8888) is less likely. You can modify the permission value yourself and test it a few more times!
Summary: NginxCommonly used commands:

Related recommendations:
Use Nginx to avoid ajax cross-domain requests
nginx reverse proxy mechanism solves front-end cross-domain problems
The above is the detailed content of Nginx load balancing server entry case. For more information, please follow other related articles on the PHP Chinese website!