
Home >WeChat Applet >Mini Program Development >Sharing practical examples from getting started with WeChat mini programs (4)
Sharing practical examples from getting started with WeChat mini programs (4)

- 小云云Original
- 2018-02-23 14:30:302169browse
Debugging method
Debugging of small programs is similar to general web debugging, but pay attention to a few points:
Selection of debugging files
Open the debugger, select the Sources tab, and then use the shortcut key: ctrl+p to open the search box and select the file with the suffix sm Perform debugging. 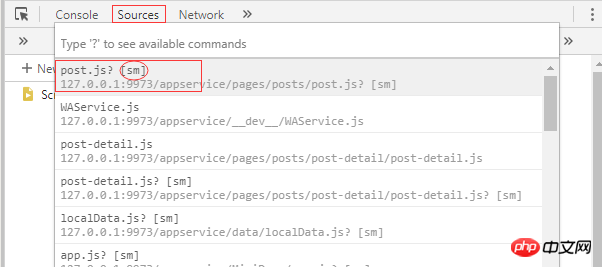
Display of data binding
Open the debugger and select AppData tab, you can check the detailed information of page data binding and whether it is bound correctly. Records the data binding content of all pages. 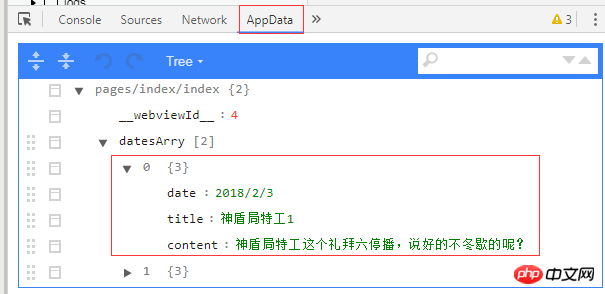
Through the above picture, we can know that only the datesArry object contains data that needs to be bound to the page.
TemplateTemplate
wxml / wxss / jsModule reuse, better encapsulation of UI and business logic to increase reusability
When an area needs to be used in multiple places, you can make this area into a template and call this template when using it. This will reduce the writing of repeated code, is easy to maintain, and makes the code tidy. .
Writing template code
<template name='postItem'>
<view class='box'>
<view class='title-box'>
<text class='title'>{{item.title}}</text>
<text class='date'>{{item.date}}</text>
</view>
<image src='{{item.imgUrl}}' class='cont-image'></image>
<text class='content'>{{item.content}}</text>
</view>
</template>
In order to facilitate the management of our template files, you can place them under the pages folder, Create a new template file, which stores the written template; we need to use the tag template to wrap the code, and add a name attribute to it. Of course, we must also write the corresponding style, and There is no difference in the normal way of writing styles.
The newly created template file can only store the wxml and wxss files of the template. Currently, putting other file types in the template file of the mini program does not work. It cannot be reused, although no error is reported, such as js files. The
template tag is just a placeholder, telling the compiler that this is where the template code is loaded. When the page is compiled, the tag disappears, so it is necessary to respond to events with the template file. , we need to wrap the template file with a tag that can add events in the area where the template file is loaded, such as: view / block
##
- Use the template code
Generally introduce it at the beginning of the file corresponding to the template file to be imported:
// 在对应的wxml文件中开头引入 <import src = '模版wxml文件路径' /> // 在对应的wxss文件中开头引入,注意末尾的分号 @import '模版wxss文件路径' ;Then in the
wxml file that introduces the template file, use
<template is = '模版的名字' data="{{要绑定到模版的数据}}" at the appropriate location. At this point, the simple template introduction and template data binding are completed. When we want to cycle the template, Just add a layer of tags outside as follows: // bolck标签的作用是作用事件到template模版上面
<block wx:for=" 服务器获取的数据集" wx:for-item='item' wx:for-index='index' >
<template is = '模版的名字' data="{{要绑定到模版的数据,一般是服务器获取的一个数据对象item}}"
</block>Template cycleThe previous article talked about the data cycle, borrowing the attributewx:for=' ' , you can know the corresponding sub-object data and its index value through the item / index obtained by default; but we found that item must be used in front of each template-bound data item. Attribute value (attribute value of sub-object) is used to bind data. item is redundant. Is there any way to simplify it? Of course!
<view wx:for='{{datesArry}}' wx:for-item='item' wx:for-index='idx'>
// 在对应的item的前面加上 ... 三个点
<template is='postItem' data='{{...item}}' />
// <view>{{idx}}</view>
</view> Just add ... three dots in front of the loop's sub-object item. A simple line of code implements the page below.
...)
data-, binds some information we need to store, and passes it to other places, such as the clicked page article index.
- Set custom attributes
view before you can operate it; the reason is that the template tag is just a placeholder and disappears after compilation.
<view wx:for='{{datesArry}}' wx:for-item='item' data-postId='{{item.postId}} wx:for-index='idx' catchtap='onPostTap' '>
<template is='postItem' data='{{...item}}' />
</view>
item.postId is obtained from the server and is an attribute in the data source.
- Get custom attributes
onPostTap:function(event){
var postId=event.currentTarget.dataset.postid;
var postIdData = event.currentTarget.dataset;
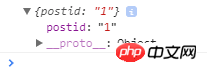
console.log(postId); // 1
console.log(postIdData);
}
event .currentTarget.dataset.postid: Obtained custom attribute value
event
Event objectevent.currentTarget:当前点击的目标元素event.currentTarget.dataset:目标元素上面的自定义属性集合
通过获取到的自定义属性,可以作为一个参数绑定一个链接上面,达到不同栏位的点击跳转到不同的页面:
  onPostTap:function(event){
      var postId=event.currentTarget.dataset.postid;
      wx.navigateTo({
        url: 'xxxx?id='+postId,
      })
  }
上面只是说明了在同一个页面之间获取自定义属性,要是在不同页面之间怎么获取自定义属性,达到传递值的作用呢?
wx.navigateTo({
        url: 'xxxx?id='+postId,
      })
通过上面的方法把参数postId,传递出去,然后在要接收的页面中使用options.id来获取
 onLoad: function (options) {
    var postId = options.id;
    console.log(options);
  }
options.id就是通过wx.navigateTo传递过去的postId
相关推荐:<br>
<a href="http://www.php.cn/js-tutorial-386466.html" target="_self">微信小程序template模板引用实例分享</a>
The above is the detailed content of Sharing practical examples from getting started with WeChat mini programs (4). For more information, please follow other related articles on the PHP Chinese website!
Related articles
See more- WeChat Mini Program Simple DEMO layout, logic, and style exercises
- Detailed explanation and examples of WeChat applet wx.request (interface calling method)
- WeChat Mini Program - Detailed explanation of WeChat login, WeChat payment, and template messages
- WeChat applet (application account) simple example application and detailed explanation of the example
- Detailed explanation of WeChat applet for loop