


Yesterday, we used HTML5 websocket and Tomcat to implement multi-person chat. It is the simplest and most basic. The most important thing to pay attention to is the development environment, which must meet jdk1.7 and tomcat8. Of course, tom7 7.063 will also work!
This article mainly introduces to you the relevant information about the sample code of HTML5 WebSocket to implement point-to-point chat. The editor thinks it is quite good, so I will share it with you now and give it as a reference. Let’s follow the editor to take a look, I hope it can help everyone.

Because it is a simulation, what is given here are two JSP pages A and B, which put two names Xiaoming and Xiaohua into the session respectively. Note, The session here is HttpSession session. The session in the previous multi-person chat was javax.websocket.Session; which is different.
Think about it here. What are the benefits of using HttpSession session to control chat users? Guess for yourself~~~
No annotations are used here. The traditional web.xml configuration method is first started in the system. When calling the InitServlet method
public class InitServlet extends HttpServlet {
    private static final long serialVersionUID = -3163557381361759907L;
    private static HashMap<String,MessageInbound> socketList;
    public void init(ServletConfig config) throws ServletException {
        InitServlet.socketList = new HashMap<String,MessageInbound>();
        super.init(config);
        System.out.println("初始化聊天容器");
    }

    public static HashMap<String,MessageInbound> getSocketList() {
        return InitServlet.socketList;
    }
}
Here you can combine it with your own system. The corresponding web configuration code is as follows:
<?xml version="1.0" encoding="UTF-8"?>
<web-app version="3.0" xmlns="http://java.sun.com/xml/ns/javaee"
    xmlns:xsi="http://www.w3.org/2001/XMLSchema-instance"
    xsi:schemaLocation="http://java.sun.com/xml/ns/javaee
    http://java.sun.com/xml/ns/javaee/web-app_3_0.xsd">

    <servlet>
        <servlet-name>websocket</servlet-name>
        <servlet-class>socket.MyWebSocketServlet</servlet-class>
    </servlet>
    <servlet-mapping>
        <servlet-name>websocket</servlet-name>
        <url-pattern>*.do</url-pattern>
    </servlet-mapping>

    <servlet>
        <servlet-name>initServlet</servlet-name>
        <servlet-class>socket.InitServlet</servlet-class>
        <load-on-startup>1</load-on-startup><!--方法执行的级别-->
    </servlet>
    <welcome-file-list>
        <welcome-file>index.jsp</welcome-file>
    </welcome-file-list>
</web-app>
This is the most common process for the front desk to send requests to the background, and it is also easy to embed into your own system
MyWebSocketServlet:
public class MyWebSocketServlet extends WebSocketServlet {
    public String getUser(HttpServletRequest request){
        String userName = (String) request.getSession().getAttribute("user");
        if(userName==null){
            return null;
        }
        return userName;
    }
    protected StreamInbound createWebSocketInbound(String arg0,
            HttpServletRequest request) {
        System.out.println("用户" + request.getSession().getAttribute("user") + "登录");
        return new MyMessageInbound(this.getUser(request));
    }
}
MyMessageInbound inheritance MessageInbound
package socket;
import java.io.IOException;
import java.nio.ByteBuffer;
import java.nio.CharBuffer;
import java.util.HashMap;
import org.apache.catalina.websocket.MessageInbound;
import org.apache.catalina.websocket.WsOutbound;
import util.MessageUtil;
public class MyMessageInbound extends MessageInbound {
    private String name;
    public MyMessageInbound() {
        super();
    }

    public MyMessageInbound(String name) {
        super();
        this.name = name;
    }

    @Override
    protected void onBinaryMessage(ByteBuffer arg0) throws IOException {

    }

    @Override
    protected void onTextMessage(CharBuffer msg) throws IOException {
        //用户所发消息处理后的map
        HashMap<String,String> messageMap = MessageUtil.getMessage(msg);    //处理消息类
        //上线用户集合类map
        HashMap<String, MessageInbound> userMsgMap = InitServlet.getSocketList();
        String fromName = messageMap.get("fromName");    //消息来自人 的userId
        String toName = messageMap.get("toName");         //消息发往人的 userId
        //获取该用户
        MessageInbound messageInbound = userMsgMap.get(toName);    //在仓库中取出发往人的MessageInbound
        MessageInbound messageFromInbound = userMsgMap.get(fromName);
        if(messageInbound!=null && messageFromInbound!=null){     //如果发往人 存在进行操作
            WsOutbound outbound = messageInbound.getWsOutbound();
            WsOutbound outFromBound = messageFromInbound.getWsOutbound();
            String content = messageMap.get("content");  //获取消息内容
            String msgContentString = fromName + "说: " + content;   //构造发送的消息
            //发出去内容
            CharBuffer toMsg =  CharBuffer.wrap(msgContentString.toCharArray());
            CharBuffer fromMsg =  CharBuffer.wrap(msgContentString.toCharArray());
            outFromBound.writeTextMessage(fromMsg);
            outbound.writeTextMessage(toMsg);  //
            outFromBound.flush();
            outbound.flush();
        }
    }

    @Override
    protected void onClose(int status) {
        InitServlet.getSocketList().remove(this);
        super.onClose(status);
    }

    @Override
    protected void onOpen(WsOutbound outbound) {
        super.onOpen(outbound);
        //登录的用户注册进去
        if(name!=null){
            InitServlet.getSocketList().put(name, this);//存放客服ID与用户
        }
    }

    @Override
    public int getReadTimeout() {
        return 0;
    }
}
Process the information sent by the foreground in onTextMessage and encapsulate the information to the target
There is also a messageutil
package util;
import java.nio.CharBuffer;
import java.util.HashMap;
public class MessageUtil {
    public static HashMap<String,String> getMessage(CharBuffer msg) {
        HashMap<String,String> map = new HashMap<String,String>();
        String msgString  = msg.toString();
        String m[] = msgString.split(",");
        map.put("fromName", m[0]);
        map.put("toName", m[1]);
        map.put("content", m[2]);
        return map;
    }
}
Of course, the front desk must also transmit information according to the prescribed format
<%@ page language="java" contentType="text/html; charset=UTF-8"
pageEncoding="UTF-8"%>
<!DOCTYPE html>
<html>
<head>
<meta http-equiv="Content-Type" content="text/html; charset=UTF-8">
<title>Index</title>
<script type="text/javascript" src="js/jquery-1.7.2.min.js"></script>
<%session.setAttribute("user", "小化");%>
<script type="text/javascript">
var ws = null;
function startWebSocket() {
if ('WebSocket' in window)
ws = new WebSocket("ws://localhost:8080/WebSocketUser/websocket.do");
else if ('MozWebSocket' in window)
ws = new MozWebSocket("ws://localhost:8080/WebSocketUser/websocket.do");
else
alert("not support");
ws.onmessage = function(evt) {
//alert(evt.data);
console.log(evt);
// $("#xiaoxi").val(evt.data);
setMessageInnerHTML(evt.data);
};
function setMessageInnerHTML(innerHTML){
document.getElementById('message').innerHTML += innerHTML + '<br/>';
}
ws.onclose = function(evt) {
//alert("close");
document.getElementById('denglu').innerHTML="离线";
};
ws.onopen = function(evt) {
//alert("open");
document.getElementById('denglu').innerHTML="在线";
document.getElementById('userName').innerHTML='小化';
};
}
function sendMsg() {
var fromName = "小化";
var toName = document.getElementById('name').value; //发给谁
var content = document.getElementById('writeMsg').value; //发送内容
ws.send(fromName+","+toName+","+content);//注意格式
}
</script>
</head>
<body onload="startWebSocket();">
<p>聊天功能实现</p>
登录状态:
<span id="denglu" style="color:red;">正在登录</span>
<br>
登录人:
<span id="userName"></span>
<br>
<br>
<br>
发送给谁:<input type="text" id="name" value="小明"></input>
<br>
发送内容:<input type="text" id="writeMsg"></input>
<br>
聊天框:<p id="message" style="height: 250px;width: 280px;border: 1px solid; overflow: auto;"></p>
<br>
<input type="button" value="send" onclick="sendMsg()"></input>
</body>
</html>This is the A.jsp page, B is the same as above
Through the above code, a point-to-point chat function can be realized. If it is large-scale, it can be made into a web version of the chat system, including chat rooms and single-person chats. It is said that websocket does not support binary transmission, but when I see a Daliu said something like this
But now I feel that using binary is not very meaningful. I have been confused for a long time. It was said that JS does not support binary. I found that it is actually just a bunch of scammers who have not studied this. . (Using filereader)
Related recommendations:
HTML5 imitation WeChat chat interface and circle of friends code
vue component Detailed explanation of chat room examples for communication between father and son
node.js Use socket to implement chat room example sharing
The above is the detailed content of HTML5 WebSocket peer-to-peer chat implementation method. For more information, please follow other related articles on the PHP Chinese website!

 SpringBoot怎么整合WebSocket实现后端向前端发送消息May 11, 2023 pm 02:07 PM
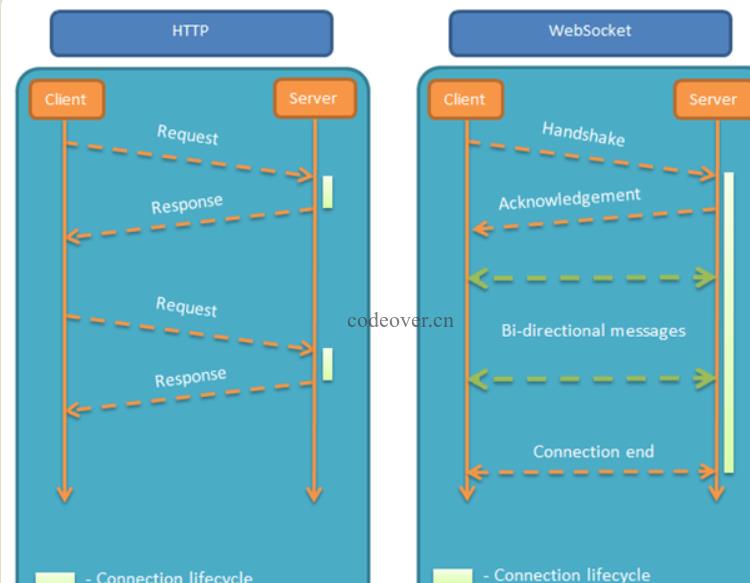
一、什么是websocket接口使用websocket建立长连接,服务端和客户端可以互相通信,服务端只要有数据更新,就可以主动推给客户端。WebSocket使得客户端和服务器之间的数据交换变得更加简单,允许服务端主动向客户端推送数据。在WebSocketAPI中,浏览器和服务器只需要完成一次握手,两者之间就直接可以创建持久性的连接,并进行双向数据传输。在WebSocketAPI中,浏览器和服务器只需要做一个握手的动作,然后,浏览器和服务器之间就形成了一条快速通道。两者之间就直接可以数据互相传送。
 在ThinkPHP6中使用Nginx反向代理WebsocketJun 20, 2023 pm 09:31 PM
在近几年的互联网应用中,Websocket已经成为了一种非常重要的通信协议。ThinkPHP6作为一款优秀的PHP开发框架,也提供了对Websocket的支持。不过,在使用Websocket时,我们通常会涉及到跨域、负载均衡等问题,因此,在这篇文章中,我们将介绍如何在ThinkPHP6中使用Nginx反向代理Websocket。首先,我们需要明确一下Webs
 Python服务器编程:实现WebSocket服务端Jun 19, 2023 am 09:51 AM
近年来,WebSocket技术日渐流行,成为了浏览器与服务器之间进行实时通信的标准选择。在Python中,我们可以通过一些成熟的库来实现WebSocket服务端的开发。本文将在介绍WebSocket技术的基础上,探索如何利用Python开发WebSocket服务端。一、什么是WebSocketWebSocket是一种在单个TCP
 SpringBoot怎么实现WebSocket即时通讯May 12, 2023 am 09:13 AM
1、引入依赖org.springframework.bootspring-boot-starter-websocketorg.projectlomboklombokcom.alibabafastjson1.2.32、WebSocketConfig开启WebSocketpackagecom.shucha.deveiface.web.config;/***@authortqf*@Description*@Version1.0*@since2022-04-1215:35*/importorg.spri
 浏览器支持WebTransport?它能替代WebSockets?Feb 23, 2023 pm 03:36 PM
许多应用程序,如游戏和直播等场景,需要一种机制来尽可能快地发送消息,同时可以接受无序、不可靠的数据传输方式。本机应用程序虽然可以使用原始 UDP 套接字,但这些在 Web 上不可用,因为它们缺乏加密、拥塞控制、同意发送机制(以防止 DDoS 攻击)。
 PHP+Socket系列之实现websocket聊天室Feb 02, 2023 pm 04:39 PM
本篇文章给大家带来了关于php+socket的相关知识,其中主要介绍了怎么使用php原生socket实现一个简易的web聊天室?感兴趣的朋友下面一起来看一下,希望对大家有帮助。
 如何在Linux中使用WebSocket技术Jun 18, 2023 pm 07:38 PM
随着现代网络应用程序的增多,WebSocket技术也变得非常流行。它是一项基于TCP协议的长连接技术,可以在客户端和服务器之间创建双向通信管道。在本文中,我们将介绍如何在Linux系统中使用WebSocket技术来创建一个简单的实时聊天应用程序。一、安装Node.js要使用WebSocket,首先需要在Linux系统中安装Node.j
 Spring Boot中使用WebSocket实现推送和通知功能Jun 23, 2023 am 11:47 AM
在现代Web应用程序开发中,WebSocket是实现即时通信和实时数据传输的常用技术。SpringBoot框架提供了集成WebSocket的支持,使得开发者可以非常方便地实现推送和通知功能。本文将介绍SpringBoot中如何使用WebSocket实现推送和通知功能,并演示一个简单的实时在线聊天室的实现。创建SpringBoot项目首先,我们需要创建一


Hot AI Tools

Undresser.AI Undress
AI-powered app for creating realistic nude photos

AI Clothes Remover
Online AI tool for removing clothes from photos.

Undress AI Tool
Undress images for free

Clothoff.io
AI clothes remover

AI Hentai Generator
Generate AI Hentai for free.

Hot Article
Hot Tools

mPDF
mPDF is a PHP library that can generate PDF files from UTF-8 encoded HTML. The original author, Ian Back, wrote mPDF to output PDF files "on the fly" from his website and handle different languages. It is slower than original scripts like HTML2FPDF and produces larger files when using Unicode fonts, but supports CSS styles etc. and has a lot of enhancements. Supports almost all languages, including RTL (Arabic and Hebrew) and CJK (Chinese, Japanese and Korean). Supports nested block-level elements (such as P, DIV),

SublimeText3 Linux new version
SublimeText3 Linux latest version

Notepad++7.3.1
Easy-to-use and free code editor

PhpStorm Mac version
The latest (2018.2.1) professional PHP integrated development tool

Dreamweaver CS6
Visual web development tools

