
Home >Backend Development >PHP Tutorial >Vue implements authority management of the website front desk
Vue implements authority management of the website front desk

- 小云云Original
- 2018-01-15 10:12:201971browse
This article mainly introduces the permission management of the website front-end based on vue (the practice of separation of front-end and back-end). The editor thinks it is quite good, and now I will share it with you and give you a reference. Let’s follow the editor to take a look, I hope it can help everyone.
As a popular language nowadays, Javascript is widely used and can be seen everywhere from front-end to back-end. This technology is now also used extensively within our projects to develop systems such as CMS and others. The front-end page of the data analysis system. I am very interested in this and use it as an extended content of the hat card for after-school study.
There are many Javascript frameworks, but the basic principles are roughly the same, so we chose vue.js developed by domestic people to make a preliminary attempt. It has been more than a week since I learned vue.js. Speaking of the main uses of vue, there is nothing more than Declarative Rendering, Component System, Client-side Routing, Vue-resource, Axios, and Vuex depending on the size of the project. Learning vue It's a small matter, but the main thing is to change your thinking. The component-based web development that separates the front and back ends is what you really want to practice.
It just so happens that my personal website CodeSheep needs to develop backend management recently, so I just used vue to implement it. When it comes to backend management, the unavoidable issue is permission management. Since we want to practice the idea of separation of front-end and back-end, all web front-end things managed by the backend should be completed independently by the front-end. This includes the very important front-end control of related things based on permissions. What we want to achieve is: different permissions correspond to different routes. At the same time, the sidebar of the page should also asynchronously generate the corresponding menu according to different permissions. To put it bluntly, users with different permissions see it during background management. The interface menu is different, so there is a set of processes for login and permission verification.
Specific implementation
1. Click the "Login" button to trigger the login event
##
this.$store.dispatch('LoginByEmail', this.loginForm).then(() => {
 this.$router.push({ path: '/' }); //登录成功之后重定向到首页
}).catch(err => {
 this.$message.error(err); //登录失败提示错误
});
The asynchronously triggered actions LoginByEmail The processing content is as follows:
LoginByEmail ({ commit }, userInfo) {
   const email = userInfo.email.trim()
   return new Promise((resolve, reject) => {
    loginByEmail(email, userInfo.password).then(response => {
     const data = response.data
     setToken(response.data.token)
     commit('SET_TOKEN', data.token)
     resolve()
    }).catch(error => {
     reject(error)
    })
   })
  }
It is easy to see that what you want to do is to put the token (uniquely indicating the user's identity) obtained from the server into the browser's local cookie.
2. Intercept routing in the global hook router.beforeEach
This step is the core. The specific processing flow is as follows: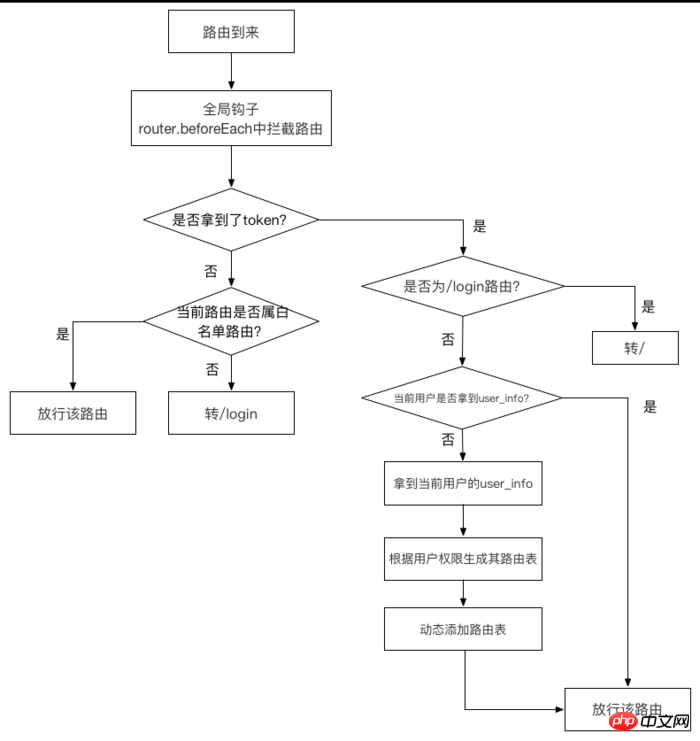
router.beforeEach((to, from, next) => {
 if (getToken()) { // 判断是否取到token
  if (to.path === '/login') {
   next({ path: '/' })
  } else {
   if (store.getters.roles.length === 0) { // 判断当前用户是否已获取完user_info信息
    store.dispatch('GetInfo').then(res => { // 获取user_info
     const roles = res.data.role
     store.dispatch('GenerateRoutes', { roles }).then(() => { // 生成可访问的路由表
      router.addRoutes(store.getters.addRouters) // 动态添加可访问路由表
      next({ ...to }) // 放行路由
     })
    }).catch(() => {
     store.dispatch('FedLogOut').then(() => {
      next({ path: '/login' })
     })
    })
   } else {
    next() // 放行该路由
   }
  }
 } else {
  if (whiteList.indexOf(to.path) !== -1) { // 在免登录白名单里的路径,继续让其访问
   next()
  } else { // 其他不在白名单里的路径全部让其重定向到登录页面!
   next('/login')
   alert('not in white list, now go to the login page')
  }
 }
})
Explain several important steps in the flow chart:Determine whether the front-end has obtained the token: getToken()
export function getToken () {
 return Cookies.get(TokenKey)
}
vuex asynchronous operation store.dispatch('GetInfo'): Obtain user information GetInfo ({ commit, state }) {
return new Promise((resolve, reject) => {
getInfo(state.token).then(response => {
const data = response.data
console.log(data)
commit('SET_ROLES', data.role)
commit('SET_NAME', data.name)
resolve(response)
}).catch(error => {
reject(error)
})
})
}The operation is also very simple , use a get restful api to obtain the user's role and name from the server GenerateRoutes ({ commit }, data) {
return new Promise(resolve => {
const { roles } = data
let accessedRouters
if (roles.indexOf('admin') >= 0) {
accessedRouters = asyncRouter
} else {
accessedRouters = filterAsyncRouter(asyncRouter, roles)
}
commit('SET_ROUTERS', accessedRouters)
resolve()
})
}As can be seen from the code, I only distinguish between the administrator role admin and other ordinary users (that is, non-Aadmin two permissions)TP5 Auth permission management example
How to implement permission management function in PHP
Linux user and permission management functions
The above is the detailed content of Vue implements authority management of the website front desk. For more information, please follow other related articles on the PHP Chinese website!