


This article mainly introduces some thoughts on the parabolic motion of pictures in h5, and introduces in detail the method of motion along the Bezier curve. It has certain reference value. Interested friends can refer to it. I hope it can Help everyone.
Commonly, objects/pictures move in a parabola or, more accurately, move along a Bezier curve. This is a common requirement in H5 development. So how to quickly calculate the movement path based on the design draft is the first solution for developers. The problem.
The commonly used design draft size for H5 development here is 640 * 1008, so the solution idea based on this size is as follows:
1. First, separate the elements to be displaced in PS Export a png. If the motion route has been planned in the design draft, you also need to export the route as png;
2. Create a new file in AI with the same size as the design draft, and then add the displacement elements Drag it into the file twice. If there is a motion route, also drag it in, as shown below:

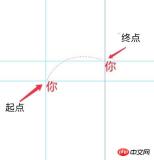
What needs to be paid attention to here is the placement of the displacement image. The starting point and end point of the path should correspond to the moving point of the picture. The corresponding situations are as follows:
There is no deformation processing in the canvas, then the moving point is the upper left corner of the picture
In the canvas, the image has been translated and moved because drawImage(image, sx, sy, sWidth, sHeight, dx, dy is added according to x1 and y1 in translate(x1, y1) , dWidth, dHeight) the final offset of dx and dy.
If the element is positioned through position:absolute and the position is controlled by translate3d(x, y, z) in transform , the offset should be x, y. Generally, in transform, we may imitate left, top and additional margin to control the position of the element, and add an additional translate3D(marginLeftX, marginLeftY, 0) in transform. Also needed Take the value of this margin into consideration.
3. Use the ctrl + r keys to pull out the reference line in AI, and move the element image to pull out its x and y positions, as follows As shown in the picture:
Then select the pen tool, click on the starting point and the end point successively, do not release the mouse after clicking the end point, drag the AI directly and it will automatically add 2 Control points. You can adjust the position of the two control points by moving the mouse to adjust the path generated by the pen tool until it is consistent with the reference line path on the design draft. As shown below:
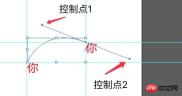
After dragging to the desired position, release the mouse and press Enter to confirm the path. If the outlined path is not what you want, you can continue to drag the control points to make adjustments.
4 , after the adjustment is completed, drag two additional reference lines to the position of control point 1, then open the information panel through the menu bar - window - information, and set the starting point, control point, end point, and the coordinates of the three points respectively. Take it out.
5, calculate the pixel difference between the control point, the end point and the starting point respectively, and calculate the real control point based on the real x, y coordinate values and pixel difference of the picture to be displaced in H5. End point coordinates. Then apply these three coordinate points to the formula.
Copy code
The code is as follows:
var path = getBezierPath([278 + 119, 572 - 32], [ 278 - 4, 572 - 137] , [278 + 119, 572 - 32] , [ 278, 572], 50);
Among them, the parameters are getBezierPath (end point, control point 1, control point 2, starting point, number of movements). If there is no control point 2, directly talk about the end point. Just fill in the coordinates. The final formula of _getBezierPath is as follows:
function getBezierPath(p1, p2, p3, p4, times) {
    function Point2D(x,y){
        this.x = x || 0.0;
        this.y = y ||0.0;
    }

    function PointOnCubicBezier( cp, t ) {
        var   ax, bx, cx;
        var   ay, by, cy;
        var   tSquared, tCubed;
        var   result = new Point2D ;
        cx = 3.0 * (cp[1].x - cp[0].x);
        bx = 3.0 * (cp[2].x - cp[1].x) - cx;
        ax = cp[3].x - cp[0].x - cx - bx;
        cy = 3.0 * (cp[1].y - cp[0].y);
        by = 3.0 * (cp[2].y - cp[1].y) - cy;
        ay = cp[3].y - cp[0].y - cy - by;
        tSquared = t * t;
        tCubed = tSquared * t;
        result.x = (ax * tCubed) + (bx * tSquared) + (cx * t) + cp[0].x;
        result.y = (ay * tCubed) + (by * tSquared) + (cy * t) + cp[0].y;
        return result;
    }
    function ComputeBezier( cp, numberOfPoints, curve ){
        var   dt;
        var   i;
        dt = 1.0 / ( numberOfPoints - 1 );
         for( i = 0; i < numberOfPoints; i++)
            curve[i] = PointOnCubicBezier( cp, i*dt );
    }

    var cp=[
        new Point2D(parseInt(p4[0]), parseInt(p4[1])), new Point2D(p2[0], p2[1]), new Point2D(p3[0], p3[1]), new Point2D(p1[0], p1[1])
    ];
    var numberOfPoints = times;
    var curve=[];
    ComputeBezier( cp, numberOfPoints, curve );
    return curve;
}
Related recommendations:
Two JSs to realize the parabolic trajectory of the ball Method of movement
Code case for parabolic movement of elastic potential energy animation in JavaScript
The above is the detailed content of Sharing tips on parabolic motion of images in HTML5. For more information, please follow other related articles on the PHP Chinese website!

 Explain the importance of using consistent coding style for HTML tags and attributes.May 01, 2025 am 12:01 AM
A consistent HTML encoding style is important because it improves the readability, maintainability and efficiency of the code. 1) Use lowercase tags and attributes, 2) Keep consistent indentation, 3) Select and stick to single or double quotes, 4) Avoid mixing different styles in projects, 5) Use automation tools such as Prettier or ESLint to ensure consistency in styles.
 How to implement multi-project carousel in Bootstrap 4?Apr 30, 2025 pm 03:24 PM
Solution to implement multi-project carousel in Bootstrap4 Implementing multi-project carousel in Bootstrap4 is not an easy task. Although Bootstrap...
 How does deepseek official website achieve the effect of penetrating mouse scroll event?Apr 30, 2025 pm 03:21 PM
How to achieve the effect of mouse scrolling event penetration? When we browse the web, we often encounter some special interaction designs. For example, on deepseek official website, �...
 How to modify the playback control style of HTML videoApr 30, 2025 pm 03:18 PM
The default playback control style of HTML video cannot be modified directly through CSS. 1. Create custom controls using JavaScript. 2. Beautify these controls through CSS. 3. Consider compatibility, user experience and performance, using libraries such as Video.js or Plyr can simplify the process.
 What problems will be caused by using native select on your phone?Apr 30, 2025 pm 03:15 PM
Potential problems with using native select on mobile phones When developing mobile applications, we often encounter the need for selecting boxes. Normally, developers...
 What are the disadvantages of using native select on your phone?Apr 30, 2025 pm 03:12 PM
What are the disadvantages of using native select on your phone? When developing applications on mobile devices, it is very important to choose the right UI components. Many developers...
 How to optimize collision handling of third-person roaming in a room using Three.js and Octree?Apr 30, 2025 pm 03:09 PM
Use Three.js and Octree to optimize collision handling of third-person roaming in the room. Use Octree in Three.js to implement third-person roaming in the room and add collisions...
 What problems will you encounter when using native select on your phone?Apr 30, 2025 pm 03:06 PM
Issues with native select on mobile phones When developing applications on mobile devices, we often encounter scenarios where users need to make choices. Although native sel...


Hot AI Tools

Undresser.AI Undress
AI-powered app for creating realistic nude photos

AI Clothes Remover
Online AI tool for removing clothes from photos.

Undress AI Tool
Undress images for free

Clothoff.io
AI clothes remover

Video Face Swap
Swap faces in any video effortlessly with our completely free AI face swap tool!

Hot Article
Hot Tools

Zend Studio 13.0.1
Powerful PHP integrated development environment

SAP NetWeaver Server Adapter for Eclipse
Integrate Eclipse with SAP NetWeaver application server.

SublimeText3 English version
Recommended: Win version, supports code prompts!

mPDF
mPDF is a PHP library that can generate PDF files from UTF-8 encoded HTML. The original author, Ian Back, wrote mPDF to output PDF files "on the fly" from his website and handle different languages. It is slower than original scripts like HTML2FPDF and produces larger files when using Unicode fonts, but supports CSS styles etc. and has a lot of enhancements. Supports almost all languages, including RTL (Arabic and Hebrew) and CJK (Chinese, Japanese and Korean). Supports nested block-level elements (such as P, DIV),

ZendStudio 13.5.1 Mac
Powerful PHP integrated development environment

