
Home >Backend Development >PHP Tutorial >Image filter algorithm code implemented in Ruby
Image filter algorithm code implemented in Ruby

- 小云云Original
- 2017-12-05 14:38:251953browse
Filters are now widely used in our lives, and we will also touch them in development. This article shares with you several image filter algorithms implemented using ruby, including grayscale, binary, and negative. , relief. It is very simple and practical, friends in need can refer to it.
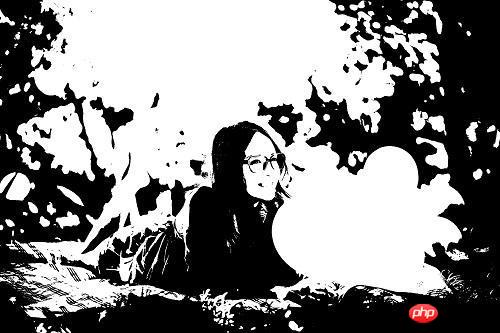
Original image

1. Grayscale algorithm
The color of each pixel in a color photo The value is composed of a mixture of red, green, and blue values. There are many values of red, green, and blue, so the color value of the pixel can also have many color values. This is the principle of color pictures, while grayscale photos There are only 256 colors. The general processing method is to set the three RGB channel values of the image color value to be the same, so that the display effect of the image will be gray.
There are generally three algorithms for grayscale processing:
Maximum method: that is, the new color value R=G=B=Max(R, G, B), The image processed by this method appears to have a high brightness value.
Average method: that is, the new color value R=G=B=(R+G+B)/3, the picture processed in this way is very soft
Weighted average method: That is, the new color value R=G=B=(R*Wr+G*Wg+B*Wb). Generally, because the human eye has different sensitivities to different colors, the weights of the three color values are different. Generally speaking, green is the highest, red is second, and blue is the lowest. The most reasonable values are Wr = 30%, Wg = 59%, Wb = 11%
The following is the weighted average Ruby implementation of value method:
##
 #灰度化图片
 #取RGB三色平均值
 def self.grey(bmp)
  for i in 0 .. bmp.height - 1
   for j in 0 .. bmp.width - 1
    rgb = bmp.getRGB(i, j)
    grey = rgb.r.to_f * 0.3+rgb.g.to_f *0.59 +rgb.b.to_f * 0.11.to_i
    bmp.setRGB(i, j, RGB.new(grey, grey, grey))
   end
  end
 end
Grayscale effect:

#二值化图片
 #小于一定阈值设为0 0 0,大于设置为255 255 255
 def self.binarization(bmp)
  imageGreyLevel = bmp.getGreyLevel
  for i in 0 .. bmp.height - 1
   for j in 0 .. bmp.width - 1
    rgb = bmp.getRGB(i, j)
    if rgb.getGreyLevel<imageGreyLevel
     bmp.setRGB(i, j, RGB.new(0, 0, 0))
    else
     bmp.setRGB(i, j, RGB.new(255, 255, 255))
    end
   end

  end
 end
Binarization effect
3. Negative film
The realization of the negative film effect is very simple, that is, inverting the value of each RGB channel, that is, using 255 to subtract#底片化图片
#RGB取反色255-
def self.contraryColor(bmp)
for i in 0 .. bmp.height - 1
for j in 0 .. bmp.width - 1
rgb = bmp.getRGB(i, j)
bmp.setRGB(i, j, rgb.getContrary)
end
end
end
Negative effect
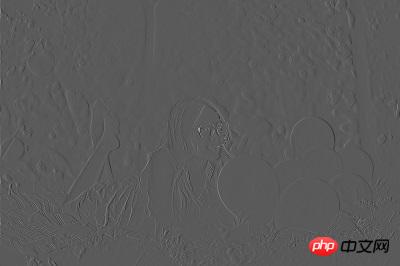
has a relief effect.
#浮雕效果
 #浮雕的算法相对复杂一些,用当前点的RGB值减去相邻点的RGB值并加上128作为新的RGB值。由于图片中相邻点的颜色值是比较接近的,
 #因此这样的算法 处理之后,只有颜色的边沿区域,也就是相邻颜色差异较大的部分的结果才会比较明显,而其他平滑区域则值都接近128左右,
 #也就是灰色,这样就具有了浮雕效果。
 #在实际的效果中,这样处理后,有些区域可能还是会有”彩色”的一些点或者条状痕迹,所以最好再对新的RGB值做一个灰度处理。
 def self.emboss(bmp)

  preRGB=RGB.new(128, 128, 128)

  for i in 0 .. bmp.height - 1
   for j in 0 .. bmp.width - 1
    currentRGB=bmp.getRGB(i, j)
    r=(currentRGB.r-preRGB.r)*1+128
    g=(currentRGB.g - preRGB.g)*1+128
    b=(currentRGB.b-preRGB.b)*1+128

    bmp.setRGB(i, j, RGB.new(r,g,b).getGreyRGB)
    preRGB = currentRGB
   end
  end

 end
Relief effect
Talk about a detailed introduction to CSS filters
Detailed examples of CSS3 filter effects
HTML5 sample code sharing to implement an image filter effect
The above is the detailed content of Image filter algorithm code implemented in Ruby. For more information, please follow other related articles on the PHP Chinese website!