Home >Backend Development >Python Tutorial >Python point-to-point simple implementation
Python point-to-point simple implementation
- 巴扎黑Original
- 2017-09-15 10:48:391639browse
This article mainly introduces python to implement simple point-to-point p2p chat in detail, which has certain reference value. Interested friends can refer to it
Peer-to-point chat is first based on multi-threaded network programming , and the second step is to save each connection as an object with unique attributes and add it to the connection list. The information sent by each connection object must contain three main contents (from, to, messages), so When the information is sent to the server, the server traverses the connection list according to the connection object of to to find the target object and sends the information to the target. After the target gets the information, it will know who sent it and then reply according to the ID number. This implementation will continue to be improved, and subsequent new features will be displayed on my personal github homepage
Server-side implementation:
##
#coding:utf-8
'''
file:server.py
date:2017/9/10 12:43
author:lockey
email:lockey@123.com
platform:win7.x86_64 pycharm python3
desc:p2p communication serverside
'''
import socketserver,json
import subprocess

connLst = []
## 连接列表,用来保存一个连接的信息(代号 地址和端口 连接对象)
class Connector(object):#连接对象类
 def __init__(self,account,password,addrPort,conObj):
 self.account = account
 self.password = password
 self.addrPort = addrPort
 self.conObj = conObj


class MyServer(socketserver.BaseRequestHandler):

 def handle(self):
 print("got connection from",self.client_address)
 register = False
 while True:
  conn = self.request
  data = conn.recv(1024)
  if not data:
  continue
  dataobj = json.loads(data.decode('utf-8'))
  #如果连接客户端发送过来的信息格式是一个列表且注册标识为False时进行用户注册
  if type(dataobj) == list and not register:
  account = dataobj[0]
  password = dataobj[1]
  conObj = Connector(account,password,self.client_address,self.request)
  connLst.append(conObj)
  register = True
  continue
  print(connLst)
  #如果目标客户端在发送数据给目标客服端
  if len(connLst) > 1 and type(dataobj) == dict:
  sendok = False
  for obj in connLst:
   if dataobj['to'] == obj.account:
   obj.conObj.sendall(data)
   sendok = True
  if sendok == False:
   print('no target valid!')
  else:
  conn.sendall('nobody recevied!'.encode('utf-8'))
  continue

if __name__ == '__main__':
 server = socketserver.ThreadingTCPServer(('192.168.1.4',8022),MyServer)
 print('waiting for connection...')
 server.serve_forever()
Client-side implementation:
#coding:utf-8
'''
file:client.py.py
date:2017/9/10 11:01
author:lockey
email:lockey@123.com
platform:win7.x86_64 pycharm python3
desc:p2p communication clientside
'''
from socket import *
import threading,sys,json,re

HOST = '192.168.1.4' ##
PORT=8022
BUFSIZ = 1024 ##缓冲区大小 1K
ADDR = (HOST,PORT)

tcpCliSock = socket(AF_INET,SOCK_STREAM)
tcpCliSock.connect(ADDR)
userAccount = None
def register():
 myre = r"^[_a-zA-Z]\w{0,}"
 #正则验证用户名是否合乎规范
 accout = input('Please input your account: ')
 if not re.findall(myre, accout):
 print('Account illegal!')
 return None
 password1 = input('Please input your password: ')
 password2 = input('Please confirm your password: ')
 if not (password1 and password1 == password2):
 print('Password not illegal!')
 return None
 global userAccount
 userAccount = accout
 return (accout,password1)

class inputdata(threading.Thread):
 def run(self):
 while True:
  sendto = input('to>>:')
  msg = input('msg>>:')
  dataObj = {'to':sendto,'msg':msg,'froms':userAccount}
  datastr = json.dumps(dataObj)
  tcpCliSock.send(datastr.encode('utf-8'))


class getdata(threading.Thread):
 def run(self):
 while True:
  data = tcpCliSock.recv(BUFSIZ)
  dataObj = json.loads(data.decode('utf-8'))
  print('{} -> {}'.format(dataObj['froms'],dataObj['msg']))


def main():
 while True:
 regInfo = register()
 if regInfo:
  datastr = json.dumps(regInfo)
  tcpCliSock.send(datastr.encode('utf-8'))
  break
 myinputd = inputdata()
 mygetdata = getdata()
 myinputd.start()
 mygetdata.start()
 myinputd.join()
 mygetdata.join()


if __name__ == '__main__':
 main()
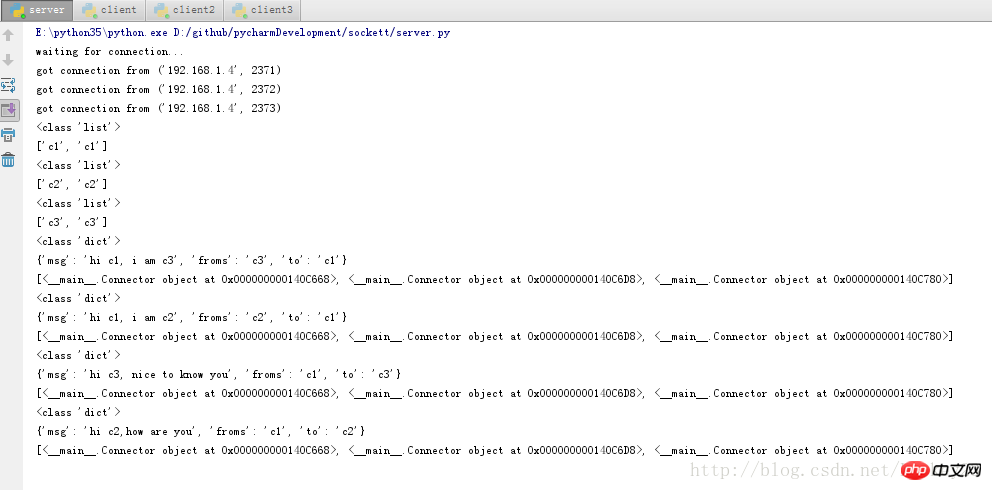
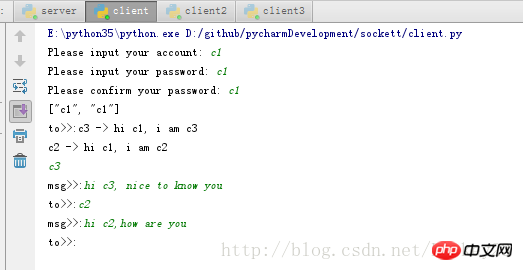
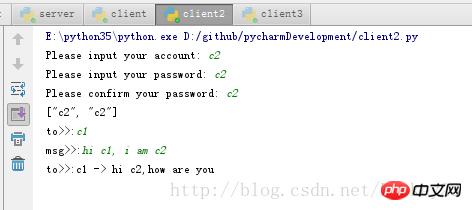
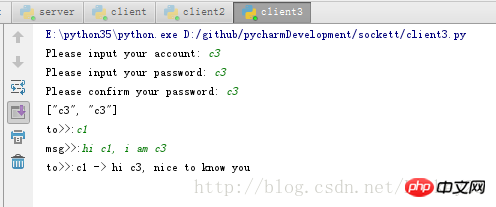
Example of running results:Server-side results:


The above is the detailed content of Python point-to-point simple implementation. For more information, please follow other related articles on the PHP Chinese website!

