Home >Backend Development >PHP Tutorial >How to install and configure PHP development environment using MAMP under Mac OSX?
How to install and configure PHP development environment using MAMP under Mac OSX?
- 黄舟Original
- 2017-09-07 09:06:022444browse
This section describes how to install MAMP on your Mac. Apache Web server, MySQL and phpMyAdmin will be installed through one operation. Friends who need it can refer to
1. Brief introduction:
PHP pages need to be processed through the Web server. Therefore, to develop in PHP, you need access to a PHP-enabled web server and a MySQL database. Also useful is phpMyAdmin, a graphical interface to MySQL. These three components are open source software that can be used to develop, test, and deploy web applications. And it's all free. The Apache web server and PHP are both pre-installed in Mac OS X. But they are not enabled by default. Also, the pre-installed version of PHP lacks many useful features, and you need to install and configure MySQL separately. Unless you're comfortable using the command line in Terminal, installing the all-in-one solution MAMP is much simpler. This section describes how to install MAMP on your Mac. The Apache web server, MySQL, and phpMyAdmin will be installed in one operation.
2. Tools/Materials
(1) MAMP (Macintosh, Apache, MySQL, PHP) download address is an application that allows you to set up a server locally , MAMP file size is about 245MB, initialize MAMP like other software, load and run MAMP, ignore MAMP PRO version, continue to use the free version of MAMP.
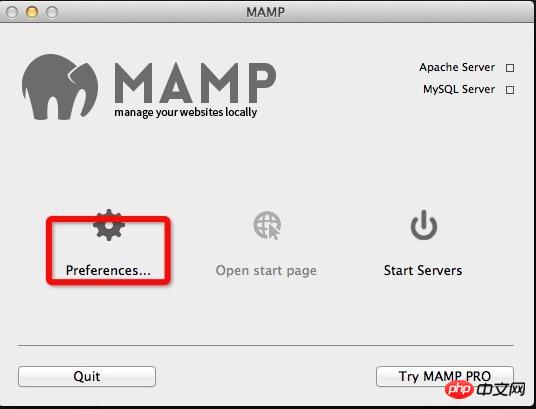
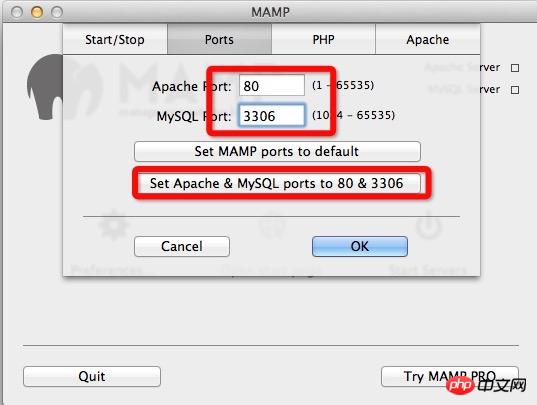
Click Preferences, select Ports and click Set Apache & MySQL ports to 80 & 3306 to replace the default value with the recommended port.


Next click Web Server/Apache and select the location to be installed. The default location is Macintosh HD/Applications/MAMP/htdocs. Similar to Public_html in the web hosting server folder (the default path can be modified by yourself).

(2)Mac OS X
(3)ThinkPHP
Three. Steps:
1. Open [System Preferences], select [Sharing]
Make sure [Internet Sharing] is turned off.
As long as MySQL has never been installed on your system, you can continue.
2. Download the latest version of MAMP
3. After downloading, click to continue installation
4. Drag the MAMP file into Applications
5. Find MAMP in the application, find the htdocs file and create a new file in this directory:

6. Create a MySQ database: Create a new database through phpMyAdmin
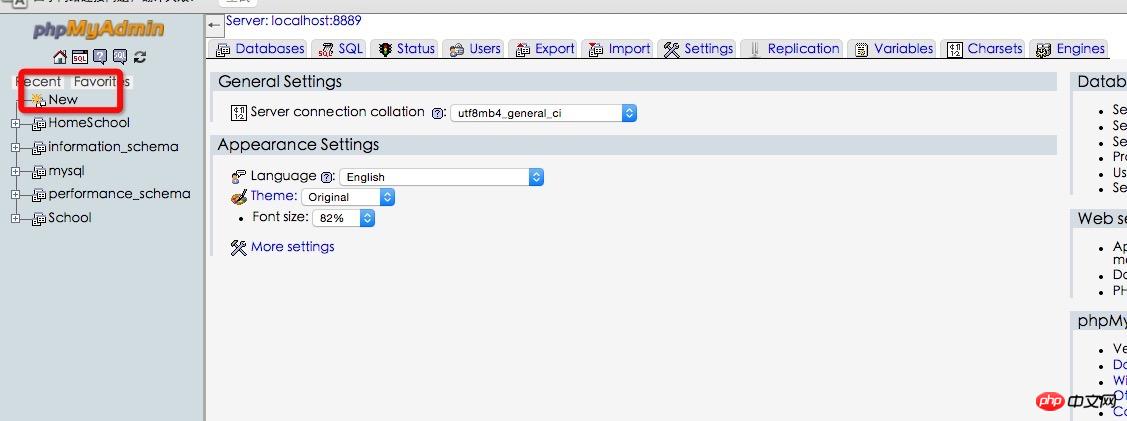
(1) Open MAMP and click Start Servers (you may need to enter your mac username and password), use a browser to access http://localhost/phpmyadmin, the following interface will appear to create a new database

7. After unzipping the downloaded ThinkPHP framework, import the ThinkPHP framework directly into the School folder created in the above steps, and create a new index.php file
<?php
define("APP_DEBUG","ture");
require "./ThinkPHP/ThinkPHP.php"
?>
Afterwards, enter http://localhost:8888/School on the browser and the following information will be displayed:

If you can see a smiling face, the connection is successful. , the following files will be automatically generated in the School file at this time (the files in the red box are created by myself and will not be automatically generated:

After finishing here, You can start PHP development.
Maybe there will be various errors in the process: but please continue, knowledge is accumulated little by little, and if you encounter wrong ideas, you will slowly find a lot of progress.
MAMP: Build an Apache, MySQL, PHP environment in OSX and install and debug WordPress locally
The name MAMP comes from Macintosh Apache MySQL PHP, which is obviously specialized Used to build Apache, MySQL, and PHP platforms in a Mac environment.
Although OSX has pre-installed Apache 1.3.x and PHP 4.3.2 environments, enabling, configuring, and installing integrated MySQL are still one step. Extremely complex work. The characteristic of MAMP is that it is simple (as can be seen from the following installation steps), and it does not destroy the files of the system itself, and the scope of modifying and creating files is limited to the program itself. Requirements: Mac OS Download the latest version.
Open the dmg file and drag MAMP to the Applications folder (note: MAMP must be in the Applications folder to work properly).
Set MAMP打开 MAMP(而不是 MAMP Pro),选择 Preferences 标签,会看到端口(Ports)的设定。默认 Apache 端口是 8888,如果不修改,就意味着需要通过 http://localhost:8888/ 访问。你也可以改成其他(例如改成 80,就不用输入 : 后面的部分了),但是缺点是,你每次都需要输入密码。
在 PHP 标签选择 PHP 5.2.4 以上版本即可(WordPress 3.2 的最低需求)。
在 Apache 标签,选择文件的存放地点,这个可以任意修改。比如我的设定是:
/Users/renfei/Documents/localhost
点 OK 完成设定。
打开 MAMP 服务并创建数据库
点击 Start Servers,稍等片刻,发现红灯变成绿灯,说明服务开启成功。
开启后,应该自动出现 MAMP 的起始页(如果没有出现,点击 Open Start Page 按钮。
在开启的网页中选择 phpMyAdmin,然后选择“数据库”标签。在“新建数据库”中给你的数据库起一个名字(例如我用 wordpress),填好后直接点“新建”。
安装 WordPress
下载 WordPress。
下载后,解压缩,把 wordpress 文件夹放到之前设定的文件存放地点。按照我的设定,文件全部在 /Users/renfei/Documents/localhost/wordpress
访问 localhost(按照我的设定,地址为localhost:8888/wordpress),并开始熟悉的 WordPress 安装过程。
相关内容按照这样填写:
database name: wordpress
database host/server: localhost
database user: root
database password: root
至此,全部安装过程完成,你可以在本机使用 WordPress 了。
The above is the detailed content of How to install and configure PHP development environment using MAMP under Mac OSX?. For more information, please follow other related articles on the PHP Chinese website!

