Home >Java >javaTutorial >Detailed analysis of new features of Java servlet3
Detailed analysis of new features of Java servlet3
- 黄舟Original
- 2017-07-24 15:31:591694browse
This article mainly introduces relevant information about the new features of servlet3 in detail, which has certain reference value. Interested friends can refer to
Overview of the new features of Servlet 3.0
Servlet 3.0 is a member of the Java EE 6 specification system and is released together with the Java EE 6 specification. This version provides several new features based on the previous version (Servlet 2.5) to simplify the development and deployment of Web applications. The introduction of several features has made developers very excited, and has also received praise from the Java community:
1. Asynchronous processing support: With this feature, Servlet threads no longer It needs to be blocked until the business processing is completed before the response can be output, and finally the Servlet thread is terminated. After receiving the request, the Servlet thread can delegate the time-consuming operation to another thread to complete and return to the container without generating a response. For situations where business processing is time-consuming, this will greatly reduce the occupation of server resources and increase the speed of concurrent processing.
2. New annotation support: This version adds several new annotations to simplify the declaration of Servlets, filters (Filter) and listeners (Listener), which makes the web.xml deployment description file starting from this version It’s no longer a must.
3. Plugability support: Developers who are familiar with Struts2 will definitely remember its integration features with various commonly used frameworks including Spring through plug-ins. Encapsulate the corresponding plug-ins into JAR packages and place them on the class path, and Struts2 can automatically load these plug-ins when running. Now Servlet 3.0 provides similar features. Developers can easily expand the functions of existing web applications through plug-ins without modifying the original application.
Below we will explain these new features one by one. Through the following study, readers will be able to clearly understand the changes in Servlet 3.0 and be able to use it smoothly for daily development work.
Asynchronous processing support
Before Servlet 3.0, the main workflow of an ordinary Servlet was roughly as follows: First, after the Servlet receives the request, it may Some preprocessing is required on the data carried by the request; then, certain methods of the business interface are called to complete the business processing; finally, the response is submitted based on the processing results, and the Servlet thread ends. The second step of business processing is usually the most time-consuming, which is mainly reflected in database operations and other cross-network calls. During this process, the Servlet thread remains blocked until the business method is executed. During the process of processing business, Servlet resources are always occupied and cannot be released. For applications with large concurrency, this may cause a performance bottleneck. In this regard, in the past, private solutions were usually used to end the Servlet thread early and release resources in a timely manner.
Servlet 3.0 has done groundbreaking work on this problem. Now by using the asynchronous processing support of Servlet 3.0, the previous Servlet processing flow can be adjusted to the following process: First, after the Servlet receives the request, it may first need to process the request. The data carried undergoes some preprocessing; then, the Servlet thread transfers the request to an asynchronous thread to perform business processing, and the thread itself returns to the container. At this time, the Servlet has not yet generated response data. After the asynchronous thread processes the business, it can directly generate a response. data (the asynchronous thread has references to the ServletRequest and ServletResponse objects), or the request continues to be forwarded to other Servlets. In this way, the Servlet thread is no longer blocked waiting for business logic processing, but can return immediately after starting the asynchronous thread.
The asynchronous processing feature can be applied to both Servlet and filter components. Since there is an essential difference in implementation between the working mode of asynchronous processing and the normal working mode, by default, Servlet and filter The asynchronous processing feature is not enabled. If you want to use this feature, you must enable it as follows:
1. For configuring Servlets and filters using the traditional deployment descriptor file (web.xml) In this case, Servlet 3.0 adds the 614385e6a121bc5f88fc4b71e028d816 subtag to the 46309ed845064fdb06e746051efff9e0 and 1d24e586ca31f4bd05eca427459d98c7 tags. The default value of this tag is false. To enable asynchronous processing support, set it to true. Taking Servlet as an example, its configuration
is as follows:
<servlet>
 <servlet-name>DemoServlet</servlet-name>
 <servlet-class>footmark.servlet.Demo Servlet</servlet-class>
 <async-supported>true</async-supported>
</servlet>
For Servlet using @WebServlet and @WebFilter provided by Servlet 3.0 Or in the case of filter configuration, both annotations provide the asyncSupported attribute. The default value of this attribute is false. To enable asynchronous processing support, just set this attribute to true. Taking @WebFilter as an example, its configuration is as follows:
@WebFilter(urlPatterns = "/demo",asyncSupported = true)
public class DemoFilter implements Filter{...}
A simple Servlet example that simulates asynchronous processing is as follows:
@WebServlet(urlPatterns = "/demo", asyncSupported = true)
public class AsyncDemoServlet extends HttpServlet {
 @Override
 public void doGet(HttpServletRequest req, HttpServletResponse resp)
 throws IOException, ServletException {
 resp.setContentType("text/html;charset=UTF-8");
 PrintWriter out = resp.getWriter();
 out.println("进入Servlet的时间:" + new Date() + ".");
 out.flush();

 //在子线程中执行业务调用,并由其负责输出响应,主线程退出
 AsyncContext ctx = req.startAsync();
 new Thread(new Executor(ctx)).start();

 out.println("结束Servlet的时间:" + new Date() + ".");
 out.flush();
 }
}

public class Executor implements Runnable {
 private AsyncContext ctx = null;
 public Executor(AsyncContext ctx){
 this.ctx = ctx;
 }

 public void run(){
 try {
  //等待十秒钟,以模拟业务方法的执行
  Thread.sleep(10000);
  PrintWriter out = ctx.getResponse().getWriter();
  out.println("业务处理完毕的时间:" + new Date() + ".");
  out.flush();
  ctx.complete();
 } catch (Exception e) {
  e.printStackTrace();
 }
 }
}
In addition, Servlet 3.0 also provides a listener for asynchronous processing, represented by the AsyncListener interface. It can monitor the following four events:
1.异步线程开始时,调用 AsyncListener 的 onStartAsync(AsyncEvent event) 方法;
2.异步线程出错时,调用 AsyncListener 的 onError(AsyncEvent event) 方法;
3.异步线程执行超时,则调用 AsyncListener 的 onTimeout(AsyncEvent event) 方法;
4.异步执行完毕时,调用 AsyncListener 的 onComplete(AsyncEvent event) 方法;
要注册一个 AsyncListener,只需将准备好的 AsyncListener 对象传递给 AsyncContext 对象的 addListener() 方法即可,如下所示:
AsyncContext ctx = req.startAsync();
ctx.addListener(new AsyncListener() {
 public void onComplete(AsyncEvent asyncEvent) throws IOException {
 // 做一些清理工作或者其他
 }
 ...
});
新增的注解支持
Servlet 3.0 的部署描述文件 web.xml 的顶层标签 8459cedd22f378aa35db2cd2b63decac 有一个 metadata-complete 属性,该属性指定当前的部署描述文件是否是完全的。如果设置为 true,则容器在部署时将只依赖部署描述文件,忽略所有的注解(同时也会跳过 web-fragment.xml 的扫描,亦即禁用可插性支持);如果不配置该属性,或者将其设置为 false,则表示启用注解支持(和可插性支持)。
@WebServlet
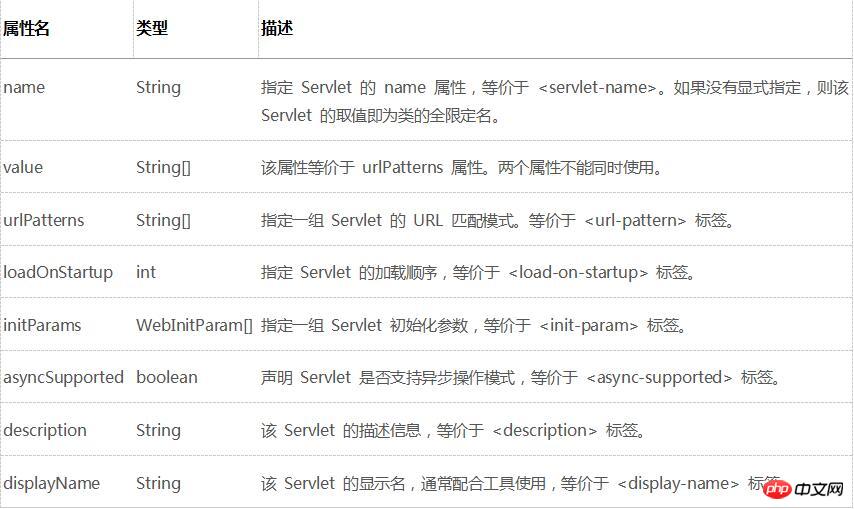
@WebServlet 用于将一个类声明为 Servlet,该注解将会在部署时被容器处理,容器将根据具体的属性配置将相应的类部署为 Servlet。该注解具有下表给出的一些常用属性(以下所有属性均为可选属性,但是 vlaue 或者 urlPatterns 通常是必需的,且二者不能共存,如果同时指定,通常是忽略 value 的取值):
表 1. @WebServlet 主要属性列表

下面是一个简单的示例:
@WebServlet(urlPatterns = {"/simple"}, asyncSupported = true,
loadOnStartup = -1, name = "SimpleServlet", displayName = "ss",
initParams = {@WebInitParam(name = "username", value = "tom")}
)
public class SimpleServlet extends HttpServlet{ … }
如此配置之后,就可以不必在 web.xml 中配置相应的 46309ed845064fdb06e746051efff9e0 和 870ae7edaa11700bcea972d006efb06e 元素了,容器会在部署时根据指定的属性将该类发布为 Servlet。它的等价的 web.xml 配置形式如下:
<servlet>
 <display-name>ss</display-name>
 <servlet-name>SimpleServlet</servlet-name>
 <servlet-class>footmark.servlet.SimpleServlet</servlet-class>
 <load-on-startup>-1</load-on-startup>
 <async-supported>true</async-supported>
 <init-param>
 <param-name>username</param-name>
 <param-value>tom</param-value>
 </init-param>
</servlet>
<servlet-mapping>
 <servlet-name>SimpleServlet</servlet-name>
 <url-pattern>/simple</url-pattern>
</servlet-mapping>
@WebInitParam
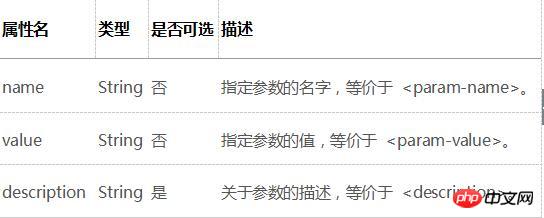
该注解通常不单独使用,而是配合 @WebServlet 或者 @WebFilter 使用。它的作用是为 Servlet 或者过滤器指定初始化参数,这等价于 web.xml 中 46309ed845064fdb06e746051efff9e0 和 1d24e586ca31f4bd05eca427459d98c7 的 380fae52cc7d04565d26dd4bbf4b5460 子标签。@WebInitParam 具有下表给出的一些常用属性:
表 2. @WebInitParam 的常用属性

@WebFilter
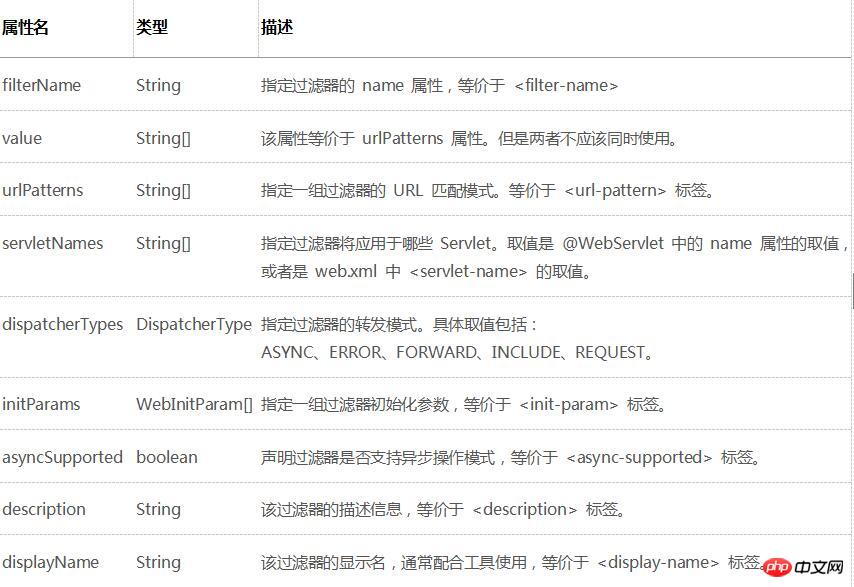
@WebFilter 用于将一个类声明为过滤器,该注解将会在部署时被容器处理,容器将根据具体的属性配置将相应的类部署为过滤器。该注解具有下表给出的一些常用属性 ( 以下所有属性均为可选属性,但是 value、urlPatterns、servletNames 三者必需至少包含一个,且 value 和 urlPatterns 不能共存,如果同时指定,通常忽略 value 的取值 ):
表 3. @WebFilter 的常用属性

下面是一个简单的示例:
@WebFilter(servletNames = {"SimpleServlet"},filterName="SimpleFilter")
public class LessThanSixFilter implements Filter{...}
如此配置之后,就可以不必在 web.xml 中配置相应的 1d24e586ca31f4bd05eca427459d98c7 和 dd0dfb26ea66647667f179a739921d33 元素了,容器会在部署时根据指定的属性将该类发布为过滤器。它等价的 web.xml 中的配置形式为:
<filter>
 <filter-name>SimpleFilter</filter-name>
 <filter-class>xxx</filter-class>
</filter>
<filter-mapping>
 <filter-name>SimpleFilter</filter-name>
 <servlet-name>SimpleServlet</servlet-name>
</filter-mapping>
@WebListener
该注解用于将类声明为监听器,被 @WebListener 标注的类必须实现以下至少一个接口:
ServletContextListener
ServletContextAttributeListener
ServletRequestListener
ServletRequestAttributeListener
HttpSessionListener
HttpSessionAttributeListener
该注解使用非常简单,其属性如下:
表 4. @WebListener 的常用属性

一个简单示例如下:
@WebListener("This is only a demo listener")
public class SimpleListener implements ServletContextListener{...}
如此,则不需要在 web.xml 中配置 eae7f28921fa176b20e23abb843be090 标签了。它等价的 web.xml 中的配置形式如下:
<listener>
 <listener-class>footmark.servlet.SimpleListener</listener-class>
</listener>
@MultipartConfig
该注解主要是为了辅助 Servlet 3.0 中 HttpServletRequest 提供的对上传文件的支持。该注解标注在 Servlet 上面,以表示该 Servlet 希望处理的请求的 MIME 类型是 multipart/form-data。另外,它还提供了若干属性用于简化对上传文件的处理。具体如下:
表 5. @MultipartConfig 的常用属性

可插性支持
如果说 3.0 版本新增的注解支持是为了简化 Servlet/ 过滤器 / 监听器的声明,从而使得 web.xml 变为可选配置, 那么新增的可插性 (pluggability) 支持则将 Servlet 配置的灵活性提升到了新的高度。熟悉 Struts2 的开发者都知道,Struts2 通过插件的形式提供了对包括 Spring 在内的各种开发框架的支持,开发者甚至可以自己为 Struts2 开发插件,而 Servlet 的可插性支持正是基于这样的理念而产生的。使用该特性,现在我们可以在不修改已有 Web 应用的前提下,只需将按照一定格式打成的 JAR 包放到 WEB-INF/lib 目录下,即可实现新功能的扩充,不需要额外的配置。
Servlet 3.0 引入了称之为“Web 模块部署描述符片段”的 web-fragment.xml 部署描述文件,该文件必须存放在 JAR 文件的 META-INF 目录下,该部署描述文件可以包含一切可以在 web.xml 中定义的内容。JAR 包通常放在 WEB-INF/lib 目录下,除此之外,所有该模块使用的资源,包括 class 文件、配置文件等,只需要能够被容器的类加载器链加载的路径上,比如 classes 目录等。
现在,为一个 Web 应用增加一个 Servlet 配置有如下三种方式 ( 过滤器、监听器与 Servlet 三者的配置都是等价的,故在此以 Servlet 配置为例进行讲述,过滤器和监听器具有与之非常类似的特性 ):
编写一个类继承自 HttpServlet,将该类放在 classes 目录下的对应包结构中,修改 web.xml,在其中增加一个 Servlet 声明。这是最原始的方式;
编写一个类继承自 HttpServlet,并且在该类上使用 @WebServlet 注解将该类声明为 Servlet,将该类放在 classes 目录下的对应包结构中,无需修改 web.xml 文件。
编写一个类继承自 HttpServlet,将该类打成 JAR 包,并且在 JAR 包的 META-INF 目录下放置一个 web-fragment.xml 文件,该文件中声明了相应的 Servlet 配置。
web-fragment.xml 文件示例如下:
<?xml version="1.0" encoding="UTF-8"?>
<web-fragment
 xmlns=http://java.sun.com/xml/ns/javaee
 xmlns:xsi="http://www.w3.org/2001/XMLSchema-instance" version="3.0"
 xsi:schemaLocation="http://java.sun.com/xml/ns/javaee
 http://java.sun.com/xml/ns/javaee/web-fragment_3_0.xsd"
 metadata-complete="true">
 <servlet>
 <servlet-name>fragment</servlet-name>
 <servlet-class>footmark.servlet.FragmentServlet</servlet-class>
 </servlet>
 <servlet-mapping>
 <servlet-name>fragment</servlet-name>
 <url-pattern>/fragment</url-pattern>
 </servlet-mapping>
</web-fragment>
从上面的示例可以看出,web-fragment.xml 与 web.xml 除了在头部声明的 XSD 引用不同之外,其主体配置与 web.xml 是完全一致的。
由于一个 Web 应用中可以出现多个 web-fragment.xml 声明文件,加上一个 web.xml 文件,加载顺序问题便成了不得不面对的问题。Servlet 规范的专家组在设计的时候已经考虑到了这个问题,并定义了加载顺序的规则。
web-fragment.xml 包含了两个可选的顶层标签,8a11bc632ea32a57b3e3693c7987c420 和 792ac9b21a68bcc1f9ef5893f6dde014,如果希望为当前的文件指定明确的加载顺序,通常需要使用这两个标签,8a11bc632ea32a57b3e3693c7987c420 主要用于标识当前的文件,而 792ac9b21a68bcc1f9ef5893f6dde014 则用于指定先后顺序。一个简单的示例如下:
<web-fragment...>
 <name>FragmentA</name>
 <ordering>
  <after>
   <name>FragmentB</name>
   <name>FragmentC</name>
  </after>
 <before>
  <others/>
 </before>
 </ordering>
 ...
</web-fragment>
如上所示, 8a11bc632ea32a57b3e3693c7987c420 标签的取值通常是被其它 web-fragment.xml 文件在定义先后顺序时引用的,在当前文件中一般用不着,它起着标识当前文件的作用。
在 792ac9b21a68bcc1f9ef5893f6dde014 标签内部,我们可以定义当前 web-fragment.xml 文件与其他文件的相对位置关系,这主要通过 792ac9b21a68bcc1f9ef5893f6dde014 的 cbc918db1beed770b0e53b074ad87b15 和 963388cc8d4734180f4322c2b988d8a2 子标签来实现的。在这两个子标签内部可以通过 8a11bc632ea32a57b3e3693c7987c420 标签来指定相对应的文件。比如:
<after>
 <name>FragmentB</name>
 <name>FragmentC</name>
</after>
以上片段则表示当前文件必须在 FragmentB 和 FragmentC 之后解析。963388cc8d4734180f4322c2b988d8a2 的使用于此相同,它所表示的是当前文件必须早于 963388cc8d4734180f4322c2b988d8a2 标签里所列出的 web-fragment.xml 文件。
除了将所比较的文件通过 8a11bc632ea32a57b3e3693c7987c420 在 cbc918db1beed770b0e53b074ad87b15 和 c15bac5f29418fadf3ed61a82491f55a 中列出之外,Servlet 还提供了一个简化的标签 97a887bdc94bec64e0472c45c3e63cd4。它表示除了当前文件之外的其他所有的 web-fragment.xml 文件。该标签的优先级要低于使用 8a11bc632ea32a57b3e3693c7987c420 明确指定的相对位置关系。
ServletContext 的性能增强
除了以上的新特性之外,ServletContext 对象的功能在新版本中也得到了增强。现在,该对象支持在运行时动态部署 Servlet、过滤器、监听器,以及为 Servlet 和过滤器增加 URL 映射等。以 Servlet 为例,过滤器与监听器与之类似。ServletContext 为动态配置 Servlet 增加了如下方法:
ServletRegistration.Dynamic addServlet(String servletName,Class67a2363d32a9733943a65b9e6b37ecfb servletClass)
ServletRegistration.Dynamic addServlet(String servletName, Servlet servlet)
ServletRegistration.Dynamic addServlet(String servletName, String className)
fd2e4e87782626871a925874e70a40e2 T createServlet(Class8742468051c85b06f0a0af9e3e506b5c clazz)
ServletRegistration getServletRegistration(String servletName)
Map5701e386b66809fdf022d23cec5ee5b2 getServletRegistrations()
其中前三个方法的作用是相同的,只是参数类型不同而已;通过 createServlet() 方法创建的 Servlet,通常需要做一些自定义的配置,然后使用 addServlet() 方法来将其动态注册为一个可以用于服务的 Servlet。两个 getServletRegistration() 方法主要用于动态为 Servlet 增加映射信息,这等价于在 web.xml( 抑或 web-fragment.xml) 中使用 870ae7edaa11700bcea972d006efb06e 标签为存在的 Servlet 增加映射信息。
以上 ServletContext 新增的方法要么是在 ServletContextListener 的 contexInitialized 方法中调用,要么是在 ServletContainerInitializer 的 onStartup() 方法中调用。
ServletContainerInitializer 也是 Servlet 3.0 新增的一个接口,容器在启动时使用 JAR 服务 API(JAR Service API) 来发现 ServletContainerInitializer 的实现类,并且容器将 WEB-INF/lib 目录下 JAR 包中的类都交给该类的 onStartup() 方法处理,我们通常需要在该实现类上使用 @HandlesTypes 注解来指定希望被处理的类,过滤掉不希望给 onStartup() 处理的类。
HttpServletRequest 对文件上传的支持
此前,对于处理上传文件的操作一直是让开发者头疼的问题,因为 Servlet 本身没有对此提供直接的支持,需要使用第三方框架来实现,而且使用起来也不够简单。如今这都成为了历史,Servlet 3.0 已经提供了这个功能,而且使用也非常简单。为此,HttpServletRequest 提供了两个方法用于从请求中解析出上传的文件:
Part getPart(String name) Collection<Part> getParts()
前者用于获取请求中给定 name 的文件,后者用于获取所有的文件。每一个文件用一个 javax.servlet.http.Part 对象来表示。该接口提供了处理文件的简易方法,比如 write()、delete() 等。至此,结合 HttpServletRequest 和 Part 来保存上传的文件变得非常简单,如下所示:
Part photo = request.getPart("photo");
photo.write("/tmp/photo.jpg");
// 可以将两行代码简化为 request.getPart("photo").write("/tmp/photo.jpg") 一行。
另外,开发者可以配合前面提到的 @MultipartConfig 注解来对上传操作进行一些自定义的配置,比如限制上传文件的大小,以及保存文件的路径等。其用法非常简单,故不在此赘述了。
需要注意的是,如果请求的 MIME 类型不是 multipart/form-data,则不能使用上面的两个方法,否则将抛异常。
The above is the detailed content of Detailed analysis of new features of Java servlet3. For more information, please follow other related articles on the PHP Chinese website!

