


In this article, I wrote a carousel image to practice my skills. I first wrote a carousel image that manually clicks on the carousel. Then I will slowly and deeply write the automatic carousel image and the mouse-over image to stop moving the carousel image.
Let’s take a look at the final manual click carousel effect:
1. Principle explanation
(1) The first is the structure of the carousel image. I used a large outermost div to wrap two small divs. Four pictures are placed in one small div, and four number buttons are placed in the other small div
(2) Set the width of the outermost large div to the width of the image. Anything beyond the width of the large div needs to be hidden. However, set the width of the small div holding the image to 2000px. A larger one will facilitate the left floating of the four images. Layout
(3) When the number button is clicked, get the index value of the button, so that you can know how much width each picture is moved to the left
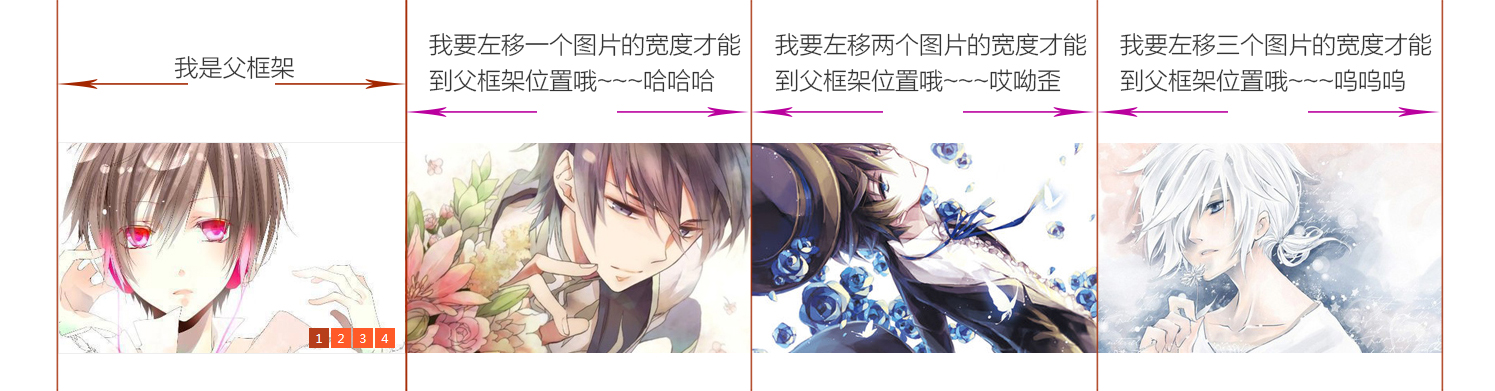
As can be seen from the above picture, the four pictures are in a floating horizontal layout. When the number button is clicked, the picture will drive the width of N pictures to the parent frame according to the index value of the number button, because Images outside the parent frame will be hidden~~~~~If you still don’t understand the principle, I can only vomit blood~~~~
2. Let’s look at the main program
<!DOCTYPE html>
<html>
 <head>
  <meta charset="utf-8" />
  <title>轮播图①(手动点击轮播)</title>
  <link type="text/css" rel="stylesheet" href="css/layout.css" />
 </head>
 <body>
  <div class="slideShow">
   <!--图片布局开始-->
   <ul>
    <li><a href="#"><img  src="/static/imghwm/default1.png"  data-src="img/picture01.jpg"  class="lazy" / alt="jQuery manually clicks to implement image carousel effects_jquery" ></a></li>
    <li><a href="#"><img  src="/static/imghwm/default1.png"  data-src="img/picture02.jpg"  class="lazy" / alt="jQuery manually clicks to implement image carousel effects_jquery" ></a></li>
    <li><a href="#"><img  src="/static/imghwm/default1.png"  data-src="img/picture03.jpg"  class="lazy" / alt="jQuery manually clicks to implement image carousel effects_jquery" ></a></li>
    <li><a href="#"><img  src="/static/imghwm/default1.png"  data-src="img/picture04.jpg"  class="lazy" / alt="jQuery manually clicks to implement image carousel effects_jquery" ></a></li>
   </ul>
   <!--图片布局结束-->

   <!--按钮布局开始-->
   <div class="showNav">
    <span class="active">1</span>
    <span>2</span>
    <span>3</span>
    <span>4</span>
   </div>
   <!--按钮布局结束-->
  </div>
  <script src="js/jquery-1.11.3.js"></script>
  <script src="js/layout.js"></script>
 </body>
</html>
I have explained the above layout in the principle. If you are interested, you can read the principle by yourself~~~~
3. CSS style
*{
 margin: 0;
 padding: 0;
}
ul{
 list-style: none;
}
.slideShow{
 width: 346px;
 height: 210px;  /*其实就是图片的高度*/
 border: 1px #eeeeee solid;
 margin: 100px auto;
 position: relative;
 overflow: hidden; /*此处需要将溢出框架的图片部分隐藏*/
}
.slideShow ul{
 width: 2000px;
 position: relative;  /*此处需注意relative : 对象不可层叠,但将依据left,right,top,bottom等属性在正常文档流中偏移位置,如果没有这个属性,图片将不可左右移动*/
}
.slideShow ul li{
 float: left;  /*让四张图片左浮动,形成并排的横着布局,方便点击按钮时的左移动*/
 width: 346px;
}
.slideShow .showNav{  /*用绝对定位给数字按钮进行布局*/
 position: absolute;
 right: 10px;
 bottom: 5px;
 text-align:center;
 font-size: 12px;
 line-height: 20px;
}
.slideShow .showNav span{
 cursor: pointer;
 display: block;
 float: left;
 width: 20px;
 height: 20px;
 background: #ff5a28;
 margin-left: 2px;
 color: #fff;
}
.slideShow .showNav .active{
 background: #b63e1a;
}
I have noted the important points in the above style. I believe it will be easy to understand if you have a basic knowledge. At first, I forgot to write position: relative; in the .slideShow ul style, which caused the subsequent jquery program images to be unable to move. It took me a long time to find this error. I hope everyone can pay attention to this place~~~~~~~
4. jQuery program
$(document).ready(function(){
 var slideShow=$(".slideShow"),  //获取最外层框架的名称
  ul=slideShow.find("ul"),
  showNumber=slideShow.find(".showNav span"),//获取按钮
  oneWidth=slideShow.find("ul li").eq(0).width(); //获取每个图片的宽度

  showNumber.on("click",function(){   //为每个按钮绑定一个点击事件
   $(this).addClass("active").siblings().removeClass("active"); //按钮被点击时为这个按钮添加高亮状态,并且将其他按钮高亮状态去掉
   var index=$(this).index(); //获取哪个按钮被点击,也就是找到被点击按钮的索引值
   ul.animate({
    "left":-oneWidth*index, //注意此处用到left属性,所以ul的样式里面需要设置position: relative; 让ul左移N个图片大小的宽度,N根据被点击的按钮索引值index确定
   })
  })
})
Do you think it is very simple? You can achieve the carousel effect of manual clicks in just a few words. What you need to pay attention to in the above program is that the left attribute is moved to the left, so it is a negative value~~~~~~~
I will share with you the automatic carousel effects in the next article, I hope you don’t miss it.

 Understanding the JavaScript Engine: Implementation DetailsApr 17, 2025 am 12:05 AM
Understanding how JavaScript engine works internally is important to developers because it helps write more efficient code and understand performance bottlenecks and optimization strategies. 1) The engine's workflow includes three stages: parsing, compiling and execution; 2) During the execution process, the engine will perform dynamic optimization, such as inline cache and hidden classes; 3) Best practices include avoiding global variables, optimizing loops, using const and lets, and avoiding excessive use of closures.
 Python vs. JavaScript: The Learning Curve and Ease of UseApr 16, 2025 am 12:12 AM
Python is more suitable for beginners, with a smooth learning curve and concise syntax; JavaScript is suitable for front-end development, with a steep learning curve and flexible syntax. 1. Python syntax is intuitive and suitable for data science and back-end development. 2. JavaScript is flexible and widely used in front-end and server-side programming.
 Python vs. JavaScript: Community, Libraries, and ResourcesApr 15, 2025 am 12:16 AM
Python and JavaScript have their own advantages and disadvantages in terms of community, libraries and resources. 1) The Python community is friendly and suitable for beginners, but the front-end development resources are not as rich as JavaScript. 2) Python is powerful in data science and machine learning libraries, while JavaScript is better in front-end development libraries and frameworks. 3) Both have rich learning resources, but Python is suitable for starting with official documents, while JavaScript is better with MDNWebDocs. The choice should be based on project needs and personal interests.
 From C/C to JavaScript: How It All WorksApr 14, 2025 am 12:05 AM
The shift from C/C to JavaScript requires adapting to dynamic typing, garbage collection and asynchronous programming. 1) C/C is a statically typed language that requires manual memory management, while JavaScript is dynamically typed and garbage collection is automatically processed. 2) C/C needs to be compiled into machine code, while JavaScript is an interpreted language. 3) JavaScript introduces concepts such as closures, prototype chains and Promise, which enhances flexibility and asynchronous programming capabilities.
 JavaScript Engines: Comparing ImplementationsApr 13, 2025 am 12:05 AM
Different JavaScript engines have different effects when parsing and executing JavaScript code, because the implementation principles and optimization strategies of each engine differ. 1. Lexical analysis: convert source code into lexical unit. 2. Grammar analysis: Generate an abstract syntax tree. 3. Optimization and compilation: Generate machine code through the JIT compiler. 4. Execute: Run the machine code. V8 engine optimizes through instant compilation and hidden class, SpiderMonkey uses a type inference system, resulting in different performance performance on the same code.
 Beyond the Browser: JavaScript in the Real WorldApr 12, 2025 am 12:06 AM
JavaScript's applications in the real world include server-side programming, mobile application development and Internet of Things control: 1. Server-side programming is realized through Node.js, suitable for high concurrent request processing. 2. Mobile application development is carried out through ReactNative and supports cross-platform deployment. 3. Used for IoT device control through Johnny-Five library, suitable for hardware interaction.
 Building a Multi-Tenant SaaS Application with Next.js (Backend Integration)Apr 11, 2025 am 08:23 AM
I built a functional multi-tenant SaaS application (an EdTech app) with your everyday tech tool and you can do the same. First, what’s a multi-tenant SaaS application? Multi-tenant SaaS applications let you serve multiple customers from a sing
 How to Build a Multi-Tenant SaaS Application with Next.js (Frontend Integration)Apr 11, 2025 am 08:22 AM
This article demonstrates frontend integration with a backend secured by Permit, building a functional EdTech SaaS application using Next.js. The frontend fetches user permissions to control UI visibility and ensures API requests adhere to role-base


Hot AI Tools

Undresser.AI Undress
AI-powered app for creating realistic nude photos

AI Clothes Remover
Online AI tool for removing clothes from photos.

Undress AI Tool
Undress images for free

Clothoff.io
AI clothes remover

AI Hentai Generator
Generate AI Hentai for free.

Hot Article
Hot Tools

MinGW - Minimalist GNU for Windows
This project is in the process of being migrated to osdn.net/projects/mingw, you can continue to follow us there. MinGW: A native Windows port of the GNU Compiler Collection (GCC), freely distributable import libraries and header files for building native Windows applications; includes extensions to the MSVC runtime to support C99 functionality. All MinGW software can run on 64-bit Windows platforms.

EditPlus Chinese cracked version
Small size, syntax highlighting, does not support code prompt function

SublimeText3 Chinese version
Chinese version, very easy to use

SublimeText3 Linux new version
SublimeText3 Linux latest version

Zend Studio 13.0.1
Powerful PHP integrated development environment

