Home >Java >javaTutorial >Share an example of implementing an e-commerce system using Spring Boot
Share an example of implementing an e-commerce system using Spring Boot
- 零下一度Original
- 2017-07-17 13:23:513222browse
Let’s start with the most basic ones, which can output Hello World! start.
1. Build tools
Assume that Java SDK 8 has been installed.
Install build tools
We choose gradle to build the project.
This page will tell you how to install it.
We can also choose to install manually, first download the case package from .
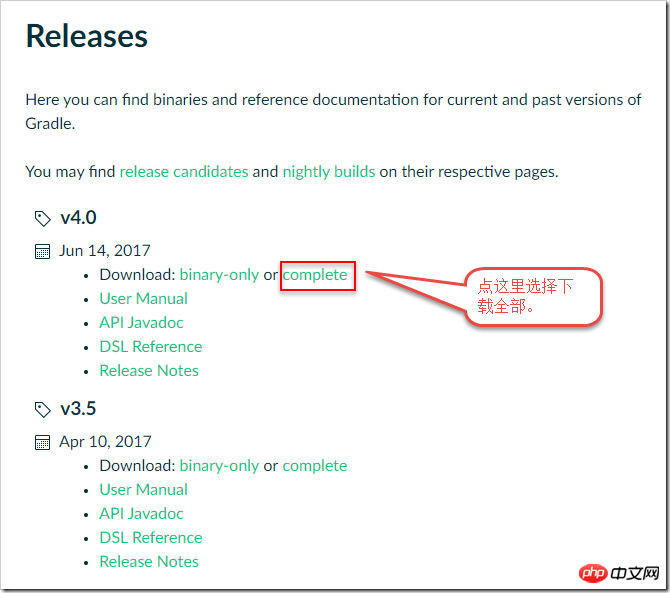
The latest version is v4.0. We will download this version and click "complete". It is a ZIP package. After the download is completed, unzip it to any directory.
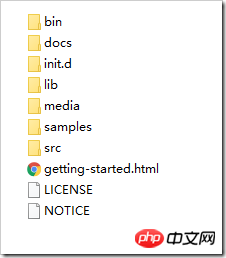
After decompression, the files in the directory are as follows
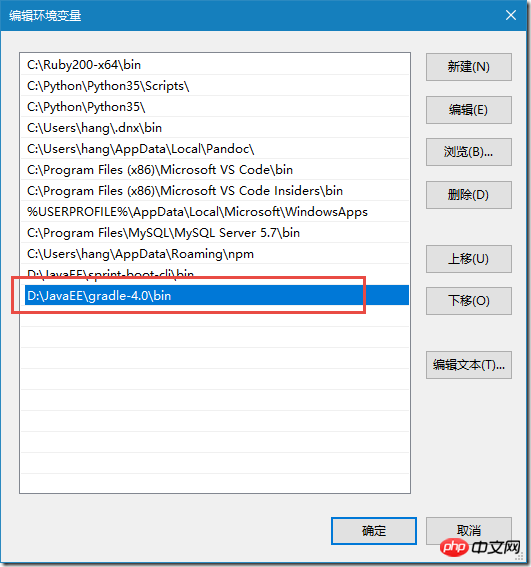
We also need to put the bin directory into the environment variable. I am currently using Windows 10 system, gradle The bin directory is "D:\JavaEE\gradle-4.0\bin", which can be placed in the "PATH" of the system variable and user variable, as follows
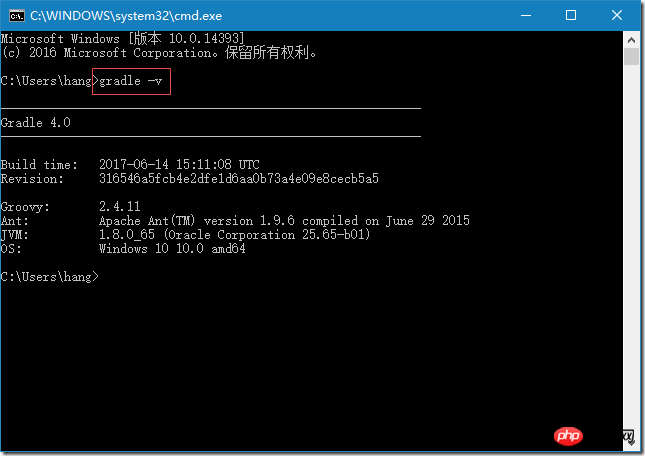
and then open it In the console, enter the command "gradle -v". If the following figure is displayed, gradle is installed successfully.
2. Create a new Spring Boot project
Create a new directory named "spring-hello" in any directory and enter In the directory, take any name,
mkdir spring-hello && cd spring-hello
Create a text file named build.gradle,
cd . > build.gradle
Create the directory src\main\ java\com\hang and enter the directory
mkdir src\main\java\com\hang && cd src\main\java\com\hang
Create the Java source file App.java
cd . > App.java## in the directory src\main\java\com\hang
mkdir controller && cd controllerCreate a source file named HelloController.java
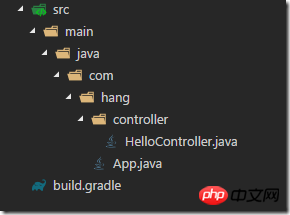
cd . > HelloController.javaThe final directory structure is as follows
package com.hang;import org.springframework.boot.SpringApplication;import org.springframework.boot.autoconfigure.SpringBootApplication;

@SpringBootApplicationpublic class App {public static void main(String[] args){
        SpringApplication.run(App.class, args);
    }
}
Enter the following content in HelloController.java:
package com.hang.controller;import org.springframework.web.bind.annotation.GetMapping;import org.springframework.web.bind.annotation.RestController;

@RestControllerpublic class HelloController {
    @GetMapping("/")public String hello(){return "Hello World!";
    }
}
Enter the following content in build.gradle
buildscript {
    repositories {
        jcenter()
    }
    dependencies {
        classpath("org.springframework.boot:spring-boot-gradle-plugin:1.5.4.RELEASE")
    }
}

apply plugin: 'java'apply plugin: 'org.springframework.boot'repositories {
    jcenter()
}

dependencies {
    compile 'org.springframework.boot:spring-boot-starter-web'}
four , Compile Let’s compile the project first and execute the command in the spring-hello directory
gradle buildThis compilation process will take some time because Gradle needs to download dependencies from the Internet library. If the following message appears, it means the compilation is successful

gradle bootRun
控制台会打出如下图信息
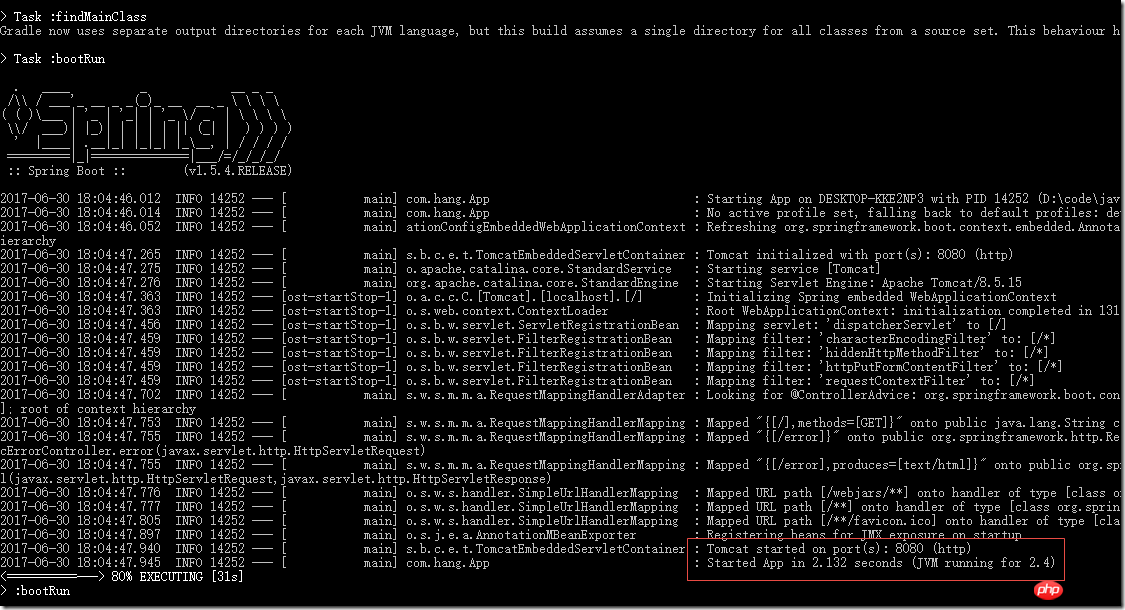
“Tomcat started on port(s): 8080 (http)”这一句说我们的 Spring Boot 程序使用的是 8080 端口,
“Started App in 2.132 seconds (JVM running for 2.4)” 这一句说明我的Spring Boot 程序已经启动成功了。
打开浏览器,输入 http://localhost:8080/
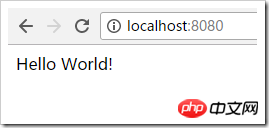
如果出现 “ Hello World!”说明我们的程序已经能正确运行。
六、简要说明
6.1 build.gradle
build.gradle 是构建配置文件,用的是 groovy 语言。gradle就是根据build.gradle来构建我们的Spring Boot项目的。
gradle本身是不知道如何构建Spring Boot程序的,但gradle支持插件,所以我们引入Spring Boot的Gradle插件,就可以构建Spring Boot程序了。
buildscript {
    repositories {
        jcenter()
    }
    dependencies {
        classpath("org.springframework.boot:spring-boot-gradle-plugin:1.5.4.RELEASE")
    }
}
以上代码就是引入Spring Boot的Gradle插件,名叫“spring-boot-gradle-plugin”,版本是“1.5.4.RELEASE”,repositories {jcenter()}是告诉Gradle去jcenter库找这个插件,jcenter库在,国内访问有些慢。只有加入了这个 buildscript后,下边的apply plugin: 'org.springframework.boot' 这一句才能起作用。
apply plugin: 'java'
表示使用 Java插件,我们是用Java写的,需要这个插件,Java插件是Gradle的内置插件,所以可以直接使用。
apply plugin: 'org.springframework.boot'
使用 org.springframework.boot这个插件来构建和运行我们的Spring Boot程序,由于这个插件不是Gradle内置的插件,所以要先在 buildscript中引入,前文已经提到。上文我们运行Spring Boot程序用到的命令“gradle bootRun”也是来自于这个插件。
repositories {
    jcenter()
}
dependencies {
    compile 'org.springframework.boot:spring-boot-starter-web'}
上面的代码意思是,我们的程序要依赖“spring-boot-starter-web”这个库,这个库要从jcenter下载。
至此,build.gradle文件已经解释完。也许有人会问,怎么就知道用 “gradle bootRun”来运行程序呢,大家可以在项目目录下执行
gradle tasks
Gradle是基于任务的,这个命令就是列出当前项目中支持的任务。
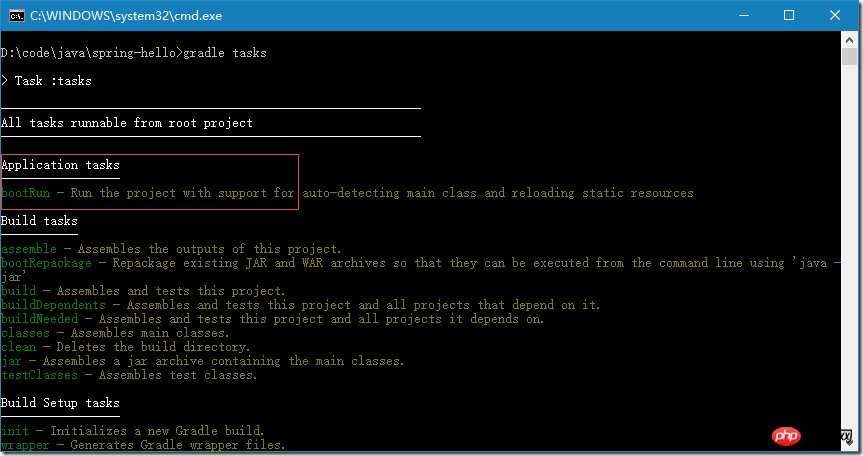
注意红框内,第一条任务就是“bootRun”,所以我们可以通过“gradle bootRun”这一句运行我们的Spring Boot程序。
6.2 App.java
由于 Spring Boot 就是一个 Java 应用程序,所以我们的先写一个程序入口 main 函数,和正常的 Java 程序的 main 函数没有什么区别。
SpringApplication.run(App.class, args);
这个语句表示直接启动 Spring 应用。
最重要的是“@SpringBootApplication” 这个注解,Spring Boot 把 Sping 以前很复杂的 XML 配置用注解来实现,完全自动化的配置。这个注解会自动地去加载配置,这个注解中还包含了一个扫描子包 Controller 的动作,会自动扫描子包,并完成配置。
6.3 HelloController.java
@RestControllerpublic class HelloController {
    @GetMapping("/")public String hello(){return "Hello World!";
    }
}
HelloController.java 很简单,只有几行代码。
@RestController 表示这个一个Restful API,
@GetMapper 注解表示一个 Get 请求,如果有 Get 请求访问根目录,比如我们在浏览器中输入“http://localhost:8080/”就执行hello()函数,函数直接返回“Hello World!”。类似的请求还有:@PostMapper, @PutMapper, DeleteMapper,分别对应着HTTP协议的POST、PUT、DELETE三个请求方法。
The above is the detailed content of Share an example of implementing an e-commerce system using Spring Boot. For more information, please follow other related articles on the PHP Chinese website!

