


1. Download the latest openssh package


##2. Before upgrading openssh, you must first open the server telnet and log in to the server through telnet, because the upgrade process will cause ssh to be temporarily unavailable
Open the linux telnet service: Check whether telnet has been installed: rpm -qa|grep telnettelnet-0.17-48.el6.x86_64telnet-server-0.17-48.el6.x86_64 If it is not installed, install it through yum[root@leotest ~]# yum install telnet[root@leotest ~]# yum install telnet-server Start the telnet service: Edit the telnet file and change disable to no[root@leotest xinetd.d]# vi /etc/xinetd.d/telnet# default: on# description: The telnet server serves telnet sessions; it uses \ # unencrypted username/password pairs for authentication.service telnet{ flags = REUSE socket_type = stream wait = no user = root server = /usr/sbin/in.telnetd log_on_failure += USERID
## disable
no}
Restart the xinetd service:
service xinetd restart
or:
/etc/rc.d/init.d/xinetd restart
Connect to the server via telnet:
[c:\~]$ telnet 192.168.5.5
Connecting to 192.168.5.5:23...
Connection established.
To escape to local shell, press 'Ctrl+Alt+]'.
Red Hat Enterprise Linux Server release 6.8 (Santiago)
Kernel 2.6.32-642.el6. x86_64 on an x86_64
login: test
Password:
[test@leotest ~]$
due to defaulttelnet can only connect to ordinary users, so you need to log in as an ordinary user and jump to rootuser
3. Back up the original openssh related files: cp /usr/sbin/sshd /usr/ sbin/sshd.bak
cp /etc/ssh/ssh_config /etc/ssh/ssh_config.bak
cp /etc/ssh/sshd_config /etc/ssh/sshd_config.bak
cp /etc/ssh/moduli /etc/ssh/moduli.bak
Note: Delete the following three files, otherwise an error will be reported during installation:
/etc/ssh/ssh_config already exists, install will not overwrite
/etc/ssh/sshd_config already exists, install will not overwrite
/etc/ssh /moduli already exists, install will not overwrite
rm /etc/ssh/ssh_config -fr
rm /etc/ssh/sshd_config -fr
rm /etc/ssh/moduli -fr
yum install pam-devel
yum install zlib-devel
yum install openssl-devel
4. Unzip and install openssh##[root@ leotest softs]# tar -zxvf openssh-7.4p1.tar.gz
[root@leotest softs]# lsopenssh-7.4p1 openssh-7.4p1.tar.gz openssh-7.4 p1-vs-openbsd.diff.gz[root@leotest softs]# cd openssh-7.4p1[root@leotest openssh-7.4p1]#./configure --prefix= /usr/local/openssh --sysconfdir=/etc/ssh --with-pam --with-md5-passwords --mandir=/usr/share/manconfigure: error: * ** zlib.h missing – please install first or check config.log
#yum install zlib-devel
configure: error: *** Can't find recent OpenSSL libcrypto (see config.log for details) ***#yum install openssl openssl-devel Recompile:Before recompiling Clean up the previous compilation information: make cleanldconfig[root@leotest openssh-7.4p1]#./configure --prefix= /usr/local/openssh --sysconfdir=/etc/ssh --with-pam --with-md5-passwords --mandir=/usr/share/man
OpenSSH has been configured with the following options :User binaries: /usr/bin
System binaries: /usr/sbin
Configuration files: /etc/ssh
Askpass program: /usr/libexec/ssh-askpass
Manual pages: /usr/share/man/manX
PID file: /var/run
Privilege separation chroot path: /var/empty
sshd default user PATH: /usr/bin:/bin:/usr/sbin:/sbin
Manpage format: doc
PAM support: no
OSF SIA support: no
KerberosV support: no
SELinux support: no
Smartcard support:
S/KEY support: no
MD5 password support: no
libedit support: no
Solaris process contract support: no
Solaris project support: no
Solaris privilege support: no
IP address in $DISPLAY hack: no
Translate v4 in v6 hack: yes
BSD Auth support: no
Random number source: OpenSSL internal ONLY
Privsep sandbox style: rlimit
Host: x86_64-pc-linux-gnu
Compiler: gcc
Compiler flags: -g -O2 -Wall -Wpointer-arith -Wuninitialized -Wsign-compare -Wformat-security -Wno-pointer-sign -fno-strict-aliasing -D_FORTIFY_SOURCE=2 -ftrapv -fno-builtin-memset -fstack-protector-all -fPIE
Preprocessor flags:
Linker flags: -Wl,-z,relro -Wl,-z,now -Wl,-z,noexecstack -fstack-protector-all -pie
Libraries: -lcrypto -lrt -ldl -lutil -lz -lcrypt -lresolv
make && make install
/etc/init.d/sshd restart
5.覆盖旧的文件
cp -p /softs/openssh-7.4p1/contrib/redhat/sshd.init /etc/init.d/sshd
chmod u+x /etc/init.d/sshd
chkconfig --add sshd
cp /usr/local/openssh/sbin/sshd /usr/sbin/sshd
[root@pttlstydb openssh-7.4p1]# cp /usr/local/openssh/sbin/sshd /usr/sbin/sshd
cp: overwrite `/usr/sbin/sshd'? y
cp: cannot create regular file `/usr/sbin/sshd': Text file busy
文件正在被使用
[root@pttlstydb openssh-7.4p1]# ps -ef|grep sshd
root 14111 1 0 10:05 ? 00:00:00 sshd: root@pts/0
root 14865 1 0 10:22 ? 00:00:00 sshd: root@notty
root 24182 14779 0 10:30 pts/1 00:00:00 grep sshd
[root@pttlstydb openssh-7.4p1]# kill -9 14865
[root@pttlstydb openssh-7.4p1]# ps -ef|grep sshd
root 24227 14779 0 10:31 pts/1 00:00:00 grep sshd
重新覆盖:
cp /usr/local/openssh/bin/ssh /usr/bin/ssh
[root@leotest openssh-7.4p1]# service sshd restart
Stopping sshd: [ OK ]
ssh-keygen: illegal option -- A
usage: ssh-keygen [options]
Options:
cat /etc/init.d/sshd
start()
{
# Create keys if necessary
/usr/bin/ssh-keygen -A
if [ -x /sbin/restorecon ]; then
/sbin/restorecon /etc/ssh/ssh_host_key.pub
/sbin/restorecon /etc/ssh/ssh_host_rsa_key.pub
/sbin/restorecon /etc/ssh/ssh_host_dsa_key.pub
/sbin/restorecon /etc/ssh/ssh_host_ecdsa_key.pub
fi
echo -n $"Starting $prog:"
$SSHD $OPTIONS && success || failure
RETVAL=$?
[ $RETVAL -eq 0 ] && touch /var/lock/subsys/sshd
echo
}
因为默认低版本的ssh-keygen没有-A参数
解决方法:
cp /usr/local/openssh/bin/ssh-keygen /usr/bin/ssh-keygen
重启sshd服务:
[root@leotest ssh]# service sshd restart
Stopping sshd: [ OK ]
Starting sshd: [ OK ]
Starting sshd:/etc/ssh/sshd_config line 81: Unsupported option GSSAPIAuthentication
/etc/ssh/sshd_config line 83: Unsupported option GSSAPICleanupCredentials
原因:新版本的openssh不支持以上参数,需要修改sshd的配置文件
[root@leotest openssh-7.4p1]# vi /etc/ssh/sshd_config
##去掉前面的注释,允许root通过ssh登录
PermitRootLogin yes
##注释掉下面三个参数
#GSSAPIAuthentication yes
#GSSAPICleanupCredentials yes
#UsePAM yes
##在文件末尾加上如下信息,否则还是无法通过ssh登录linux:
导致此问题的原因是ssh升级后,为了安全,默认不再采用原来一些加密算法,我们手工添加进去即可。
Ciphers aes128-cbc,aes192-cbc,aes256-cbc,aes128-ctr,aes192-ctr,aes256-ctr,3des-cbc,arcfour128,arcfour256,arcfour,blowfish-cbc,cast128-cbc
MACs hmac-md5,hmac-sha1,umac-64@openssh.com,hmac-ripemd160,hmac-sha1-96,hmac-md5-96
KexAlgorithms diffie-hellman-group1-sha1,diffie-hellman-group14-sha1,diffie-hellman-group-exchange-sha1,diffie-hellman-group-exchange-sha256,ecdh-sha2-nistp256,ecdh-sha2-nistp384,ecdh-sha2-nistp521,diffie-hellman-group1-sha1,curve25519-sha256@libssh.org
6.重启sshd服务,测试ssh连接服务器
service sshd restart
[c:\~]$ ssh 192.168.5.5
Connecting to 192.168.5.5:22...
Connection established.
To escape to local shell, press 'Ctrl+Alt+]'.
Last login: Tue Dec 27 00:22:10 2016 from 192.168.5.2
[root@leotest ~]# ssh -V
OpenSSH_7.4p1, OpenSSL 1.0.1e-fips 11 Feb 2013
7.禁用telnet
[root@leotest ~]# vi /etc/xinetd.d/telnet
# default: on
# description: The telnet server serves telnet sessions; it uses \
# unencrypted username/password pairs for authentication.
service telnet
{
flags = REUSE
socket_type = stream
wait = no
user = root
server = /usr/sbin/in.telnetd
log_on_failure += USERID
disable = yes
}
StopxinetdService:
[root@leotest ~]# service xinetd stop
Stopping xinetd:
stop Stopping and starting. :off --list xinetd
xinetd 0:off 1:off 2:off3:off 4:off 5:off
6:off## After the upgrade, the problem is solved:
An error is reported when logging into Linux through winscp. The solution is as follows:
[root@leotest ~]# vi /etc/ssh/sshd_config
# override default of no subsystems#Subsystem sftp /usr/libexec/openssh/sftp-server
Subsystem sftp internal-sftpComment out the original and change it to the following internal-sftp
Restart the sshd service:
service sshd restart
The above is the detailed content of Detailed example of upgrading openssh. For more information, please follow other related articles on the PHP Chinese website!

 Windows 上的 OpenSSH:安装、配置和使用指南Mar 08, 2024 am 09:31 AM
对于大多数Windows用户来说,远程桌面协议(RDP)一直是远程管理的首选,因为它提供了友好的图形界面。然而,对于那些需要更精细控制的系统管理员来说,SSH更适合他们的需求。通过SSH,管理员可以通过命令行与远程设备进行交互,这样可以让管理工作更加高效。SSH的优势在于其安全性和灵活性,使得管理员能够更方便地进行远程管理和维护工作,尤其是在处理大量设备或进行自动化任务时。因此,尽管RDP在用户友好性方面表现出色,但对于系统管理员来说,SSH的功能和控制力更胜一筹。以前,Windows用户需要借
 redhat linux 免费吗Mar 25, 2023 am 10:43 AM
redhat linux是免费的,使用者是可以免费使用Redhat,但是Redhat的服务是需要收费的;也就是说,用户可以免费使用Redhat,但用户需要支付一定的费用来获取Redhat公司的服务。
 win7系统升级成win10系统怎么升级Jul 11, 2023 am 11:49 AM
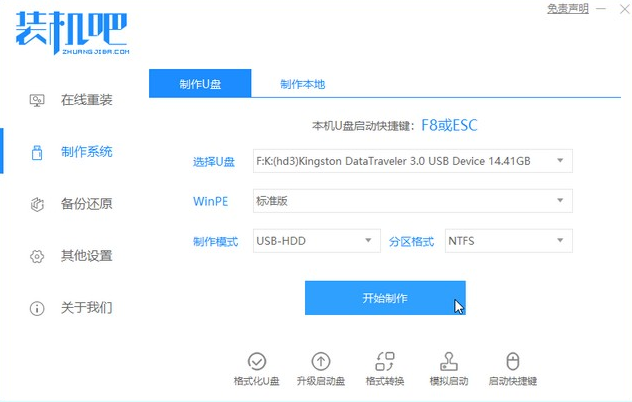
win10系统已经越来越成熟了,很多win7用户都想把系统升级成win10,但是又不知道如何升级,下面就教大家电脑升级成win10的方法吧。1、浏览器搜索装机吧在线系统重装工具软件并打开,选择制作系统,点击开始制作。2、选择win10系统镜像,然后点击开始制作。3、进入下载文件阶段,请耐心等候。4、等待下载部署完成后,拔除启动盘退出。5、把制作好的启动U盘插到电脑上,开机快速按Esc或Del或F12等进入到Bios设置U盘启动。这里是按F12进入的快速引导菜单,选择U盘进入。6、进入PE系统,选
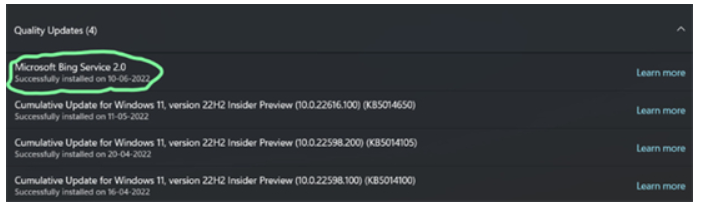 win10/11BingService2.0升级是啥win10/11BingService2.0升级內容详细介绍Jul 13, 2023 am 09:41 AM
win10/11BingService2.0升级是什么叫最近许多用户满意度的问题,客户们在应用win10和win11的过程中发觉最近升级了个新的服务项目,名叫BingService2.0,这一名字大伙儿第一眼会非常生疏,事实上这一业务是微软的bing搜索的服务项目结合,那麼下边便是实际的win10/11BingService2.0升级內容详细介绍。win10/11BingService2.0升级是啥一些Win11/Win10客户汇报了一个新的神密升级,被分类为品质升级,名字为“Microsoft
 redhat怎么安装php和mysqlFeb 09, 2023 am 09:50 AM
redhat安装php和mysql的方法:1、通过“yum install httpd”安装Apache2并启动;2、使用“yum install mysql mysql-server”安装MySQL并启动;3、通过“yum install php”安装PHP,然后重新启动Apache以使php生效即可。
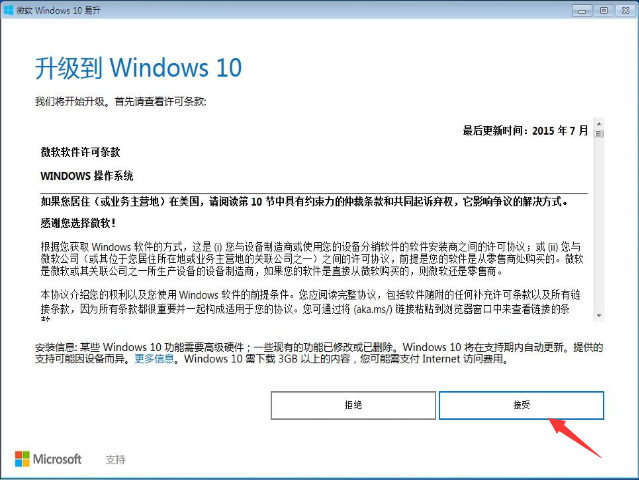 教你如何将windows7升级到win10Jul 12, 2023 pm 04:13 PM
随着windows10系统的发布,大部分用户都去升级了系统,不过也有小部分windows7系统的用户觉得win10还不够稳定,依旧观望不升级,最近就有个windows7的用户想要升级到win10系统,那么我们该如何升级呢?接下来小编就把win7升级win10教程分享给大家,快来学习下吧。 windows7升级到win10方法如下: 1.首选我们打开微软官网,升级win10创意者更新的工具易升,点击接受微软软件许可条款。 2.升级工具检测电脑环境是否正常,检测完成后会开始下载win10系
 教大家正版win7怎么升级win10系统Jul 09, 2023 pm 03:33 PM
随着windows10操作系统的不断成熟,越来越多的win7系统用户开始使用win10操作系统,那么win7怎么升级到win10呢?1、首先我们在电脑上下载小白一键重装系统,打开选择win10系统安装,重装之前请自行备份好c盘和桌面的数据。2、选择之后会为我们自动下载安装系统所需要的文件,耐心等待注意电脑不要断电断网。3、文件下完之后会提示我们重启电脑,点击立即重启。4、接着来到这个界面,我们选择第二个选项进入pe系统。5、进入pe系统后软件会开始安装win10系统,耐心等待即可。6、接着引导修
 win7如何升级到win10系统Jul 11, 2023 pm 05:29 PM
随着Win10系统的逐步成熟,很多用户已经用上了Win10系统,而一些还在用Windows7的朋友是不是也心动了呢,那么Windows7怎么升级10系统呢?下面一起来看看吧。1、浏览器搜索装机吧在线系统重装工具软件并打开,选择制作系统,点击开始制作。2、选择win10系统镜像,然后点击开始制作。3、进入下载文件阶段,请耐心等候。4、等待下载部署完成后,拔除启动盘退出。5、把制作好的启动U盘插到电脑上,开机快速按Esc或Del或F12等进入到Bios设置U盘启动。这里是按F12进入的快速引导菜单,


Hot AI Tools

Undresser.AI Undress
AI-powered app for creating realistic nude photos

AI Clothes Remover
Online AI tool for removing clothes from photos.

Undress AI Tool
Undress images for free

Clothoff.io
AI clothes remover

AI Hentai Generator
Generate AI Hentai for free.

Hot Article
Hot Tools

SublimeText3 Chinese version
Chinese version, very easy to use

SublimeText3 Mac version
God-level code editing software (SublimeText3)

MantisBT
Mantis is an easy-to-deploy web-based defect tracking tool designed to aid in product defect tracking. It requires PHP, MySQL and a web server. Check out our demo and hosting services.

Dreamweaver CS6
Visual web development tools

DVWA
Damn Vulnerable Web App (DVWA) is a PHP/MySQL web application that is very vulnerable. Its main goals are to be an aid for security professionals to test their skills and tools in a legal environment, to help web developers better understand the process of securing web applications, and to help teachers/students teach/learn in a classroom environment Web application security. The goal of DVWA is to practice some of the most common web vulnerabilities through a simple and straightforward interface, with varying degrees of difficulty. Please note that this software

