Under Linux system, Tegra K1 (ARM system), only QtCreator environment, install Qwt6.1.0;
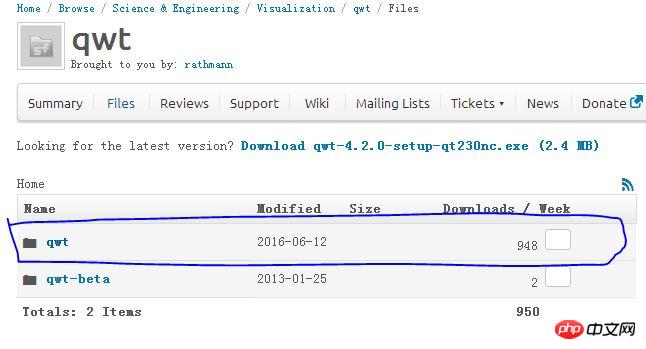
Download:
After the system is installed, connect directly to the Internet, search for Qt in the software installation program that comes with the system, install Qt5.2.1, and then download it

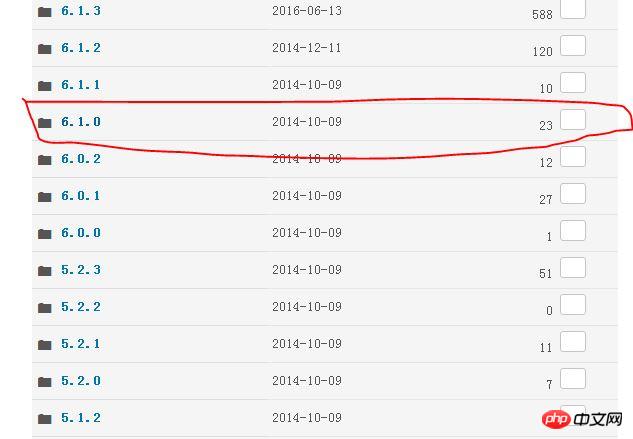
After entering, select version 6.1.0, as shown below:
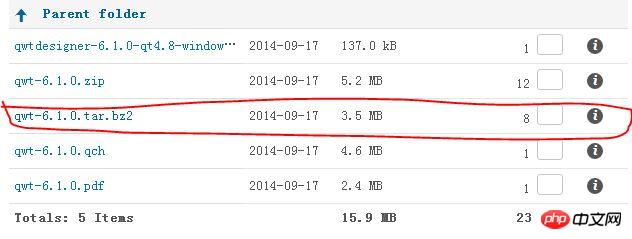
## Then select the qwt-6.1.0.tar.bz2 format Compressed package (qwt-6.1.0.qch is the help document, which is the content displayed on the F1 help interface in Qtcteator), used for Linux operating system
installation:
After the download is completed, unzip the file, enter the directory where the compressed package is located, and run the command: tar -xvf qwt-6.1.0.tar.bz2. You should be able to decompress it, or you can directly use the mouse like a fool to operate it. After completion , use QtCreator to open the project and build the project.
The key point is encountered below, which is also a problem. An error will be reported during the compilation process (it is best to go directly without errors). When you check the compilation output, you will see Project ERROR: Unknown module(s) in QT: svg; I checked a lot of posts, and most of them said it was caused by version inconsistency. This may be the reason, but in this case it is indeed caused by the lack of svg Modules. (Additional note: SVG Scalable vector graphics (scalable vector graphics) is a graphics format based on extensible markup (XML) that is developed by the W3C and is independent of image resolution. The advantages compared with other image formats are: can be created and modified through a text editor; can be searched, indexed, scripted or compressed; can be scalable; can be printed with high definition at any resolution; can be printed without any loss of image quality (enlarged below)
Solution:
sudo apt-get install libqt5svg5*
Install the svg module, recompile and pass,
Then enter the compilation and generation directory, such as build-qwt6.1.0-gcc, run make install on the command line, and install the compiled things. A qwt6.1.0 directory will be automatically generated in /usr/local/, which contains what we need. Things, so far, even if the compilation and installation pass
Configuration usage:
1. Copy all files under /usr/local/qwt6.1.0/lib to /usr/lib /arm-linux-aneauhbf/qtcreator/, copy the /usr/local/qwt6.1.0/plugins/designer file to /usr/lib/arm-linux-aneauhbf/qt5/plugins/designer (if not, create a new one) ( Both must be done at the same time to see the Qwt plug-in in the ui editor)
2 Add INCLUDEPATH += /usr/local/qwt6.1.0/include (add header file) to the pro file of your project
3 Add LIBS += -L/usr/local/qwt6.1.0/lib -lqwt in the pro file of your project (add library files, there must be no less space in front of -l);
After completing the above, you can use the Qwt plug-in. . . . . . . . . . . . . . . . . . . . . . . . . . .
Transplantation (supplementary):
1. Copy all files under /usr/local/qwt6.1.0/lib to the /usr/lib/ directory, otherwise the executable generated by QtCreator The file can only be run in the QtCreator environment, not through the command line.
The above is the detailed content of NIVIDIA Tegra K1 QWT installation tutorial. For more information, please follow other related articles on the PHP Chinese website!