Home >Operation and Maintenance >Linux Operation and Maintenance >DevStack installation steps and usage
DevStack installation steps and usage
- 零下一度Original
- 2017-06-25 10:11:023509browse

Official website installation tutorial link:
After I successfully installed DevStack on both ubuntu14.04 LTS desktop version/server version, I recorded the installation process here.
Introduce the installation environment:
VMware Workstation Pro 12
ubuntu14.04 LTS system
Preparation before installation:
## 1. System replacement ubuntu source, select a data source from the link, the source I chose is as follows:
deb http://mirrors.yun-idc.com/ubuntu/ trusty main restricted universe multiverse deb http://mirrors.yun-idc.com/ubuntu/ trusty-security main restricted universe multiverse deb http://mirrors.yun-idc.com/ubuntu/ trusty-updates main restricted universe multiverse deb http://mirrors.yun-idc.com/ubuntu/ trusty-proposed main restricted universe multiverse deb http://mirrors.yun-idc.com/ubuntu/ trusty-backports main restricted universe multiverse deb-src http://mirrors.yun-idc.com/ubuntu/ trusty main restricted universe multiverse deb-src http://mirrors.yun-idc.com/ubuntu/ trusty-security main restricted universe multiverse deb-src http://mirrors.yun-idc.com/ubuntu/ trusty-updates main restricted universe multiverse deb-src http://mirrors.yun-idc.com/ubuntu/ trusty-proposed main restricted universe multiverse deb-src http://mirrors.yun-idc.com/ubuntu/ trusty-backports main restricted universe multiverse2. Ubuntu manually configures an IP so that DevStack can be used after the Ubuntu system is restarted. 3. Ubuntu can configure a network card that can access the external network. 4. Since the pip tool will be involved when installing the environment, the address of the pip source needs to be mapped to the domestic one:
[global]
timeout = 6000index-url = http://pypi.douban.com/simple/[install]
trusted-host = pypi.douban.com
Installation Steps
Configure pip source
root@ubuntu:/# mkdir /root/.pip
root@ubuntu:/# vi /root/.pip/pip.conf


[global]
timeout = 6000index-url = http://pypi.douban.com/simple/[install]
trusted-host = pypi.douban.com
Download DevStack
Install git tool And download DevStackroot@ubuntu:/# sudo apt-get install git root@ubuntu:/# cd /home root@ubuntu:/# git clone http://git.trystack.cn/openstack-dev/devstack.git -b stable/mitaka
Create stack user
Create stack under non-root user
Devstack@ubuntu:~$ cd /home/devstack/tools/Devstack@ubuntu:~$ sudo ./create-stack-user.sh
Authorize stack user
Create under root user
root@ubuntu:/# vi /etc/sudoers

#找到如下一行:
root ALL=(ALL:ALL) ALL
#添加stack授权:
stack ALL=(ALL:ALL) ALL

root@ubuntu:/# chown -R stack:stack /home/devstack
root@ubuntu:/# chown -R stack:stack /opt/stack
local.conf file
Enter the /home/devstack directory, create and edit the local.conf fileroot@ubuntu:/# cd /home/devstack root@ubuntu:/home/devstack# vi local.confAdd the following content to the local.conf file (
Configure IP to modify according to your own environment):
[[local|localrc]]
# use TryStack git mirror
GIT_BASE=http://git.trystack.cn  NOVNC_REPO=http://git.trystack.cn/kanaka/noVNC.git  SPICE_REPO=http://git.trystack.cn/git/spice/spice-html5.git    # CredentialsDATABASE_PASSWORD=pass
DATABASE_PASSWORD=pass
ADMIN_PASSWORD=pass
SERVICE_PASSWORD=pass
SERVICE_TOKEN=pass
RABBIT_PASSWORD=pass

HOST_IP=192.168.28.138  SERVICE_HOST=192.168.28.138  MYSQL_HOST=192.168.28.138 RABBIT_HOST=192.168.28.138  GLANCE_HOSTPORT=192.168.28.138:9292
  disable_service n-net
enable_service q-svc
enable_service q-agt
enable_service q-dhcp
enable_service q-l3
enable_service q-meta
enable_service q-metering
enable_service neutron

# only support IP v4
SERVICE_IP_VERSION=4  ## Neutron optionsQ_USE_SECGROUP=True
FLOATING_RANGE="192.168.28.0/24"  FIXED_RANGE="10.0.1.0/24"  NETWORK_GATEWAY="10.0.1.254"  Q_FLOATING_ALLOCATION_POOL=start=192.168.28.230,end=192.168.28.250  PUBLIC_NETWORK_GATEWAY="192.168.28.2"  Q_L3_ENABLED=True
PUBLIC_INTERFACE=eth0
Q_USE_PROVIDERNET_FOR_PUBLIC=True
OVS_PHYSICAL_BRIDGE=br-ex
PUBLIC_BRIDGE=br-ex
OVS_BRIDGE_MAPPINGS=public:br-ex

# VLAN configuration.Q_PLUGIN=ml2
ENABLE_TENANT_VLANS=True
Run the script as stack user to install DevStack:
root@ubuntu:/home/devstack# su stack
root@ubuntu:/home/devstack# ./stack.sh
After the above configuration, the installation can be completed.
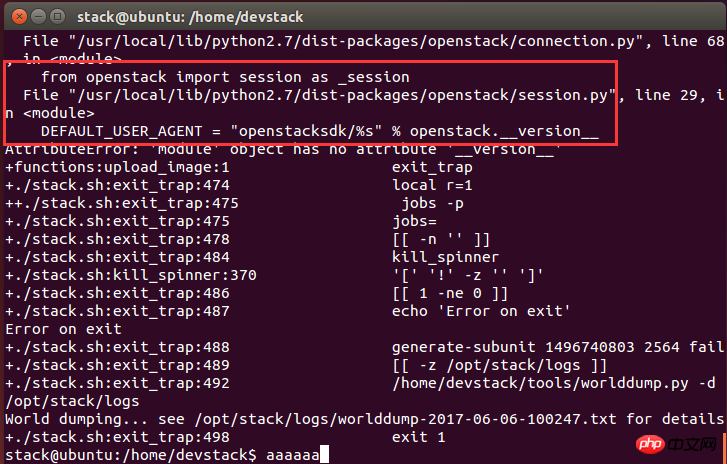
There will be related errors during the installation process.
Error:
python
import openstack
import pbr.version
print(pbr.version.VersionInfo('openstacksdk').version_string())
quit()

./unstack.sh
./clean.sh
./stack.sh
As shown in the picture:

The above is the detailed content of DevStack installation steps and usage. For more information, please follow other related articles on the PHP Chinese website!

