
 Operation and MaintenanceLinux Operation and MaintenanceAbout how to clone vmware virtual machine
Multiple virtual machines need to be used for experiments during development. The reinstallation process is too cumbersome. Using the software that comes with the vmware virtual machine can quickly clone the exact same system. Below I will explain to you how to clone a vmware virtual machine. The VMware version I am using is 11.0.0.
1. Select an installed virtual machine under the My Computer node on the left side of the main panel of Vmware Workstation. My own is Hadoop-Senior02

2. On the Hadoop-Senior02 virtual machine, select Manage->Clone through the right-click menu, and click Clone


Because Hadoop-Senior01 is cloned from Hadoop-Senior02, the MAC address displayed here is the same for the two, which is problematic and must be regenerated
,
Linux system network card settings
The above is the detailed content of About how to clone vmware virtual machine. For more information, please follow other related articles on the PHP Chinese website!

 如何为VMware虚拟机启用复制和粘贴Feb 21, 2024 am 10:09 AM
您可以轻松地在VMware虚拟机(VM)和物理系统之间复制和粘贴文本和文件。这种功能让您可以方便地在虚拟机和主机系统之间传输图像、格式化和非格式化文本,甚至电子邮件附件。本文将向您展示如何启用这一功能,并演示复制数据、文件和文件夹的方法。如何在VMware中启用复制/粘贴VMware提供了三种不同的方式将数据、文件或文件夹从虚拟机复制到物理计算机,反之亦然,如下所述:复制和粘贴要素拖放功能文件夹共享1]使用VMware工具启用复制粘贴如果您的VMWare安装和来宾操作系统满足要求,则可以使用键盘
 Win11运行VMware虚拟机崩溃死机解决方案Feb 14, 2024 pm 02:36 PM
很多用户由于某些需要或者爱好,需要在电脑上安装虚拟机,但是最近有Win11小伙伴发现自己的电脑一运行VMware虚拟机就崩溃死机,这该怎么办?其实这个问题并不难解决,下面小编就给大家带来了四种解决方案,希望可以帮到你。方法一:Hyper-V方案1、打开控制面板-程序-启用或关闭Windows功能,可能你的电脑上发现没有Hyper-V,连vm也无法使用(如果你的打开有的话就如下图勾上,重启电脑即可),没有Hyper-V需要安装,可以转到下面1.2步骤安装。2、系统上安装Hyper-V,新建一个记事
![VMware Horizon Client无法打开[修复]](https://img.php.cn/upload/article/000/887/227/170835607042441.jpg) VMware Horizon Client无法打开[修复]Feb 19, 2024 pm 11:21 PM
VMware Horizon Client无法打开[修复]Feb 19, 2024 pm 11:21 PMVMwareHorizon客户端可帮助您便捷地访问虚拟桌面。然而,有时虚拟桌面基础设施可能会遇到启动问题。本文将讨论当VMwareHorizon客户端未能成功启动时,您可以采取的解决方法。为什么我的VMwareHorizon客户端无法打开?在配置VDI时,如果未打开VMWareHorizon客户端,可能会出现错误。请确认您的IT管理员提供了正确的URL和凭据。如果一切正常,请按照本指南中提到的解决方案解决问题。修复未打开的VMWareHorizon客户端如果您的Windows计算机上未打开VMW
 Win11与VMware虚拟机如何实现文件共享?Jan 29, 2024 pm 09:39 PM
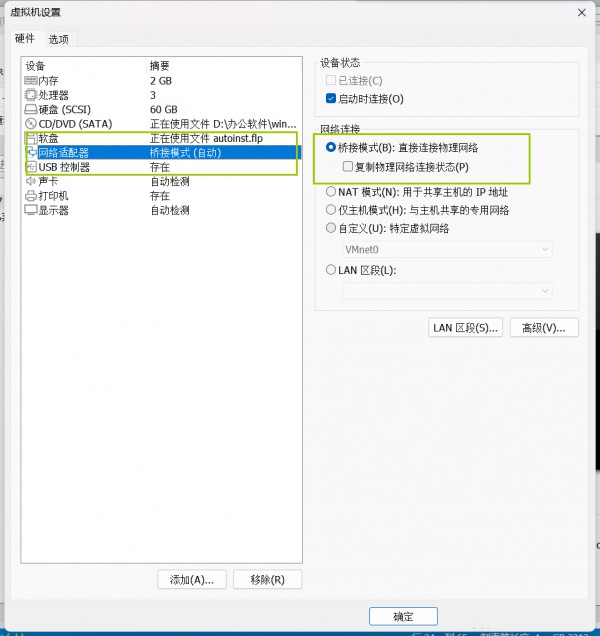
VMware虚拟机可以让用户在一台机器上同时运行两个或更多Windows、DOS、LINUX系统。那么VMware虚拟机与主机之间如何进行文件共享呢?今天小编就以Win11为例,给大家分享一下VMware虚拟机与主机文件共享设置教程。虚拟机文件共享?1、安装的VMware虚拟机的网络设置为桥接模式。在VMware虚拟机中,你可以通过以下步骤配置共享文件夹:点击虚拟机->虚拟机设置->选项,开启共享文件夹,并点击添加按钮设置文件夹路径。注意:开启共享文件夹操作需要在关闭虚拟机时进行。4、为共享文件
 将VMware转换为VirtualBox,反之亦然Feb 19, 2024 pm 05:57 PM
虚拟机是一种经济实惠的方式,让您在一台计算机上体验和使用多个操作系统。VMWare和VirtualBox是虚拟机行业的两大品牌。您可以轻松地将VMware虚拟机转换为VirtualBox虚拟机,反之亦然,这样您就可以在它们之间灵活切换计算机,无需重新创建。将虚拟机从VMWare迁移到VirtualBox并不复杂,反之亦然。只需按照下面的指示操作即可轻松完成。如何将VMware转换为VirtualBoxVMwareVM以.vmx格式存储,然后将转换为.ovf,这是VirtualBox和VMWare
![VMware Horizon客户端在连接时冻结或停滞[修复]](https://img.php.cn/upload/article/000/887/227/170942987315391.jpg) VMware Horizon客户端在连接时冻结或停滞[修复]Mar 03, 2024 am 09:37 AM
VMware Horizon客户端在连接时冻结或停滞[修复]Mar 03, 2024 am 09:37 AM在使用VMWareHorizon客户端连接到VDI时,我们可能会遇到应用程序在身份验证过程中冻结或连接阻塞的情况。本文将探讨这个问题,并提供解决这种情况的方法。当VMWareHorizon客户端出现冻结或连接问题时,您可以采取一些措施来解决这一问题。修复VMWareHorizon客户端在连接时冻结或卡住如果VMWareHorizon客户端在Windows11/10上冻结或无法连接,请执行下面提到的解决方案:检查网络连接重新启动Horizon客户端检查Horizon服务器状态清除客户端缓存修复Ho
 Microsoft Wi-Fi 直连虚拟适配器:它有什么作用?Jun 29, 2023 pm 12:33 PM
您可能想知道MicrosoftWi-Fi直接虚拟适配器在您的PC上的作用。最好放心,此网络适配器Microsoft且完全安全。但是,如果适配器弄乱了您的活动,并且您想知道它是否值得保留,本指南将为您提供您需要了解的所有信息。MicrosoftWi-FiDirect虚拟适配器有什么作用?顾名思义,MicrosoftWi-Fi直接虚拟适配器有助于使您的PC成为无线热点。这样,其他计算机可以连接到您的PC以访问互联网。它通过虚拟化无线网络适配器来实现此目的。这样,您的单个物理无线适配器将转换为两个虚拟
 25个AI智能体源码现已公开,灵感来自斯坦福的「虚拟小镇」和《西部世界》Aug 11, 2023 pm 06:49 PM
熟悉《西部世界》的观众都了解,这部剧设定在未来世界的一个巨大高科技成人主题乐园中,机器人们具备与人类相似的行为能力,能够记忆所见所闻,重复核心故事情节。每天,这些机器人都会被重置,回到初始状态在斯坦福论文《GenerativeAgents:InteractiveSimulacraofHumanBehavior》发布后,这种情景不再仅限于影视剧中,AI已经成功复现了这一场景Smallville的「虚拟小镇」概览图论文地址:https://arxiv.org/pdf/2304.03442v1.pdf


Hot AI Tools

Undresser.AI Undress
AI-powered app for creating realistic nude photos

AI Clothes Remover
Online AI tool for removing clothes from photos.

Undress AI Tool
Undress images for free

Clothoff.io
AI clothes remover

AI Hentai Generator
Generate AI Hentai for free.

Hot Article
Hot Tools

Atom editor mac version download
The most popular open source editor

Dreamweaver CS6
Visual web development tools

Safe Exam Browser
Safe Exam Browser is a secure browser environment for taking online exams securely. This software turns any computer into a secure workstation. It controls access to any utility and prevents students from using unauthorized resources.

MantisBT
Mantis is an easy-to-deploy web-based defect tracking tool designed to aid in product defect tracking. It requires PHP, MySQL and a web server. Check out our demo and hosting services.

Zend Studio 13.0.1
Powerful PHP integrated development environment

