
Home >Java >javaTutorial >An example explanation of Jiguang push Jpush
An example explanation of Jiguang push Jpush

- PHP中文网Original
- 2017-06-21 16:51:064348browse
About Jiguang Push Jpush
Push is an indispensable function of mobile apps. This time I need to study it because of the company project. Since push is usually written on the server side, it is a headache for Javaweb programmers who do not know Android to write a complete demo. So I will write an example from beginning to end here for reference. Since I don’t understand Android, I just made a demo from Baidu because of the project needs. There are many shortcomings in it and I don’t want you to correct me.
1. First, let’s briefly introduce what Aurora Push is
①Why push is needed: In order to solve the problem of data synchronization, there are two commonly used methods on mobile platforms. One is to regularly query the data on the server, also called Polling, and the other is to maintain a long TCP connection between the mobile phone and the server. When the server has data, it is pushed to the client in real time, which is what we call Push. Because it is technically difficult to maintain long connections under mobile networks when doing push, and when the number of users increases, many servers are needed to maintain long connections, and the cost is also very high. Therefore, we need a third-party jar package to support our push service. If you want to know more, please refer to the official documentation of Aurora Push.
②The popular answer of Jiguang Push: It is to send the content that needs to be pushed to the Jiguang Push server by calling the jpush API. The Jiguang Push server chooses to push it to the specific app based on the content we have pushed in the past.
2. Source code
Server code:
Android client code:
The Android environment is: ADT+SDK+ eclipse
ADT download:
SDK download:
The required JDK environment installation will not be described one by one.
Note: The code can be imported directly and only needs to be changed in a few places, which will be explained later. First, I will teach you how to set up the Android environment and ensure that the code can be imported successfully
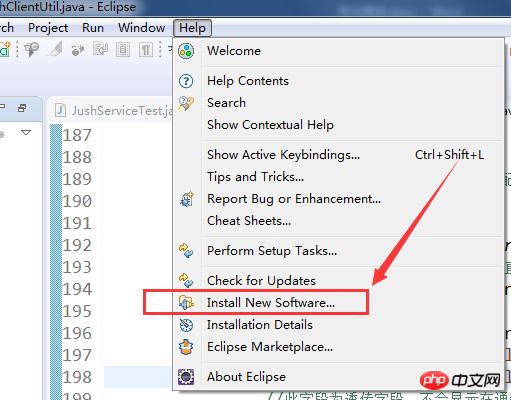
3. Operation steps
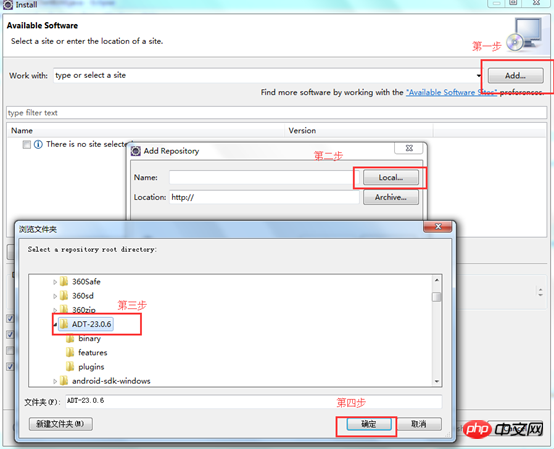
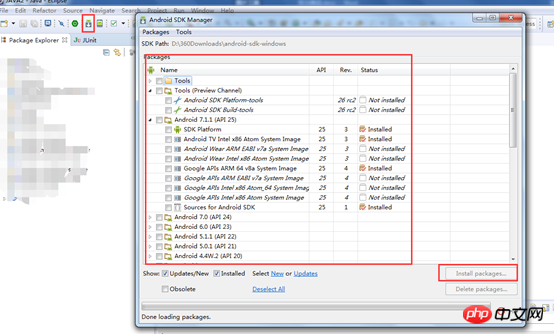
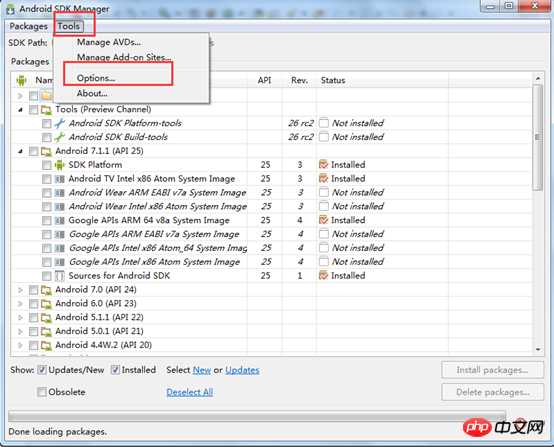
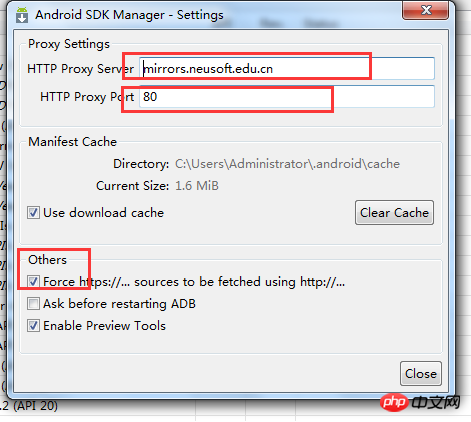
① Install the plug-in
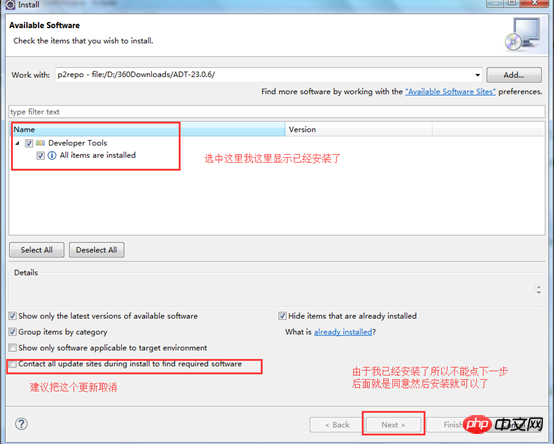
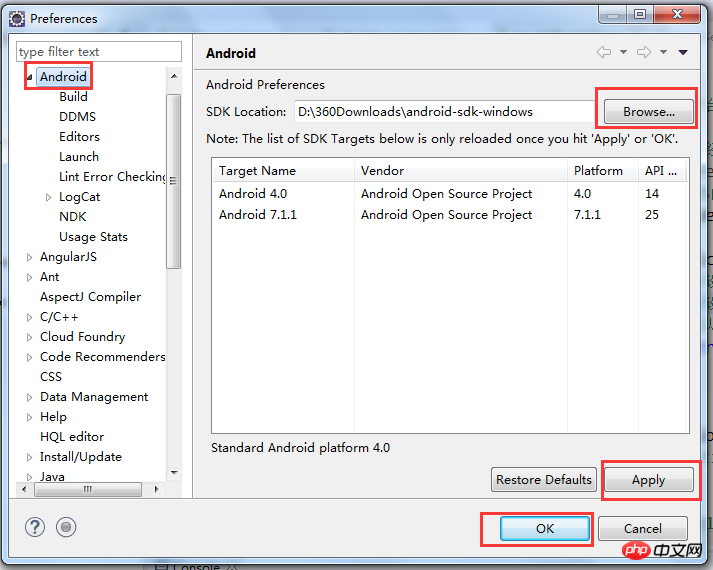
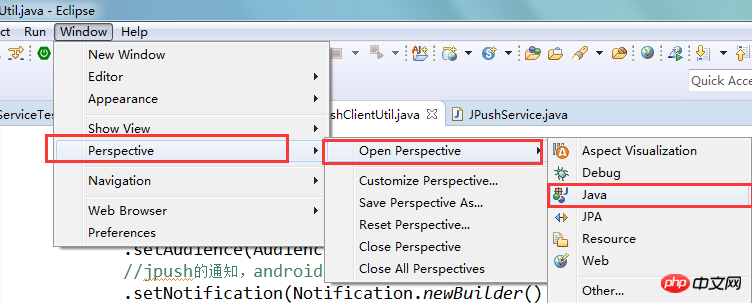
After this step is completed, the page will switch to the Android development interface, and there will be two more things on the page

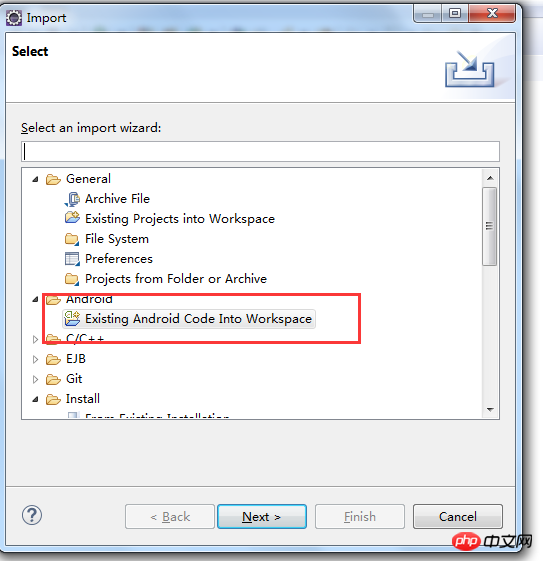
## ③ Then import the Android project (the server-side project will not be described how to import)
Right-click in the blank space of the project list - select import - and then operate as shown
Then run the Android program (it is best to plug in the data cable--turn on the USB debugging of the phone--and then go back to the phone when the program is running)
Specific You can download it from Baidu.
4. How to use Aurora Push (you must register an account on the official website)
Please refer to Baidu for specific usage, or refer to the official website. The following are the main screenshots
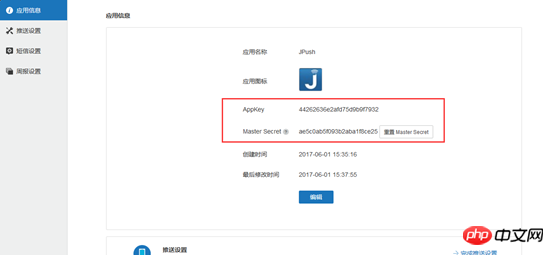 appkey and master secret will be used later
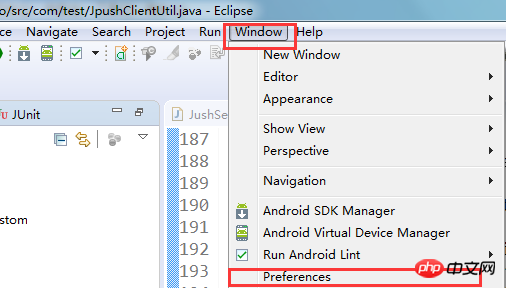
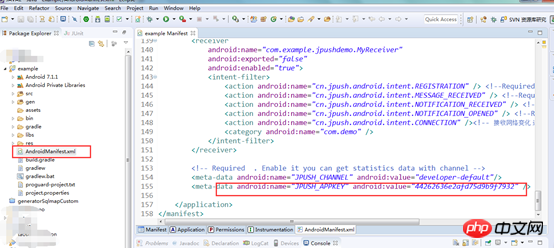
5. Modify the Android configuration file and change the appkey to the appkey of the application you added
6. Server code display, the codes are all commented, so I won’t explain them one by one.
Only use these three codes
## Change #APPKET and MASTERSECRET to the strings generated when you added the application in Jiguang Developer Service 


1 package com.uxun.serviceImpl; 2 3 import com.uxun.service.JPushService; 4 5 import cn.jiguang.common.resp.APIConnectionException; 6 import cn.jiguang.common.resp.APIRequestException; 7 import cn.jpush.api.JPushClient; 8 import cn.jpush.api.push.PushResult; 9 import cn.jpush.api.push.model.Platform; 10 import cn.jpush.api.push.model.PushPayload; 11 import cn.jpush.api.push.model.audience.Audience; 12 import cn.jpush.api.push.model.notification.AndroidNotification; 13 import cn.jpush.api.push.model.notification.IosNotification; 14 import cn.jpush.api.push.model.notification.Notification; 15 16 public class JPushServiceImpl implements JPushService { 17 18 private final static String APPKET = "44262636e2afd75d9b9f7932"; 19 20 private final static String MASTERSECRET = "ae5c0ab5f093b2aba1f8ce25"; 21 22 private static JPushClient jPushClient = new JPushClient(MASTERSECRET, APPKET);//通知默认保留24小时。 23 24 @Override 25 public int sendToRegistrationId(String registrationId, String notification_alert, String notification_title, 26 String extrasparam) { 27 int result = 0; 28 try { 29 PushPayload pushPayload= JPushServiceImpl.buildPushObjectWithRegistrationId(registrationId, 30 notification_alert, notification_title, extrasparam); 31 System.out.println(pushPayload); 32 PushResult pushResult=jPushClient.sendPush(pushPayload); //发送推送对象 33 //System.out.println(pushResult); 34 if(pushResult.getResponseCode() == 200) { //状态码等于200 为成功 35 result=1; 36 } 37 } catch (APIConnectionException e) { 38 e.printStackTrace(); 39 } catch (APIRequestException e) { 40 e.printStackTrace(); 41 } 42 43 return result; 44 } 45 46 @Override 47 public int sendToAll(String notification_alert, String notification_title, String extrasparam) { 48 int result = 0; 49 try { 50 PushPayload pushPayload= JPushServiceImpl.buildPushObjectWithAll(notification_alert, 51 notification_title, extrasparam); 52 System.out.println(pushPayload); 53 PushResult pushResult=jPushClient.sendPush(pushPayload); //发送推送对象 54 //System.out.println(pushResult); 55 if(pushResult.getResponseCode() == 200) { //状态码等于200 为成功 56 result=1; 57 } 58 } catch (APIConnectionException e) { 59 e.printStackTrace(); 60 } catch (APIRequestException e) { 61 e.printStackTrace(); 62 } 63 64 return result; 65 } 66 67 @Override 68 public int sendToAllIos(String notification_alert, String notification_title, String extrasparam) { 69 70 int result = 0; 71 try { 72 PushPayload pushPayload= JPushServiceImpl.buildPushObjectWithIos(notification_alert, 73 notification_title, extrasparam); 74 System.out.println(pushPayload); 75 PushResult pushResult=jPushClient.sendPush(pushPayload); //发送推送对象 76 //System.out.println(pushResult); 77 if(pushResult.getResponseCode() == 200) { //状态码等于200 为成功 78 result=1; 79 } 80 } catch (APIConnectionException e) { 81 e.printStackTrace(); 82 } catch (APIRequestException e) { 83 e.printStackTrace(); 84 } 85 86 return result; 87 } 88 89 @Override 90 public int sendToAllAndroid(String notification_alert, String notification_title, String extrasparam) { 91 92 int result = 0; 93 try { 94 PushPayload pushPayload= JPushServiceImpl.buildPushObjectWithAndroid(notification_alert, 95 notification_title, extrasparam); 96 System.out.println(pushPayload); 97 PushResult pushResult=jPushClient.sendPush(pushPayload); //发送推送对象 98 //System.out.println(pushResult); 99 if(pushResult.getResponseCode() == 200) { //状态码等于200 为成功100 result=1;101 }102 } catch (APIConnectionException e) {103 e.printStackTrace();104 } catch (APIRequestException e) {105 e.printStackTrace();106 }107 108 return result;109 }110 111 /**112 * 建立以唯一设备标识符推送的对象113 * @param registrationId 唯一设备标识114 * @param notification_alert 通知内容115 * @param notification_title 通知标题116 * @param extrasparam 扩展字段117 * @return 返回推送对象118 */119 private static PushPayload buildPushObjectWithRegistrationId(String registrationId, String notification_alert, String notification_title,120 String extrasparam) {121 return PushPayload.newBuilder()122 //指定要推送的平台,all代表当前应用配置了的所有平台,也可以传android等具体平台123 .setPlatform(Platform.all())124 //指定推送的接收对象,all代表所有人,也可以指定已经设置成功的tag或alias或该应应用客户端调用接口获取到的registration id125 .setAudience(Audience.registrationId(registrationId))126 //jpush的通知,android的由jpush直接下发,iOS的由apns服务器下发,Winphone的由mpns下发127 .setNotification(Notification.newBuilder()128 //指定当前推送的android通知129 .addPlatformNotification(AndroidNotification.newBuilder()130 .setAlert(notification_alert) //设置通知内容(必填)131 .setTitle(notification_title) //设置通知标题(可选)132 //此字段为透传字段,不会显示在通知栏。用户可以通过此字段来做一些定制需求,如特定的key传要指定跳转的页面(value)133 .addExtra("androidNotification extras key",extrasparam)134 .build())135 136 //指定当前推送的iOS通知137 .addPlatformNotification(IosNotification.newBuilder()138 //传一个IosAlert对象,指定apns title、title、subtitle等139 .setAlert(notification_alert)140 //直接传alert141 //此项是指定此推送的badge(应用角标)自动加1142 .incrBadge(1)143 //此字段的值default表示系统默认声音;传sound.caf表示此推送以项目里面打包的sound.caf声音来提醒,144 // 如果系统没有此音频则以系统默认声音提醒;此字段如果传空字符串,iOS9及以上的系统是无声音提醒,以下的系统是默认声音145 .setSound("sound.caf")146 //此字段为透传字段,不会显示在通知栏。用户可以通过此字段来做一些定制需求,如特定的key传要指定跳转的页面(value)147 .addExtra("iosNotification extras key",extrasparam)148 //此项说明此推送是一个background推送,想了解background看:http://docs.jpush.io/client/ios_tutorials/#ios-7-background-remote-notification149 //取消此注释,消息推送时ios将无法在锁屏情况接收150 // .setContentAvailable(true)151 .build())152 153 //指定当前推送的winPhone通知154 /*.addPlatformNotification(WinphoneNotification.newBuilder()155 .setAlert(notification_alert)156 //.setTitle("")) //设置通知标题(可选)此标题将取代显示app名称的地方157 .build())*/158 .build())159 .build();160 }161 162 /**163 * 建立推送所有用户的推送对象164 * @param notification_alert 通知内容165 * @param notification_title 通知标题166 * @param extrasparam 扩展字段167 * @return 返回推送对象168 */169 private static PushPayload buildPushObjectWithAll(String notification_alert,170 String notification_title, String extrasparam) {171 return PushPayload.newBuilder()172 //指定要推送的平台,all代表当前应用配置了的所有平台,也可以传android等具体平台173 .setPlatform(Platform.all())174 //指定推送的接收对象,all代表所有人,也可以指定已经设置成功的tag或alias或该应应用客户端调用接口获取到的registration id175 .setAudience(Audience.all())176 //jpush的通知,android的由jpush直接下发,iOS的由apns服务器下发,Winphone的由mpns下发177 .setNotification(Notification.newBuilder()178 //指定当前推送的android通知179 .addPlatformNotification(AndroidNotification.newBuilder()180 .setAlert(notification_alert) //设置通知内容(必填)181 .setTitle(notification_title) //设置通知标题(可选)182 //此字段为透传字段,不会显示在通知栏。用户可以通过此字段来做一些定制需求,如特定的key传要指定跳转的页面(value)183 .addExtra("androidNotification extras key",extrasparam)184 .build())185 186 //指定当前推送的iOS通知187 .addPlatformNotification(IosNotification.newBuilder()188 //传一个IosAlert对象,指定apns title、title、subtitle等189 .setAlert(notification_alert)190 //直接传alert191 //此项是指定此推送的badge(应用角标)自动加1192 .incrBadge(1)193 //此字段的值default表示系统默认声音;传sound.caf表示此推送以项目里面打包的sound.caf声音来提醒,194 // 如果系统没有此音频则以系统默认声音提醒;此字段如果传空字符串,iOS9及以上的系统是无声音提醒,以下的系统是默认声音195 .setSound("sound.caf")196 //此字段为透传字段,不会显示在通知栏。用户可以通过此字段来做一些定制需求,如特定的key传要指定跳转的页面(value)197 .addExtra("iosNotification extras key",extrasparam)198 //此项说明此推送是一个background推送,想了解background看:http://docs.jpush.io/client/ios_tutorials/#ios-7-background-remote-notification199 //取消此注释,消息推送时ios将无法在锁屏情况接收200 // .setContentAvailable(true)201 .build())202 203 //指定当前推送的winPhone通知204 /*.addPlatformNotification(WinphoneNotification.newBuilder()205 .setAlert(notification_alert)206 //.setTitle("")) //设置通知标题(可选)此标题将取代显示app名称的地方207 .build())*/208 .build())209 .build();210 }211 212 /**213 * 建立推送所有ios用户的推送对象214 * @param notification_alert 通知内容215 * @param notification_title 通知标题216 * @param extrasparam 扩展字段217 * @return 返回推送对象218 */219 private static PushPayload buildPushObjectWithIos(String notification_alert,220 String notification_title, String extrasparam) {221 return PushPayload.newBuilder()222 //指定要推送的平台,all代表当前应用配置了的所有平台,也可以传android等具体平台223 .setPlatform(Platform.ios())224 //指定推送的接收对象,all代表所有人,也可以指定已经设置成功的tag或alias或该应应用客户端调用接口获取到的registration id225 .setAudience(Audience.all())226 //jpush的通知,android的由jpush直接下发,iOS的由apns服务器下发,Winphone的由mpns下发227 .setNotification(Notification.newBuilder()228 229 //指定当前推送的iOS通知230 .addPlatformNotification(IosNotification.newBuilder()231 //传一个IosAlert对象,指定apns title、title、subtitle等232 .setAlert(notification_alert)233 //直接传alert234 //此项是指定此推送的badge(应用角标)自动加1235 .incrBadge(1)236 //此字段的值default表示系统默认声音;传sound.caf表示此推送以项目里面打包的sound.caf声音来提醒,237 // 如果系统没有此音频则以系统默认声音提醒;此字段如果传空字符串,iOS9及以上的系统是无声音提醒,以下的系统是默认声音238 .setSound("sound.caf")239 //此字段为透传字段,不会显示在通知栏。用户可以通过此字段来做一些定制需求,如特定的key传要指定跳转的页面(value)240 .addExtra("iosNotification extras key",extrasparam)241 //此项说明此推送是一个background推送,想了解background看:http://docs.jpush.io/client/ios_tutorials/#ios-7-background-remote-notification242 //取消此注释,消息推送时ios将无法在锁屏情况接收243 // .setContentAvailable(true)244 .build())245 .build())246 .build();247 }248 249 /**250 * 建立推送所有安卓用户的推送对象251 * @param notification_alert 通知内容252 * @param notification_title 通知标题253 * @param extrasparam 扩展字段254 * @return 返回推送对象255 */256 private static PushPayload buildPushObjectWithAndroid(String notification_alert,257 String notification_title, String extrasparam) {258 return PushPayload.newBuilder()259 //指定要推送的平台,all代表当前应用配置了的所有平台,也可以传android等具体平台260 .setPlatform(Platform.android())261 //指定推送的接收对象,all代表所有人,也可以指定已经设置成功的tag或alias或该应应用客户端调用接口获取到的registration id262 .setAudience(Audience.all())263 //jpush的通知,android的由jpush直接下发,iOS的由apns服务器下发,Winphone的由mpns下发264 .setNotification(Notification.newBuilder()265 //指定当前推送的android通知266 .addPlatformNotification(AndroidNotification.newBuilder()267 .setAlert(notification_alert) //设置通知内容(必填)268 .setTitle(notification_title) //设置通知标题(可选)269 //此字段为透传字段,不会显示在通知栏。用户可以通过此字段来做一些定制需求,如特定的key传要指定跳转的页面(value)270 .addExtra("androidNotification extras key",extrasparam)271 .build())272 .build())273 .build();274 }275 276 277 278 }
After running the server code, the phone will receive the following notification:
In fact, the server sends the notification to the Aurora server through the uniquely identified appkey and master secret, and the server then forwards it to the corresponding app (appkey is also configured in the configuration file of the above app)

There are so many specific operations. It may not be very detailed, but there are too many steps, so I won’t take screenshots one by one. Here I only give most of the details. direction.
The above is the detailed content of An example explanation of Jiguang push Jpush. For more information, please follow other related articles on the PHP Chinese website!