Home >Java >javaTutorial >Introduction to Spring MVC and introductory examples (detailed explanations with pictures and texts)
Introduction to Spring MVC and introductory examples (detailed explanations with pictures and texts)
- 怪我咯Original
- 2017-06-25 09:59:563992browse
Note: All the content of the article is excerpted from the experimental building tutorial [Spring MVC Simple Tutorial]
1. What is Spring MVC
Spring MVC is a follow-up product of SpringFrameWork and has been integrated into Spring Inside Web Flow is a powerful and flexible Web framework. Spring MVC provides a DispatcherServlet as a front-end controller to dispatch requests. Through the strategy interface, the Spring framework is highly configurable. Spring MVC also includes a variety of view technologies, such as Java Server Pages (JSP), Velocity, Tiles, iText, POI, etc. Spring MVC separates the roles of controllers, model objects, dispatchers, and handler objects, making them easier to customize.
The Spring MVC framework is mainly composed of DispatcherServlet, processor mapper, processor adapter, processor (controller), view resolver, and view.
2. Spring MVC execution process
Spring MVC’s high-level request processing workflow is as follows (picture from Spring official website):
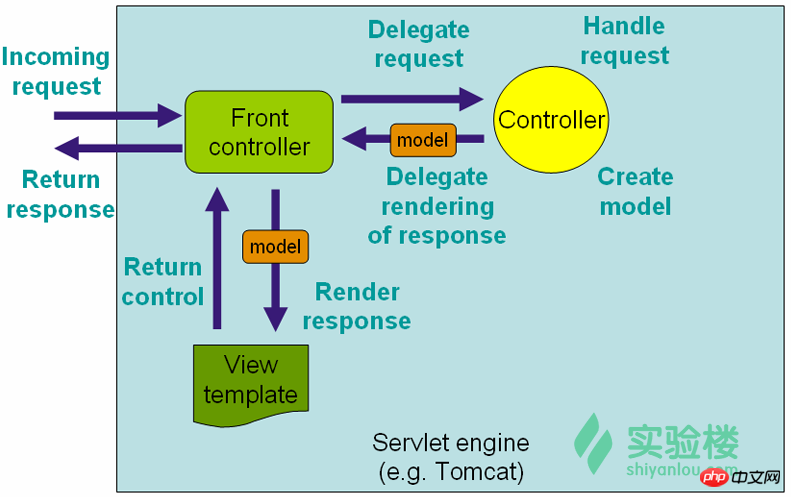
After breakdown, the Spring MVC execution process is as follows, including a total of eight steps:
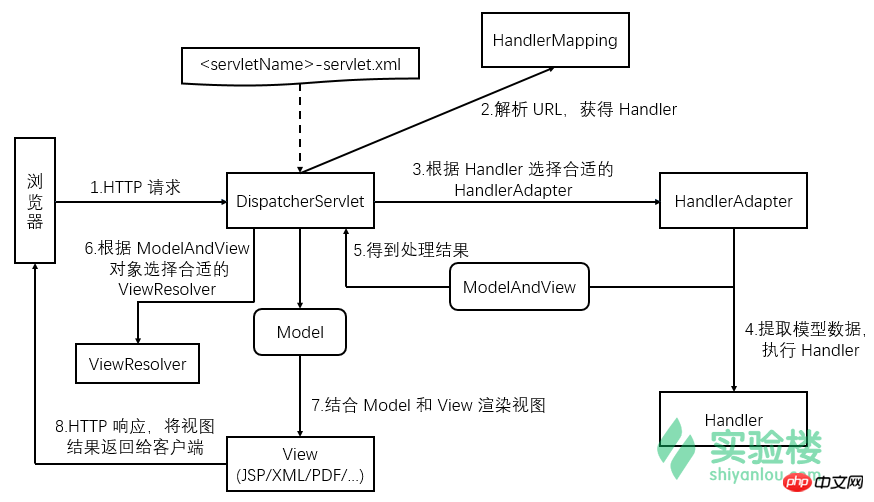
Spring MVC related interface explanation:
(1) DispatcherServlet
Front-end controller, all requests are uniformly distributed through it, and the requests will be distributed to the corresponding Handler.
(2) HandlerMapping (processor mapper)
Parses the request link, and then finds the class that executes the request (the handler referred to by HandlerMapping) based on the request link.
(3) HandlerAdapter (processor adapter)
Call specific methods to process requests from users.
(4)Controller
Controller will process the user request. After the Controller has processed the user request, it will return the ModelAndView object to the DispatcherServlet front-end controller.
From a macro perspective, DispatcherServlet is the controller of the entire web application; from a micro perspective, Controller is the controller in the processing of a single Http request.
(5) ViewResolver (view resolver)
Resolve MdoelAndView, change the logical view name in MdoelAndView into a real View object, and take out the Model in MdoelAndView.
Spring MVC has been briefly introduced before. Let’s take simple user registration as an example to understand some basic principles and applications of Spring MVC.
3. Project file structure
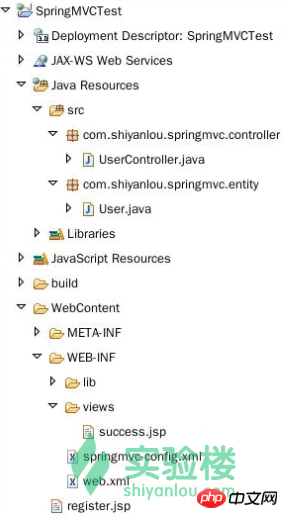
4. Development preparation
Spring MVC related files are placed on the server of the laboratory building , please open Xfce on the desktop of the experimental environment, enter the following code to obtain:
wget
Enter the following command to decompress the .zip file:
unzip Spring-jars.zip
5. Experimental steps
1 Create a new project
Create a new Web project (Dynamic Web Project) in Eclipse and name it SpringMVCTest.
Please check the option "Automatically generate web.xml".
Copy all jar packages in the /home/shiyanlou/Spring-jars/ path to the WebContent/WEB-INF/lib/ directory of the project.
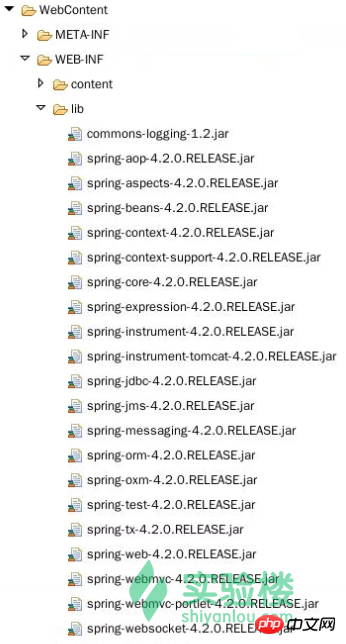
2 Configure the web.xml file
Modify the content of the web.xml file as follows:
<?xml  version="1.0" encoding="UTF-8"?>
<web-app>
    <display-name>SpringMVCTest</display-name>

    <!-- 配置 Spring MVC DispatchcerServlet 前端控制器 -->
    <servlet>
        <servlet-name>springmvc</servlet-name>
        <servlet-class>org.springframework.web.servlet.DispatcherServlet</servlet-class>
        <init-param>
            <!-- contextConfigLocation 是参数名称,该参数的值包含 Spring MVC 的配置文件路径 -->
            <param-name>contextConfigLocation</param-name>
            <param-value>/WEB-INF/springmvc-config.xml</param-value>
        </init-param>
        <!-- 在 Web 应用启动时立即加载 Servlet -->
        <load-on-startup>1</load-on-startup>
    </servlet>
    <!-- Servlet 映射声明 -->
    <servlet-mapping>
        <servlet-name>springmvc</servlet-name>
        <!-- 监听当前域的所有请求 -->
        <url-pattern>/</url-pattern>
    </servlet-mapping>
    <!-- 添加 register.jsp 为首页 -->
    <welcome-file-list>
        <welcome-file>register.jsp</welcome-file>
    </welcome-file-list>
</web-app>
Configured in web.xmlDispatchcerServlet, DispatchcerServlet requires a Spring MVC configuration file when loading. By default, it will search for the corresponding [servlet-name]-servlet.xml file under WEB-INF. , as in this example, the default search is springmvc-servlet.xml.
Spring MVC configuration file can be placed anywhere, just describe it with the servlet sub-element init-param, see the above sample code, then DispatchcerServlet will look for it /WEB-INF/springmvc-config.xml.
3 springmvc-config.xml file
Create a new Spring MVC configuration file in the WebContent/WEB-INF/ directory springmvc-config.xml , configure the Spring MVC Controller and add the following code:
<?xml  version="1.0" encoding="UTF-8"?>
<beans>

    <annotation-config></annotation-config>
    <!-- 配置自动扫描的包,完成 Bean 的创建和自动依赖注入的功能 -->
    <component-scan></component-scan>
     <!-- 这两个类用来配置 annotation 类型的处理器映射器和处理器适配器 -->
    <bean></bean>
    <bean></bean>

    <!-- 配置视图解析器 -->
    <bean>
        <property></property>
        <property></property>
    </bean>

</beans>
In the above configuration file, Spring uses a scanning mechanism to find all annotation-based controller classes in the application. In this example, the scan is All Java files under the com.shiyanlou.springmvc.controller package and its sub-packages.
The annatation type processor mapper DefaultAnnotationHandlerMapping and the processor adapter AnnotationMethodHandlerAdapter are configured at the same time. DefaultAnnotationHandlerMapping searches for mapping according to the request, and AnnotationMethodHandlerAdapter completes the call to the @RequestMapping annotation method (described below) of the controller class.
最后配置的视图解析器 InternalResourceViewResolver 用来解析视图,将 View 呈现给用户。视图解析器中配置的 prefix表示视图的前缀, suffix表示视图的后缀。
注:在 Spring4.0 之后,如果不配置处理映射器、处理器适配器和视图解析器,会使用默认的。
4 实体类 User
在项目目录 /Java Resources/src 的包 com.shiyanlou.springmvc.entity 下新建类 User.java,包含 id、username、password 和 age 属性,代码如下:
package com.shiyanlou.springmvc.entity;

import java.io.Serializable;

public class User implements Serializable {

    private static final long serialVersionUID = 1L;
    private Integer id;
    private String username;
    private String password;
    private Integer age;

    public Integer getId() {
        return id;
    }

    public void setId(Integer id) {
        this.id = id;
    }

    public String getUsername() {
        return username;
    }

    public void setUsername(String username) {
        this.username = username;
    }

    public String getPassword() {
        return password;
    }

    public void setPassword(String password) {
        this.password = password;
    }

    public Integer getAge() {
        return age;
    }

    public void setAge(Integer age) {
        this.age = age;
    }

}
5 Controller 类的实现
在包 com.shiyanlou.springmvc.controller 下新建 Controller 类 UserController.java,具体解释注释已经给出,代码如下:
package com.shiyanlou.springmvc.controller;

import org.springframework.stereotype.Controller;
import org.springframework.ui.Model;
import org.springframework.web.bind.annotation.ModelAttribute;
import org.springframework.web.bind.annotation.RequestMapping;

import com.shiyanlou.springmvc.entity.User;

/**
 * UserController 是一个基于注解的控制器
 * 可以同时处理多个请求动作
 */
@Controller
public class UserController {

    /**
    * RequestMapping 用来映射一个请求和请求的方法
    * value="/register" 表示请求由 register 方法进行处理
    */
    @RequestMapping(value="/register")
    public String Register(@ModelAttribute("form") User user, Model model) {  // user:视图层传给控制层的表单对象;model:控制层返回给视图层的对象
        // 在 model 中添加一个名为 "user" 的 user 对象
        model.addAttribute("user", user);
        // 返回一个字符串 " success" 作为视图名称
        return "success";
    }
}
6 JSP 页面
(1)register.jsp
在 WebContent 目录下新建一个 JSP 页面命名为 register.jsp,代码如下:
nbsp;html PUBLIC "-//W3C//DTD HTML 4.01 Transitional//EN" "http://www.w3.org/TR/html4/loose.dtd">


<meta>
<title>register page</title>
(2)success.jsp
在 WebContent/WEB-INF 目录下新建文件夹 views,并在该路径下新建一个 JSP 页面命名为 success.jsp,代码如下:
nbsp;html PUBLIC "-//W3C//DTD HTML 4.01 Transitional//EN" "http://www.w3.org/TR/html4/loose.dtd">


<meta>
<title>success page</title>


    <h5>login was successful</h5>
    <p>
        name:${requestScope.user.username}<br> password:${requestScope.user.password}<br> age:${requestScope.user.age}<br>
    </p>
7 运行测试
注:由于在线环境的资源问题,这里启动 tomcat 比较慢,需要大家耐心等待几分钟。如果遇到 Tomcat 启动超时的问题,请按照下图的方法延长 Tomcat 的启动时间。
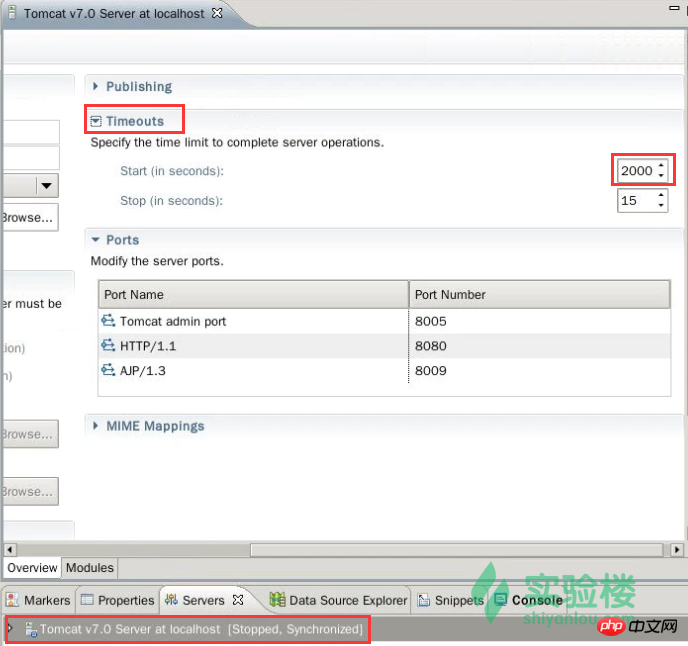
右击 SpringMVCTest 工程,Run As->Run on Server,保持默认选项不变,点击 Finish,一会儿即可看到结果:
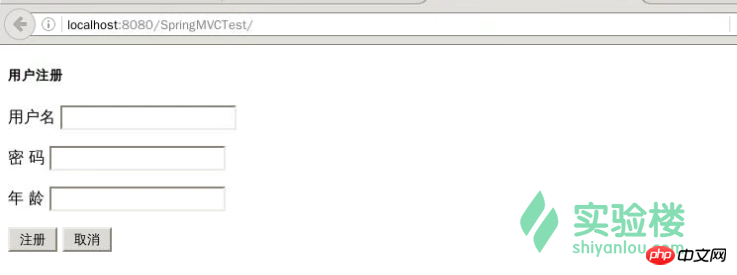
输入注册信息,点击注册按钮,结果如下:


The above is the detailed content of Introduction to Spring MVC and introductory examples (detailed explanations with pictures and texts). For more information, please follow other related articles on the PHP Chinese website!
Related articles
See more- Why and How Should You Synchronize on String Objects in Java?
- How Does Java\'s Enum Generic Type Parameter `E extends Enum` Work?
- How Can I Dynamically Add Components to a JDialog in Java Swing and Ensure Proper Display?
- When Does Caching Method References in Java 8 Offer Performance Benefits?
- How Can You Implement Customizable Version String Comparisons in Java?

