


This week, under the guidance of the master, Ben K completed a small example of a message board function that combines ajax and php file upload processing. Now let Ben K Let me show you how to implement this function.
1. Interface Overview
First, let’s take a look at the specific effect of this small demo.

This demo mainly includes three steps, which also correspond to three functions, namely Registration, login and message boardFunction. These three functions basically rely on several front-end and back-end interaction technologies. Below, I will show you the codes for implementing these three functions.
2. Function implementation
1. Registration function and login function
1.1 Code display
1.1.1 Registration function
(1) Front part
nbsp;html><meta><title>用户注册</title><link><style>body{margin: 0px;padding: 0px;background-color: #CCCCCC;}.panel{width: 380px;height: 350px;position: absolute;left: 50%;margin-left: -190px;top: 50%;margin-top: -175px;}.form-horizontal{padding: 10px 20px;}.btns{display: flex;justify-content: center;}</style>
    <div>
<div><div>用户注册</div></div>
<div><form>
<div>
<label>用户名</label><input>
</div>
<div>
<label>密码</label><input>
</div>
<div>
<label>确认密码</label><input>
</div>
<div>
<input>    <a></a>返回登录</div>
</form></div>
</div><script></script><script>$(function(){
            $("#submit").on("click",function(){var str = $("form").serialize();
                console.log(str);
                $.post("doReg.php",{"formData":str},function(data){if(data=="true"){
                        alert("注册成功!即将跳转登陆页!");
                        location = "login.php";
                    }else{
                        alert("注册失败!因为啥我不知道!");
                    }
                });
            });
        });</script>
(2)Backend part
<?phpheader ("Content-Type:text/html;charset=utf-8");    $str = $_POST["formData"]."[;]";    $num = file_put_contents("user.txt", $str,FILE_APPEND);    if($num>0){echo "true";
    }else{echo "false";
    }
(3) User data storage file
userName=123&pwd=123&rePwd=123[;]// 这其实是一个普通的txt文件,就是后台部分的user.txt
1.1.2 Login function
(1) Front-end part
nbsp;html><meta><title>用户登录</title><link><style>body{margin: 0px;padding: 0px;background-color: #CCCCCC;}.panel{width: 380px;height: 280px;position: absolute;left: 50%;margin-left: -190px;top: 50%;margin-top: -140px;}.form-horizontal{padding: 10px 20px;}.btns{display: flex;justify-content: center;}</style>
<div>
<div><div>用户登录</div></div>
<div><form>
<div>
<label>用户名</label><input>
</div>
<div>
<label>密码</label><input>
</div>
<div>
<input> <a></a>注册账号</div>
</form></div>
</div><script></script><script>$(function(){
$("#submit").on("click",function(){var str = $("form").serialize();
console.log(str);
$.post("doLogin.php",{"formData":str},function(data){if(data=="true"){
location = "index.php?name="+$("input[name='userName']").val();
}else{
alert("用户名或密码错误!!!");
}
});
});
});</script>(2)Backend part
<?phpheader ("Content-Type:text/html;charset=utf-8");    $str = $_POST["formData"];    list($userName) = explode("&", $str);list(,$pwd) = explode("&", $str);    $users = file_get_contents("user.txt");    $userArr = explode("[;]", $users);    foreach ($userArr as $user) {list($realName) = explode("&", $user);list(,$realPwd) = explode("&", $user);if($userName==$realName&&$pwd==$realPwd){echo "true";die();
        }
    }    echo "false";
1.2 Function details
Implementation of user registration and login functions There are three main dependencies, namely, ajax transmits data to the background and accepts the results, the php background processes the data sent by ajax and feeds back the results, and receives and stores user data (this can actually be turned into the background processing part).
1.2.1 Front-end details
The main task of the front-end part is to receive information from users and transmit it to the background. The implementation of this part of the task mainly relies on two lines of code.
First, let’s take a look at how the ajax request is implemented. The implementation of this part of the function mainly relies on two lines of code.
The first line of code is var str = $("form").serialize(); The function of this line is to sequence the data submitted in the form into a string, the specific implementation is as shown below

The submitted data in the form is serialized so that the background can better parse this part.
The other key line of code is the main part of the ajax request. This part is mainly difficult to understand and is the accepted data parameters . The data parameter is a piece of information that the background feeds back to the front desk after the corresponding background processing of the ajax request is completed, such as true returned after successful registration and false returned after failure.
1.2.2 Backend details
The key to the background processing of data transmitted from the front end lies in how to obtain and parse the data transmitted. In this part, PHP provides us with three lines of code to implement.
The first line of code: $str = $_POST["formData"]; Get the front-end transmission through the super global array $_POST The serialized string solves the data acquisition part.
The second line of code: file_put_contents("user.txt", $str,FILE_APPEND); PHP provides us with file_putt_contents(), so that we can The data we obtain is stored in a file for long-term retention.
The third line of code: file_get_contents("user.txt"); This is the data extraction method provided by PHP corresponding to file_putt_contents().
Relying on the above three lines of code, coupled with our processing of data analysis, we can easily implement the entire function in the background.
2. Message function
2.1 Code display
(1) Front-end part
nbsp;html><meta><title></title><style>#note{width: 400px;height:100px;}</style><div></div><textarea></textarea><br><input><h1 id="留言内容">留言内容</h1><hr><div></div><script></script><script>$(function(){
getData(); var userName = '<?php echo isset($_GET["name"])?$_GET["name"]:"null"; ?>';if(userName=="null"){
location = "login.php";
}
$("#div1").html("欢迎您,<span style='color:red;'>"+userName+"");
$("#submit").on("click",function(){var noteVal = $("#note").val();if(noteVal==""){
alert("留言内容不能为空,请核对!");return;
}var time = getTime();var note = {"userName":userName,"time":time,"noteVal":noteVal
}
$.post("doAdd.php",note,function(data){if(data=="true"){
alert("留言内容提交成功!");
location.reload(true);
}else{
alert("留言失败!原因不明!");
}
});
});
}); function getData(){
$.post("doShowNote.php",function(data){var arr = data.split("[;]");
arr.pop();
console.log(arr);for (var i=0;i< arr.length;i++) {var thisNote = $.parseJSON(arr[i]);var div = "<br/><div id='div"+i+"'>用户名:"+thisNote.userName+" 发布时间:"+thisNote.time+"<br/><br/> 留言内容:"+thisNote.noteVal+"</script>"$("#liuyanban").prepend(div); } }) } function getTime(){var today = new Date();var year = today.getFullYear();var month = today.getMonth();var date1 = today.getDate();var hours = today.getHours();var minutes = today.getMinutes()
(2)Backend part
// 笔记的添加<?phpheader ("Content-Type:text/html;charset=utf-8");    $userName = $_POST["userName"];$time = $_POST["time"];$noteVal = $_POST["noteVal"];    $arr = ["userName"=>$userName,"time"=>$time,"noteVal"=>$noteVal];    $str = json_encode($arr);    $num = file_put_contents("note.txt", $str."[;]",FILE_APPEND);    if($num>0){echo "true";
    }else{echo "false";
    }
// 笔记的展示<?phpheader ("Content-Type:text/html;charset=utf-8");echo file_get_contents("note.txt");(3)Message data storage file
// 这也是一个用于存储留言内容等各种信息的TXT文件{"userName":"123","time":"2017\u5e746\u670818\u65e514:01:12","noteVal":"123123"}[;]{"userName":"123","time":"2017\u5e746\u670818\u65e514:01:28","noteVal":"\u54c8\u54c8\u54c8\uff0c\u6211\u662f\u5c0fK\uff0c\u6211\u4e3a\u81ea\u5df1\u4ee3\u8a00\u3002"}[;]2.2 Function details
2.1.1 Front-end part
The function of the front-end part is the same as the login and registration function, except that it adds the current date according to the requirements. , user name data, message board style acquisition.
2.1.2 Backend part
The backend part is actually the same routine as the backend implementation of login and registration, but it is one step more than the two. json_encode($arr); This is the method provided by PHP to convert arrays into JSON object format, which makes it easier for us to leave messages on the front end. Data feedback acquisition.
The above is the small function demo that this K brings to you for the first time this week. I hope it can help you. If there are any mistakes, please correct me. Thank you for your support!
The above is the detailed content of An example sharing of front-end and back-end interaction. For more information, please follow other related articles on the PHP Chinese website!

 Discuz后台登录问题解决方法大揭秘Mar 03, 2024 am 08:57 AM
Discuz后台登录问题解决方法大揭秘,需要具体代码示例随着互联网的快速发展,网站建设变得越来越普遍,而Discuz作为一款常用的论坛建站系统,受到了许多站长的青睐。然而,正是因为其功能强大,有时候我们在使用Discuz的过程中会遇到一些问题,比如后台登录问题。今天,我们就来大揭秘Discuz后台登录问题的解决方法,并且提供具体的代码示例,希望能帮助到有需要
 demo是什么意思Feb 12, 2024 pm 09:12 PM
demo这个词对于喜欢唱歌的小伙伴已经不在陌生了,但是有很多没有接触到的用户好奇了demo是什么意思呢?现在就来看一下小编带来的demo的含义介绍吧。demo是什么意思答案:录音样带。1、demo读音英['deməʊ]、美['demoʊ]2、demo是"demonstration"的缩写,一般指歌曲正式录制前试听的初步效果;3、demo用作名词是录音样带和试样唱片的意思,用动词是试用(尤指软件)、演示和示范;
 5个常见的JavaScript内存错误Aug 25, 2022 am 10:27 AM
JavaScript 不提供任何内存管理操作。相反,内存由 JavaScript VM 通过内存回收过程管理,该过程称为垃圾收集。

 WordPress后台乱码烦恼?试试这些解决方案Mar 05, 2024 pm 09:27 PM
WordPress后台乱码烦恼?试试这些解决方案,需要具体代码示例随着WordPress在网站建设中的广泛应用,许多用户可能会遇到WordPress后台乱码的问题。这种问题会导致后台管理界面显示乱码,给用户的使用带来极大困扰。本文将介绍一些常见的解决方案,帮助用户解决WordPress后台乱码的烦恼。修改wp-config.php文件打开wp-config.
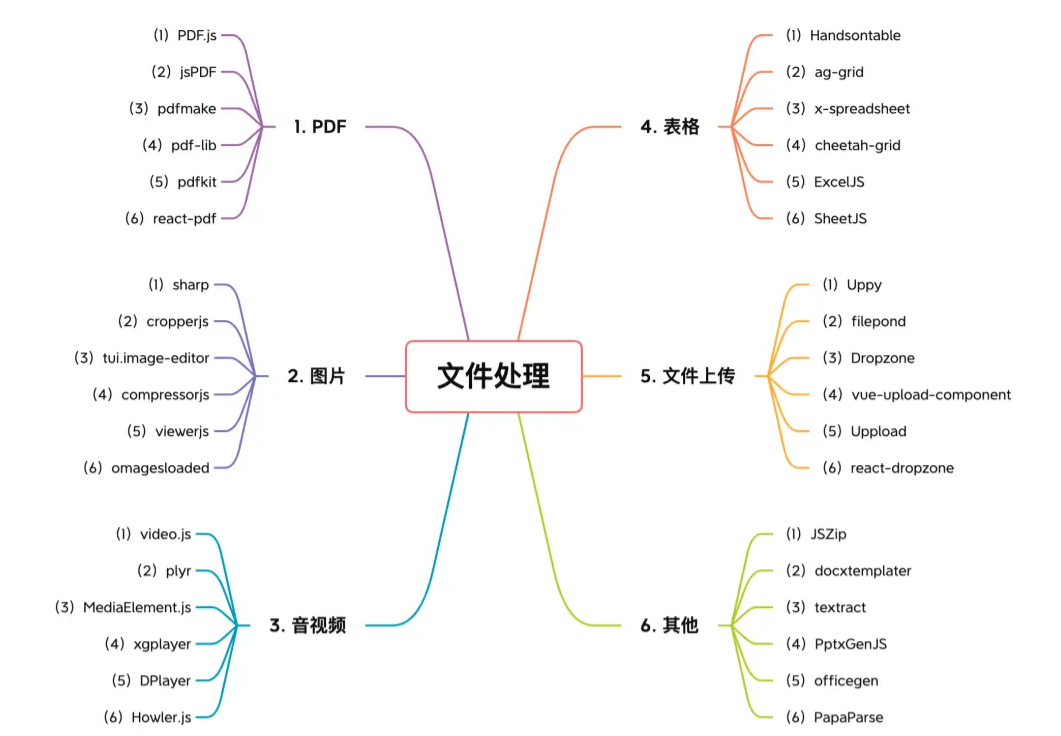 【6大类】实用的前端处理文件的工具库,快来收藏吧!Jul 15, 2022 pm 02:58 PM
本篇文章给大家整理和分享几个前端文件处理相关的实用工具库,共分成6大类一一介绍给大家,希望对大家有所帮助。
 原来利用纯CSS也能实现文字轮播与图片轮播!Jun 10, 2022 pm 01:00 PM
怎么制作文字轮播与图片轮播?大家第一想到的是不是利用js,其实利用纯CSS也能实现文字轮播与图片轮播,下面来看看实现方法,希望对大家有所帮助!
 前端人必备:详解抓包原理和抓包工具whistle的用法Sep 16, 2022 am 11:00 AM
能不能在原生 app 加载线上 h5 时,跑本地的代码呢?答案是可以的,通过抓包工具比如 whistle 就可以做到拦截线上页面请求数据,再响应本地代码,本文主要讲述抓包的原理和抓包工具 whistle 使用。


Hot AI Tools

Undresser.AI Undress
AI-powered app for creating realistic nude photos

AI Clothes Remover
Online AI tool for removing clothes from photos.

Undress AI Tool
Undress images for free

Clothoff.io
AI clothes remover

AI Hentai Generator
Generate AI Hentai for free.

Hot Article
Hot Tools

Dreamweaver CS6
Visual web development tools

DVWA
Damn Vulnerable Web App (DVWA) is a PHP/MySQL web application that is very vulnerable. Its main goals are to be an aid for security professionals to test their skills and tools in a legal environment, to help web developers better understand the process of securing web applications, and to help teachers/students teach/learn in a classroom environment Web application security. The goal of DVWA is to practice some of the most common web vulnerabilities through a simple and straightforward interface, with varying degrees of difficulty. Please note that this software

WebStorm Mac version
Useful JavaScript development tools

Atom editor mac version download
The most popular open source editor

MinGW - Minimalist GNU for Windows
This project is in the process of being migrated to osdn.net/projects/mingw, you can continue to follow us there. MinGW: A native Windows port of the GNU Compiler Collection (GCC), freely distributable import libraries and header files for building native Windows applications; includes extensions to the MSVC runtime to support C99 functionality. All MinGW software can run on 64-bit Windows platforms.

